Table of Contents
Advertisement
Advertisement
Table of Contents

Related Manuals for Cubii JR1+


Summary of Contents for Cubii JR1+
- Page 1 Owner’s Manual...
-
Page 3: Table Of Contents
Using Your Cubii JR1+ ..............Positioning Adjusting the Resistance Charging Your Cubii Elliptical Battery Life and Power Reading the Display Console Installing and Pairing with the Cubii App Bluetooth® Related App Features General Information ..............Return Policy and Warranty Troubleshooting Sensors and Motors Care and Maintenance Important Health &... - Page 5 Whether you are taking the first step on your fitness journey or looking to get more exercise from the comfort of home, bringing the Cubii JR1+ into your routine is a big stride toward a healthier, more active life! Before you begin, we want you to be familiar with important information on how to use the Cubii JR1+ safely so that you and your loved ones get the most out of your experience.
-
Page 6: Before You Begin
4. Do not allow children to use or play on Cubii JR1+. Keep children and pets away from Cubii JR1+ when it is in use. 5. Set up and operate Cubii JR1+ on a solid, level surface. Do not position Cubii JR1+ on loose rugs or uneven surfaces. -
Page 7: Consult Your Physician
13. Maximum recommended user weight is 300 pounds (136 kg). Never stand on the pedals, no matter your weight. 14. Cubii JR1+ should be used by only one person at a time. Consult Your Physician It is always important to consult your physician before starting an exercise program. -
Page 8: Getting Started
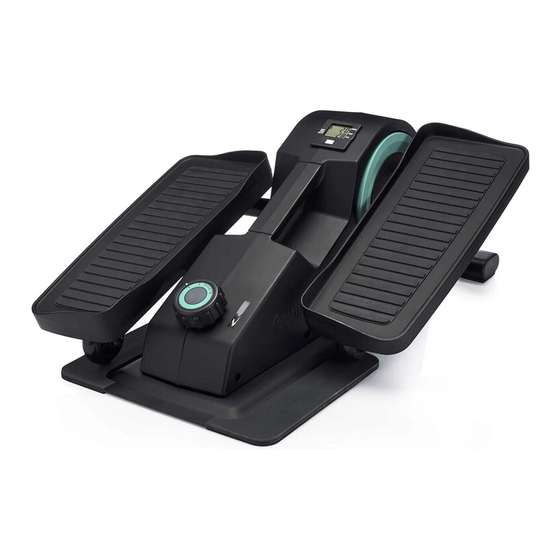
GETTING STARTED Product Size and Weight The assembled Cubii JR1+ measures: 23.2”L x 17.6”W x 9.8”H (58.8cm x 44.6cm x 24.8cm) The weight of the unit is approximately 25.7lb (11.6kg). What’s in the Box Screws (x4) JR1+ Main Body Charging Cable... -
Page 9: Warning Labels
II. Getting Started Warning Labels The warning label is located on your Cubii JR1+ product here: WARNING Failure to follow all warnings and instructions could result in serious injury or death. Before assembling or using this product, read and follow the Owner’s Manual and all other instructions that accompany this product. -
Page 10: Assembling Your Unit
ASSEMBLING YOUR UNIT Follow the steps below to assemble your JR1+ compact elliptical. Step 1 — Align Align the right pedal with the right arm. Insert the bottom of the pedal into the two small holes. Step 2 — Flip For maximum support, make sure you flip the pedal you are assembling so it is at the bottom and close to the base. - Page 11 III. Assembling Your Unit Step 3 — Screw With a screwdriver, screw in the pedal until tight. Make sure it does not wobble. Step 4 — Repeat Repeat steps 1-3 with the left pedal, then get moving!
-
Page 12: Using Your Cubii Jr1
Make sure to have followed all of the assembly steps in the Quick Start guide before you begin using Cubii JR1+. Positioning The Cubii JR1+ can be used either in an upright position, such as with an office chair, or in a more reclined position, such as when used on a sofa. -
Page 13: Adjusting The Resistance
IV. Using Your Cubii JR1+ Adjusting the Resistance Cubii JR1+ has 8 resistance levels. Adjust your workout intensity by turning the resistance control knob. Level 1 is the lowest intensity and level 8 is the highest. We recommend you begin at Level 1 and increase the intensity gradually over time. -
Page 14: Battery Life And Power
30 days before you need to charge again. Charging your JR1+ completely can take up to 6 hours. You can check the battery level in the Cubii app or on the built-in screen. READING THE DISPLAY CONSOLE User Options Your Cubii JR1+ elliptical can store data separately for User 1, User 2, and Guest. - Page 15 “Smart Reset” All metrics are additive and counted throughout the day. Once you have paired the mobile app with your Cubii, then the metrics displayed on the console will automatically reset each evening at midnight (as long as your Cubii battery does not deplete). If you...
- Page 16 To switch from miles to kilometers (or kilometers to miles), use the MODE button to select the Distance metric. Then, hold the MODE button for 6 seconds. If you are using the Cubii app, this update will also be reflected there.
- Page 17 If you do not choose to manually set the clock following the instructions above, and do not connect to the Cubii app, your console will continue to add and display all data until you manually reset the screen.
- Page 18 Bluetooth® symbol glow and start blinking. 2. Confirm that you’ve enable Bluetooth wireless technology in your device’s settings. 3. Upon opening the Cubii app for the first time, you will be prompted to create an account. Be sure to review/ accept the Terms of Use and Privacy Policy.
-
Page 19: Bluetooth® Related App Features
Offline Mode The Cubii app should remain open in the background in order for Cubii to send data to your device. If the app is not open, then the Cubii itself will store your workout data until the next time your app is paired, at which point the data will be retrieved. - Page 20 IV. Using Your Cubii JR1+ Resistance Level The Cubii app will automatically retrieve the resistance level from the elliptical. However, please note that the app CANNOT update the resistance on the elliptical itself. The resistance is managed by the elliptical and the app reads that information.
-
Page 21: General Information
“Smart” Reset After you connect your elliptical to the app, your Cubii console will reset itself each night at midnight (your local time based on your phone’s settings). This feature will automatically take effect after your first pairing. -
Page 22: Care And Maintenance
V. General Information Care and Maintenance The safety and integrity designed into Cubii JR1+ can only be maintained when Cubii JR1+ is regularly examined for damage and wear. It is the sole responsibility of the user/owner to ensure that regular maintenance is performed. -
Page 23: Important Health & Safety Instructions
Do not leave Cubii JR1 in direct sunlight for an extended period of time. • Do not place Cubii JR1+ in a location where it may cause an obstruction. • Do not use cleaners or solvents to clean Cubii JR1+. -
Page 24: Regulatory Notices
The device has been evaluated to meet general RF exposure requirement. The device can be used in portable exposure conditions without restriction. Fitness Cubed Inc is authorized to apply the CE Mark on Cubii, Model F4A2, thereby declaring conformity to the essential requirements and other relevant provisions of:... - Page 25 CAN ICES-003 (B) / NMB-003 (B) This device contains license-exempt transmitter(s)/receiver(s) that comply with Innovation, Science and Economic Development Canada’s license-exempt RSS(s). Operation is subject to the following two conditions: (1) This device may not cause interference. (2) This device must accept any interference, including interference that may cause undesired operation of the device.
- Page 26 Customer Support support@mycubii.com cubii.com/help 1-844-282-4401...
Need help?
Do you have a question about the JR1+ and is the answer not in the manual?
Questions and answers