
Summary of Contents for IRadimed MRidium 3860
- Page 1 3860 3860 REF 112 MRidium MRI INFUSION/MONITOR SYSTEM SERVICE MANUAL SERVICE MANUAL REF. 1125A REF 1125A...
- Page 3 MRidium 3860+ Infusion/Monitor System Service Manual, Part Number 1125A Release 6B, 2015-08 ECN 000702 ©2009-2015 IRadimed Corporation IRadimed Corporation 1025 Willa Springs Drive Winter Springs, Florida 32708 Tel: 407-677-8022 Fax: 407-677-5037 e-mail:customerservice@iradimed.com European Authorized Representative Medical Device Consultancy 7 Pinewood Drive...
-
Page 5: Table Of Contents
TABLE OF CONTENTS Paragraph Page PREPARATION FOR USE ..............1-1 Introduction..................1-1 Pre-Operational Mechanical Inspection ..........1-1 Operational Performance Check ............1-2 1.3.1 Pre-operational Check Battery Charge ..........1-2 1.3.2 Pre-operational Electrical Inspection............. 1-2 Control and Indicator Operational Performance Test ....... - Page 6 Software Update ................3-22 Dose Error Reduction System (DERS) Option Installation ...... 3-23 Systems Test .................. 3-24 3.5.1 Reference Documents ..............3-24 3.5.2 Test Equipment Needed..............3-24 3.5.3 Basic Tools ..................3-24 MRidium MR IV Pump, main unit, Verification (3860+) ......
- Page 7 Flow Switch ................... 4-12 Display Subsystem ................. 4-12 Communications Interface and Signal Definitions ........ 4-13 Critical Error/Service Codes .............. 4-13 SECTION 5 ASSEMBLIES AND SCHEMATICS..........5-1...
-
Page 9: Preparation For Use
Therefore, it is recommended that the following inspection procedure be performed upon receipt of the instruments at the user's facility. 1. Carefully remove the MRidium 3860+, 3861 or 3865 from their shipping containers. (It is recommended the shipping material be saved in the event an instrument has been damaged and must be returned to the factory for service or repair). -
Page 10: Operational Performance Check
(3860+ only). NOTE In the event a MRidium 3860+, 3861 or 3865 shows evidence of shipping damage, notify the carrier's agent immediately. Do not return a damaged instrument to the factory before the carrier’s agent has authorized repairs. Contact IRadimed for authorization to return the instrument for repair regardless of liability for repair costs. -
Page 11: Control And Indicator Operational Performance Test
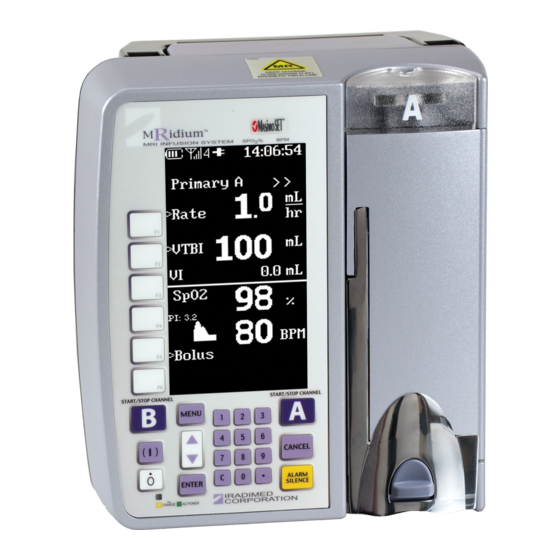
Control and Indicator Operational Performance Test The following operational performance test is designed to ensure each of the MRidium 3860+'s controls and indicators is functioning properly, and to check the operability of all the features available in the normal operating modes. -
Page 12: Sound
1.4.4 Prepare IV Set Using IV Set 1056 insert set spike into water container and hang water container approximately 21 inches above MRidium 3860 MRI Infusion Pump. Squeeze drip chamber to fill approximately 2/3 full. With Free Flow Restrictor pinch clamp open prime tubing and clear air by slowly open roller clamp allowing water to fill tubing. -
Page 13: Flow Test (3860+ Or 3861 Sidecar)
Figure 1-2. 1.4.6 Flow Test (3860+ or 3861 SideCar) Connect patient end of IV Set to Infutest 2000 (or other IV Pump Flow test device). Set Pump Rate to 100 ml and VTBI to 25 ml, verify Ready to Start is flashing in lower right of the display. Press the Start/Stop Channel A (Channel B for SideCar) key and verify the pump begins running as indicated by the pulsing “>”... -
Page 14: Inlet Occlusion Test
1.4.7 Inlet Occlusion Test Press the Start/Stop Channel A (Channel B for SideCar) key and verify the pump begins running as indicated by the pulsing “>” in the upper portion of the display and Green flashing LED in the top of the door. Use the hemostat to pinch off the tubing above the instrument and verify the following conditions: 1. -
Page 15: Radio Setup And Verification
This can increase commu- nication reliability in most all cases. 5) Space between Emitters - Make sure there is at least 0.5meters (20 inches) between the IRadimed equipment Antenna and any other radio emit- ters (e.g. monitors, injectors, etc.). -
Page 16: Programming Custom Drug Settings
Programming Custom Drug Settings 1. Enter Service Mode. This is done by pressing the Power On (1) button while simultaneously holding the CANCEL key until the Service Mode MENU is observed on the screen. 2. Select the NEXT MENU Softkey 3 (F3), which will enter the extended MENU 3 choices. - Page 17 10. Once the drug modality has been selected, now the DOSE, CONC (Concentration), or TIME (if applicable) values can be programmed. This can be accomplished by either using the ENTER key to scroll to the appropriate selection, or by pressing the appropriate Softkeys (either F1, F2, or F5) to select the DOSE, CONC, or TIME settings.
- Page 18 • Units* • mU* • Units/kg* • mU/kg* *With Software version 3.2.9 and higher, when selecting the units-based Dose Units values, the Concentration Units Value must first to set to either "units", or "mU". With Software version 3.2.9 and higher, the default Bolus Dose units for the Drug Library choices for the 5 drug types, and DERS Drug Library includes the following choice: •...
- Page 19 NOTE: The CONC denominator units value is always in milliliters (mL) and can't be modified. 16. If any timeless DOSE units have been set (e.g. mcg/kg or mg/kg), the TIME value can be set using the UP/DOWN keys, or the numeric keypad keys.
- Page 20 22. If only 1 or 2 drug types are programmed by the user, the remaining drug types will continue to show the factory default values in the Normal Use mode of the Dose Rate Calculator. These default values can be found in enclosed Table 1.
- Page 21 27 above, and verify user-presets have been saved. 2. Turn off the 3860 Pump. 3. Using another AM05 Software Update card provided by Iradimed Corporation, install this card in the 3860 Pump’s Memory Port in the rear of the pump.
- Page 22 Dose Rate Calculator Factory Default Values Table 1 Factory Defaults DRC Default Drug Name Label Values Primary Secondary Bolus Drug? Dose 0.0 mcg/kg/min Same as Primary 0.0 mcg/kg/min Conc 1.00 mg/ 1 ml Same as Primary 1.00 mg/ 1 ml 0.0 kg Same as Primary 0.0 kg...
- Page 23 Dose Rate Calculator Custom Protocol Values Worksheet Table 2 Custom Protocol(s) DRC User Selected Custom Drug Name Label Values Primary Secondary Bolus Custom: Dose Same as Primary Conc Same as Primary Name: Same as Primary Rate Same as Primary Time Same as Primary VTBI Same as Primary...
- Page 24 Table 3 STANDARD USER SETTING RANGES AND DEFAULTS Characteristic Specification Range Initial Start-Up (Factory Default) Value Primary Flow Rate Range - 0 to 100 0.1 to 99.9 mL/hr in 0.1 mL/hr 1 mL/hr mL/hr increments Primary Flow Rate Range - > 100 mL/ 100 to 1400 mL/hr in 1 mL/hr 1 mL/hr increments...
- Page 25 Additional Dose Rate Calculator Settings and Ranges (for use with Dose Rate Calculator and Dose Error Reduction System (DERS)) Table 3 Units Value Minimum Default Maximum Notes Dose mcg/kg/min 0.01 9,999 mg/kg/min 0.01 9,999 mcg/kg/hr 0.01 9,999 mg/kg/hr 0.01 9,999 mcg/kg 0.01 9,999...
-
Page 26: Mridium™ 3860+ Mr Iv Pump
2 Installation NOTE: The optional Dose Error Reductions System (DERS) feature requires MRidium 3860 Pump software version 3.0.xxxx or higher. Refer to the Installation instructions in the PN 1145 DERS Software Update Kit’s SD005 Instructions for loading the pump software (if necessary), and installing the DERS Drug Library Card. -
Page 27: Preparing The Pump And Ders Memory For Programming
The DERS card maintains the order of drugs/protocols as entered ( they cannot be re-sorted by the pump). Drug names can be the entire width of the display screen, and so, may be up to twenty characters long. However, various Tall/Capital and wide letters/numbers can limit the total character count. -
Page 28: Create New Drug
1.7.3 Create New Drug Upon selection of this option, verify the display shows “PROGRAM DOSE LIBRARY” “New Drug”. Notice twenty place holding dash marks across upper portion of display. These indicate remaining space for drug name characters. Drug names must be no wider than this display screen. Create drug names by choosing each letter/number with the up/down arrow keys. -
Page 29: Programming Or Editing A Dose Protocol
1.7.4 Programming or Editing a Dose Protocol 1. It is recommended to choose and set the units for concentration as the first step, as this will limit the range of unit choices for the Dose. Units are available in a number of weight/time combination for both mass ( mg/mcg) and international UNITS ( Units/mU). -
Page 30: Removing Drugs
Press CANCEL, and return to “PROGRAM DOSE LIBRARY”, a. above to enter any additional Drugs/protocols. 1.7.5 Removing Drugs Via the ‘Edit Custom Drug’ to ‘Edit Protocol’ menu, previously saved drugs can be removed from a DERS Library memory card. Enter SERVICE MODE, choose service options by pressing ‘F3’ select EDIT CUSTOM DRUGS by pressing ‘F3’, and see: ‘PROGRAM DOSE LIBRARY’... -
Page 31: Erasing Ders Memory Cards
process of making additional copies can be repeated by simply inserting another new or erased formatted DERS card and pressing ‘F5’. The DERS cards should now be installed into 3860+ MR IV pumps following procedure Installing or Removing DERS Library programming card below. - Page 32 Pulse Oximeter Verification (3860+ only) See Section 7 of the 1138 MRidium 3860+ Operation Manual. Plug 1170 Fiber Optic Sensor Cable into port on back of 3860+ pump. Turn on 3860+ Pump. Place sensor on operator using 1171 grip. Verify normal operator's and Pulse reading, SpO display is 96 - 100%, Pulse display is pulse rate of operator, and no error messages are displayed (Low...
-
Page 33: Pulse Oximeter Verification (3860+ Only)
MRidium 3860+ PREPARATION FOR USE TEST DATA SHEET Pump Serial No. _______________ Software Revision ______________________ Date ________________ Technician ____________________________________ Description Reference Pass/Fail Test Paragraph Pre-Operation Mechanical Inspection Pass___Fail___ Battery Charge 1.3.1 Pass___Fail___ Electrical Leakage Test 1.3.2.1 Pass___Fail___ Electrical Ground Test 1.3.2.2... - Page 34 1-26...
-
Page 35: Service Mode Description
SERVICE MODE DESCRIPTION SERVICE MODE DESCRIPTION The MRidium 3860+ is configured with a Service Mode that allows technicians to access the software diagnostic subsystem. Once the Service Mode is enabled, the technician can use the diagnostic test sequences to verify... - Page 36 mechanism for inlet pressure/occlusion sensing for pump channel B, and P4 located below the pump mechanism for patient side fluid pressure sensing of pump channel B; Sensor A to D count is displayed on the left with pressure in psi displayed on the right of each location. These are non-selectable information displays.
-
Page 37: Calibrate Pump Screen
2.1.1 Calibrate Pump Screen Figure 2-2. From the Service Mode screen the Calibrate Pump A or B Screen (see Figure 2-2) is accessed by pressing the F1 (top function key on the left side of the display screen). This screen is for displaying current pump A or SideCar B calibration settings, adjusting these settings, clearing the History record and making pressure sensor adjustments. -
Page 38: Battery Status Screen
4. Span Cal. Pressing this soft key (F5) just to the right of the Span Cal option will set the Span of the pressure sensors. The software assumes 5 psi is applied to the pressure sensors. Note: To ensure pressure has been applied the software looks for an A to D count of 455 to 485 as displayed in the Service Mode in the left numerics beside P1 &... -
Page 39: Service Menu Screen
2.1.3 Service Menu Screen Figure 2-4. The SERVICE MENU (see Figure 2-4) is brought up by pressing the F3 soft key (third key down on left side of screen). From this menu the Set Time, History Log, Radio Settings, Keylock, Language and a Next Menu are accessible. - Page 40 Figure 2-5. 2.1.3.2 History Log. Pressing the History Log soft key (F2) just to the right of the History Log in the SERVICE MENU will select the History Log (see Figure 2-6) for output to the rear I/O port. The screen will display Press ENTER to stop and the pump will start sent a text history log out the I/O port.
- Page 41 The following table describes this history log output. Token Description Format Event Power On SW Revision string At power up KVO Rate changed #.# mL / hr Occlusion Pressure Alarm # PSI Limit (downstream) changed Alarm Volume Limit # (no units) changed Dose Error Reduction Soft Refer to Table 6...
- Page 42 Token Description Format Event Stop infusion button #.# mL Store VI pressed Cancel infusion button #.# mL Store VI pressed Alert Detected Alert number. See table 4 Hold time exceeded alarm Pump door open has just been opened Pump Malfunction Error number See error number Table 2.
- Page 43 Token Description Format Event History Checksum Error At power up when a checksum error has been encountered. History database has been When history log is manually cleared. cleared. Remote Comm. Established Remote Comm. Lost Table 2 : Error number descriptions. Token Action Description Event...
- Page 44 Table 3: Alarm codes for events 49 (Audible alarm silenced) and 50 (Alarm detected) Door Open Patient Occlusion Bubble Detected Bag Empty Upstream Occlusion Dead Battery Clear VI Check Door (possible Free-Flow conditions) Invalid Parameter Table 4: Alert codes for event 17 Token Action Description Format...
- Page 45 2.1.3.3 Radio Settings Pressing the Radio Settings soft key (F3) just to the right of the Radio Settings option in the SERVICE MENU will select the Configure Radio menu sp highlighted (see Figure 2-7). Figure 2-6. 2.1.3.3.1 WIT2450 Banner When a WIT2450 Radio is connected to the pump and this menu is selected the WIT2450 banner “WIT v1.32 Cirronet :Remote 0003087 for detailed information of radio...
- Page 46 2.1.3.3.5 Load Defaults This soft function key (F6) is used to automatically send all Iradimed default radio settings to the radio. Once Load Defaults is complete, the Store (F5) soft function key must be pressed to store default settings. From the normal operating screen, Menu, Next Menu, and Set Comm Channel the radio setting for channel selection are automatically changed.
- Page 47 Table 1: Radio Configuration Sheet Command Description Pump Remote pn [01, 3e] Set Maximum Number of Remotes pk [00, d4] Set Minimum Data Length pr [00, ff] Set Packet Attempts Limit pt [00, ff] Set Data Transmit Delay Set Slot Assignment pw [00, 2f] Set Base Slot Size Set ARQ Mode...
- Page 48 On the 3860+MRidium 3860+ pump, pressing the Language soft key (F5) will enable the user to scroll through the various languages available for use on the MRidium 3860+ screen display. Once the selected language is set in the Service Menu, exit the Service Mode. On next power-up of pump, selected language will be displayed.
- Page 49 2.1.3.10 Clear Custom Drugs For MRidium 3860+ pumps, the Clear Custom Drugs softkey allows user to reset the Drug Table to the factory defaults (see Section 1.6 for instructions on Clear Custom Drugs softkey). 2.1.3.11 Previous Menu Pressing this soft key will return the user to the first Service Menu screen.
- Page 50 2-16...
-
Page 51: Preventive Maintenance
MRidium 3860+, 3861 and 3865 MR IV pump and accessories. Please reference Section 5 for drawings and exploded views of the various assemblies, components, and PCB’s. -
Page 52: Cleaning Instructions
NOT attempt to sterilize with Ethylene Oxide gas, head steam, radiation, or autoclaving. To do so may damage the pump and void the warranty. 1. Exterior surfaces of the MRidium 3860+, 3861 and 3865 may be cleaned using any of the following recommended solutions. This list is considered adequate to permit clean up of all expected contaminates. - Page 53 2. Perform a pumping mechanism integrity /extension spring (HM10) integrity test by closing the IV set patient side tube clamp while the pump is operating in the Pump mode. ( Any iRadimed Series 1000 IV set may be used for this test) Set the occlusion pressure to maximum at 10 PSI.
-
Page 54: Basic Tools ( For Basic Repairs And Pm's)
12. Exercise the pole clamp mechanism to ensure freedom of movement (3860+). 13. Set the pump to deliver 100 mL/Hr and check for accurate fluid delivery. Follow the procedures below utilizing the ‘Infutest’ or alternate calibrated fluid measurement system. 14. Replace the CR2032 coin cell memory/clock ‘backup’ battery every two years or as needed. - Page 55 pressure gauge remains at 5.0, press the F1 Key (top left white key) to enter the Calibrate Pump screen, then press the F5 key (Span Cal). Press the Cancel key to return to the Service Mode display and verify P1 and P2 are now 5 +/- 0.5. 3.2.4.2.4 Zero Verification after Adjustment Open pressure gauge hand bulb and verify P1 and P2 now read 0 +/- 0.2.
- Page 56 IV1056 IV Set cut at top & bottom then connected to T fitting for connection to above. 3.2.4.3 Battery Verification Insure battery is easly removed and does not show signs of swelling. (See Section 3.2.7.4 for swelled battery removal) Press the F2 key And verify the following Battery Status, with charger cable connected.
- Page 57 3.2.4.4 Bubble Detect Verification: With no IV Test Set installed verify Bubble detect indicated by Upper case “B” in the lower center of the display 3.2.4.5 Verify No Bubble Detect: Load a IVP1056 set filled with fluid and verify no Bubble detect s indicated by Lower case “b”...
- Page 58 3.2.4.9 Green Run and Red Alarm LED Verification: Load a fluid filled set into the pump and close the door. Press Power On (I) key, select New Patient and verify normal Pump display. With the Rate 1.0 highlighted, press Enter again to Select a VTBI of .1.
- Page 59 3.2.4.11.3.2 Occlude inlet of IV Set above Pump and verify Red Alarm LEDs are flashing and speaker Alarm sounds on both Pump and Remote. Press ALARM SILENCE key on remote, verify Alarm sound is silenced, and Alarm LEDs stop flashing on both Pump and Remote.
-
Page 60: Key Pad Verification (3860 Only)
3.2.4.11.4 3861 SideCar Verification: Install Test 3861 Side Car on Pump if SideCar is to be used with pump. Press Pump (I) key and verify Pump Power is On. Resume Therapy screen appears, press Same Patient. Select Channel B and verify the following: 3.2.4.11.5 Press Channel B (F6) soft key, press (F1) soft key, set Rate of 83.2 and press ENTER. -
Page 61: Pump Flow Test
3.2.6 Pump Flow Test. Pump flow test can be preformed using a Infusion Pump Analyzer or a graduated beaker. Place Pump on IV Pole with IVP1056 infusion set connected to 1000 ML distilled water bag. Place output of IVP1056 infusion set into 100 ML empty graduated beaker or connect to Infusion Pump Analyzer. -
Page 62: Spo2 Verification
and verify average flow rate on infusion analyzer is 25 ml +/- 5% or graduated beaker contains 4.2 ml +/- 5%. (3.99 - 4.41) 3.2.7 SpO2 Verification 3.2.7.1 Connect 1170 test F.O. probe to pump. Press Cancel to return to Resume Therapy Screen, verify SpO2 is displayed in lower portion of screen on both Pump and Remote. - Page 63 3.2.8.1 Motor Speed Verification Select MANUAL PUMP RUN, press and hold ENTER on Keypad (100% duty cycle). Verify speed to approximately 135 +/-30 RPM. 3.2.8.1.1 3861 Pressure Verification: See Figure 1:Pressure test set made using a portion of the IVP1056 in section 3.2.4. 3.2.8.1.2 Tare Offset Verification: Connect Pressure Gauge with Hand Bulb to a circular IV Test Set (no fluid) and with Hand Bulb...
-
Page 64: 3861 Pump Flow Test
the F6 Key. Open Channel B door, press black pinch clamp in on IV Set Flow preventer assembly, verify Check Door B flashes at top of screen and pulsing alarm sounds within 2 seconds. Note: Flow switch must be On in service menu. 3.2.8.1.9 Flow Stop Pull Test: Open door verify black pinch clamp has been fully retracted (Flow stop is closed) and Flow preventer... -
Page 65: 3865 Pm Verification
and verify average flow rate on infusion analyzer is 999 ml +/- 5% or graduated beaker contains 33.3 ml +/- 5%. (31.634 - 34.965) 3.2.9.5 Set the Pump Rate to 500 mL/hr., & VTBI >16.6 mL. Press Start/Stop B on the Pump. Verify the pump is running as indicated by the pulsing “>”... - Page 66 verify Ready to Start is displayed on both Pump and Remote. Press Start Channel A Remote and verify green (run) LED flashes on both Pump and Remote. 3.2.10.3.2 Occlude inlet of IV Set above Pump and verify Red Alarm LEDs are flashing and speaker Alarm sounds on both Pump and Remote.
-
Page 67: Battery Pack Maintenance
3.2.10.4 10 Key Pad Verification (3865 Remote) only. 3.2.10.4.1 On the 3865 Remote using 10 key pad with Rate highlighted enter 123, verify tone with each key pres and then press enter verifying 123 entered in rate. 3.2.10.4.2 On the 3865 Remote using 10 key pad with VTBI highlighted enter 456, verify tone with each key press and then press enter verifying 456 entered in VTBI. - Page 68 3.2.11.1 1133 Battery Pack Maintenance Checkout Procedure The 1133 Battery Pack should be inspected anytime the pack is removed, or at least every 90 days for the following: 3.2.11.1.1 Battery Pack communicates with the Pump. This indicated by the Battery Icon being shown on the display of the Pump or Remote Display.
- Page 69 3.2.11.3 Battery Pack Related Precautions The 1133 Battery Pack contains several lithium-polymer cells and an integral safety circuit. As these cells age, they can expand due to inter- nal gas release, which is anticipated for this type of cell. However, if excessive expansion occurs, this can result in the battery case expand- ing (swelling), and possibly cause failure of the battery case, cells, or safety circuit.
-
Page 70: Removing A Swelled Battery Pack (Figure 3-2)
3.2.12.5 If battery is so swelled that using this method does not prove successful, or if the batterys plastic case begins to crack at the point of contact, or the screw driver penetrates the plastic, please discontinue attempting removal and contact Iradimed Corporation Technical Ser- vice immediately at 1-407-677-8022. 3-20... - Page 71 Figure 3-2. 3-21...
-
Page 72: Software Update
Failure to follow these instructions will disable your pump and require it to be returned to Iradimed Corporation for repair. 3.3.1 To determine the current software version of the MRidium Infu... -
Page 73: Dose Error Reduction System (Ders) Option Installation
Any custom settings will be reset to factory default values after any software update is performed. Dose Error Reduction System (DERS) Option Installation Refer to Iradimed Corporation Document SD005-B for the installation of the 1145 DERS Software Upgrade. For a copy of this document contact customer service toll free at: 866-677-8022. -
Page 74: Systems Test
Test Software provided on 1125 Service Manual CD. Sartorius Model GD603 or GD605 Scale with RS-232 connection. Infutest 2000 IV Pump Test set (or equivalent) Iradimed 1000 Series IV Sets and IV pole. IV Fluid Container (Distilled Water) Closed Continuous Flow Circular/Looped Series 1000 IV Set. -
Page 75: Mridium Mr Iv Pump, Main Unit, Verification (3860+)
3/16” Nut Driver 100 mL and/or 25 mL Graduated cylinder ( Simple flow testing) MRidium IV sets MRidium MR IV Pump, main unit, Verification (3860+) (Reference IVPAB001 assembly drawing in section 5.) 3.6.1 DC Input Verification 3.6.1.1 Connect DC Power Supply to POWER IN connector (+ to P6-2 or 3 &... -
Page 76: Battery Charge Verification & Adjustment
3.6.2.4 Turn off DC Power Supply. Disconnect supply line from P2 BATTERY connector. 3.6.3 Battery Charge Verification & Adjustment The following requires Iradimed TF009 Battery Simulator: 3.6.3.1 Connect Battery Simulator TF009 to P2 BATTERY connector and connect DC Power Supply to P6 POWER IN connector. Connect meter to measure Amps to Battery Simulator (This is the DC Power Supply current). -
Page 77: Time And Date Verification
3.6.4.5 If counter is greater than 1002 before it rolls over to 0, read- just R57 (may require more than 8 ms). Press Start/Stop A Key. 3.6.4.6 Verify speed is still at 130~150 RPM, by selecting Manual Pump Run and press Enter. 3.6.4.7 Select MANUAL PUMP RUN with the arrow keys and depress and hold the ENTER Key. -
Page 78: Battery Verification
3.6.6.4 Zero Verification after Adjustment : Open pressure gauge hand bulb and verify P1 and P2 now read 0 +/- 0.2. Repeat Tare Offset and Pressure Adjust until P1 and P2 reads dis- plays 5 +/- 0.5 with 5 PSI applied and are 0 +/-0.5 with hand bulb open (0 pressure applied). -
Page 79: 3860+ Remote Radio Setup
3.6.10 3860+ Remote Radio Setup If during repair the IVPAB015 Remote Radio assembly was replaced, the radio will need to be programed before use. Preform the following: 3.6.10.1 Remote Radio Programing: From Service Mode A Press the (F3) soft key then the (F6) soft key “Load Defaults”, note Command, Sent, and Rec. - Page 80 Channel 1. 3.6.10.8 Press power (I) on test Remote. If “No Communications” dis- played, press MENU key, press (F6) soft key to select Next Menu, press (F5) soft key to select Set Comm. Channel, then press (F1) soft key to select Channel 1 and press Enter.
-
Page 81: Key Pad Verification (3860+ Only)
screen, then press the ENTER key. 3.6.10.9.6 Press (F6) Next Menu then press the (F2) soft key to select Occlusion Limit. Verify Occlusion Limit screen is displayed. Verify that pressing the Down arrow key decrements 0.1 psi with each press to 1 psi. -
Page 82: Mridium Side Car Verification (3861)
.5%. 3.6.12.6 On Pump, press Menu, Next Menu (F6), Spo2 Menu (F4), and HR Hi Limit: (F2). Verify 200 bpm highlighted. With Down Arrow select 130 bpm and press Enter. On both the Pump and Remote, verify “High HR” displayed alternately with battery icon at top of screen, Alarm sound and Alarm LED. -
Page 83: Dc Input Verification (3861)
Cable Set. Connect the 3861 SideCar rear (IVPAB011) to the 3861 front (AS100 pump assembly) using the SideCar Pump Test Adapter Cable Set as Shown below, being sure to connect filter plate ground clips to rear chassis. Without the Test Adapter Cable Set, alternative connection may be made by directly mounting the Side Car front chassis to the Pump connection port ( 3860+ left side facing rear) and extending the cables as best as possible to the motor and 20pin ribbon through the PCB cover/RF filter. -
Page 84: Pump Motor Speed Adjustment (3861)
3.7.2 Pump Motor Speed Adjustment (3861) Place Pump into Service Mode by pressing Keypad On (I) button and holding the CANCEL key depressed until the Service Mode is displayed. Select Channel B by pressing the Channel B START/STOP key to select SERVICE MODE B. - Page 85 3.7.4.1 3861 Pressure Verification: See Figure 1:Pressure test set made using a portion of the IVP1056 in section 3.2.4. 3.7.4.1.1 Tare Offset Verification: Connect Pressure Gauge with Hand Bulb to a circular IV Test Set (no fluid) and with Hand Bulb open (0 PSI) See photo below.
-
Page 86: Pump Calibration (3860+ And 3861)
3.7.4.1.8 Flow Stop Pull Test: Open door verify black pinch clamp has been fully retracted (Flow stop is closed) and Flow preventer housing is retained in the gray/violet flow stop carrier (IVP1047/AS120). Note: If pull test fails (black flow preventer not fully retracted) on a new 1000 series IV set, the IVP1068 Door Clamp Clip is worn and should be replaced. - Page 87 name file(SN_Raw_Date), click Open, then click Save. Click Start SartoConnect data collection program and Select Calibrate on Pump and press ENTER. This test will take 10 to 20 minutes. When scale reading reads greater than 0.07 grams press Stop on SartoConnect data collection program. Using Microsoft Excel, open saved file and line graph data by highlighting time and weight columns form 0 to 0.07.
- Page 88 Figure B: Too Much Taper Raw Curve 3860+/61 Figure C: Not Enough Taper Raw Curve 3860+/61 3-38...
-
Page 89: Calibration Verification
3.8.1.2 Auto Pump Calibration and Flow Correction Click T SartoConnect data collection program, verify Scale is now at 0. Connect Scale RS232 cable to I/O port at rear of Pump. Note Scale #s and 255 displayed on first line at bottom of display indicating Scale connection. - Page 90 On Pump, select Index and press ENTER, again on Pump select Rate; 1.0, ensure SartoConnect is Online (Offline showing in tab), zero Scale with T-tab on SartoConnect, start data collection (select T-Start), and press START on Pump. Monitor Scale and stop Pump after 0.06 g is displayed on Scale window.
-
Page 91: Pump Accuracy Verification (3860+ And 3861)
Restart the unit in normal mode. Using IV Set 1056 insert set spike into water container and hang water container approximately 21 inches above MRidium 3860 MRI Infusion Pump. Squeeze drip chamber to fill approximately 2/3 full. With Free Flow Restrictor pinch clamp open prime tubing and clear air by slowly open roller clamp allowing water to fill tubing. - Page 92 3.8.3.1 Infutest 2000 Connect patient end of IV Set to Infutest 2000 as shown below to either Channel A or B as desired and set the other channels stop cock to off as shown on following page: 3-42...
- Page 93 Ensure that Infutest 2000 Flush Syringe has approximately 60 cc of water, connect IV Set to right side as shown above (the long 21 gauge flow restrictor side), with stop cock position as shown run Pump for a short time to flush all air bubbles past stop cock.
- Page 94 With Set Test ensure “Test: Single Rate” as shown below. Rotate Flush syringe Stop to Prime Position and inject about 5 cc of water into the channel over about 5 seconds. Note the Infutest reminds the user to do this via the LCD prior to starting each test.
- Page 95 Return the Stop Cock to the Test Position. 3-45...
- Page 96 Rate Test. Once all channels are started on Infutest 2000 select Control on Tera Term Program, then select MACRO and double click on Infutest_st.ttl. MACRO - Infutest_stop.ttl (available from Iradimed) should appear at the bottom of the screen indicating the program Macro will stop all channels of 3-46...
- Page 97 the Infutest 2000 after 6 hours. (Note: this is necessary because the Infutest 2000 only has 6 hours of memory data and the 1st 6 hours of data is required. The 2nd hour of data must be used for Trumpet verification. Connect Infutest 2000s serial port (DB25) to PC Com-1 port of personal computer with Infutest DTP program installed.
- Page 98 Verify Ready to Start is flashing in lower right of the Pump display. Press the START/STOP Channel A key and verify the Pump begins running as indicated by the pulsing “>” in the upper portion of the display and Green flashing LED in the top of the Door.
-
Page 99: History Verification (3860+)
upper portion of the display and Green flashing LED in the top of the Door. Press Go on the Infutest 2000. Allow Pump to run for a minimum of 10 minutes, then press Stop on the Infutester. Verify Average Flow Rate is 25 mL +/- 3% and record. 3.8.3.8 0.4 ml Flow Rate Test Select Cancel Infusion with the bottom function key on the Pump. -
Page 100: Power Supply Verification (3865)
6 by pressing the soft key next to that channel and verify that Channel is now highlighted. 3.8.5.5 Press the Menu key on the MRidium 3860+ MRI IV Pump. 3.8.5.6 Press the NEXT MENU soft key to bring up additional menu options, then press the Set Comm Channel soft key. -
Page 101: Battery Charger Verification (3865)
3.9.2 Battery Charger Verification (3865) 3.9.2.1 Connect Battery Simulator TF009 to P1 BATTERY connector, connect DC Power Supply to J5 POWER IN connector. Connect meter to measure Amps into Battery Simulator (This is the DC Power Supply cur- rent). Insure TF009 Battery Simulator Load Knob is fully counter-clock- wise. - Page 102 3.9.4.1 Verify Power Off requires a 2 second depression of the Power Off (0) key. Figure 3-4. 3.9.4.2 Software Load Verification; Insert DataFlash Program Card (AM04) in card slot at bottom of 3865 (see Figure 3-2). Depress Power On (I) key and verify card is detected and the following is displayed: IRI LOADER FLASHER ©...
-
Page 103: Remote Pump Control Verification (3865)
“v” firmware version. Press (F6) soft key; “Load Defaults”, note Com- mand, Sent, and Rec. setting will scroll while defaults are loaded. Once Scrolling stops, press (F5) soft key “Store” and verify Rec.: and Sent: display “m”. Press the CANCEL key and set Keylock Enable; insure that Keylock is also enabled on 3860 Pump. -
Page 104: Battery Charge And Burn-In Verification (3865)
3.9.7 BATTERY CHARGE and Burn-In Verification (3865) Install a new uncharged Battery (1133) and power on the 3865 while holding down the “CANCEL” key. 3.9.7.1 Press the (F2) soft key and verify the following Battery Sta- tus: State of Charge (%) xxx [0 to 2] Term. Voltage (V) xx.xxx [15 to 16.8]. -
Page 105: Principles Of Operation
PRINCIPLES OF OPERATION 4.0 PRINCIPLES OF OPERATION Introduction The operational principles upon which the Iradimed 3860+ MR IV pump and its accessory parts are based is presented in the following sub-sections. The presentation format compliments the maintenance and troubleshooting instructions found in their associated sections of this manual. Reference... - Page 106 Figure 4-1.
-
Page 107: Pumping Mechanism
Figure 4-2. Generally, all the RF noise producing electronics are located on the display side of the chassis. The Pump side is designed with non-RF producing ‘analog’ or very slow digital electronics along with the non- magnetic ultrasonic motor. The surround of the chassis contains RF gasket material which provides both RF tight and drip proof seal keeping RF noise from getting out or in. -
Page 108: Force Sensors (Pressure Transducer)
Figure 4-3. 4.2.3 Force sensors (Pressure Transducer) Pressures within the IV set tubing are sensed via tubing wall force exerted upon the face of two semiconductor force sensors. One located directly above the pump mechanism for inlet pressure/occlusion sensing, and the other below, for patient side fluid pressure sensing. These sensors must be zeroed and span calibrated with IV set tubing in place. -
Page 109: Mechanical Functional Operation
With this test passed, the unit is ready to load an IV set. When an Iradimed 105x type IV administration set is installed and the access door is closed and latched, the set's flowstop is opened by action of the flowstop actuator pressing the slide clamp into the flowstop bias arm. -
Page 110: Electronic Operation
4.3.1 Electronics Functional Description The MRidium 3860+ MR IV pump’s electronics are micro processor based. There are two processors working together to accomplish this control and to check one another. providing a high degree of system safety and control. -
Page 111: Power Supply / Motor Driver Functional Operation
pulses or ticks, and performs an independent check for proper motor speed. The index is also watched by U6, so that proper mechanical positioning is maintained for the correct application of the speed modulation profile which linearizes the flow characteristic of the pump. The master translates user input flow rate requirements into a time expected between each encoder pulse, or Master Tick Time. - Page 112 Power off involves pulling the shutdown line, pin 15 of IR1 low through R29, and draining the hold on charge from C18 via D21. The low going off signal is generated with a time delay on the AB002 processor board using U20 and U21 along with the charge on C82.
-
Page 113: Processor Assembly
4.3.2.6 US Motor Driver The IR3C21N IC shown as U2, is a custom analog integrated circuit which generates the approximately 45KHz sin and cos drive for powering the US motor. The motor run command from U6 on the AB002 turns off Q6 and enables U2 at pin 1, via U3. - Page 114 The MRidium 3860/3860+ is based upon a multi-processor design, with a main processor for user interface, system wide functions, dose rate calculations and rate/volume motor controller computations and communications. This main processor, a Zilog eZ80 (U3), also watches the function of the motor control processor(s).
-
Page 115: Air-In-Line Detector
system, checking the proper function of the motor controller(s). Should the eZ80 find encoder ticks ( indicating motor movement ) arriving at the wrong time or rate, the motor controllers will be issued a stop command and the motor kill line asserted, along with a critical error message and alarm. -
Page 116: Door Sensor
receiving element which generates a voltage signal that is proportional in amplitude and frequency to the coupled energy. If an air bolus is interposed between the lenses, the acoustic impedance is significantly increased as the acoustic wave is reflected by the liquid-air interface. The energy received is reduced and the voltage output is commensurately reduced. - Page 117 Definition GND (Ground) Host TX (Transmit Data) 3860 to Host Serial data transmitted to host computer from MRidium 3860 RX (Receive Data) Host to 3860 Serial data transmitted to MRidium from host computer. RTS (Request to When asserted, RTS indicates to the...
- Page 118 Pump Malfunction - Should have seen a minor Channel A index mark while the motor is not running and has not seen a minor index mark. Pump Malfunction - Slave processor did not see Channel A encoder index during normal operation Pump Malfunction - Slave processor did not see Channel B encoder index while seeking starting index mark...
Need help?
Do you have a question about the MRidium 3860 and is the answer not in the manual?
Questions and answers