Table of Contents
Advertisement
Quick Links
Advertisement
Table of Contents

Summary of Contents for CBC DDK3000
-
Page 2: Before Using This Product
Before Using This Product The use of surveillance devices may be prohibited by law in your country. The DDK-3000 Video Encoder is a high-performance, web-enabled encoder that can be part of a flexible surveillance system. It is the user’s responsibility to ensure that the operation of such devices is legal before installing this unit for its intended use. -
Page 3: Table Of Contents
Table of Contents Before Using This Product ......................1 Table of Contents..........................2 Package Contents..........................3 Physical Description........................4 Front Panel ..........................4 Rear Panel ..........................5 Installation ............................6 Hardware installation......................6 Installation..........................6 Initial Access to the Video Encoder..................7 How to Use.......................... -
Page 4: Package Contents
Package Contents DDK-3000 Video Encoder I/O terminal block connector 12VDC power adapter Software CD - 3 -... -
Page 5: Physical Description
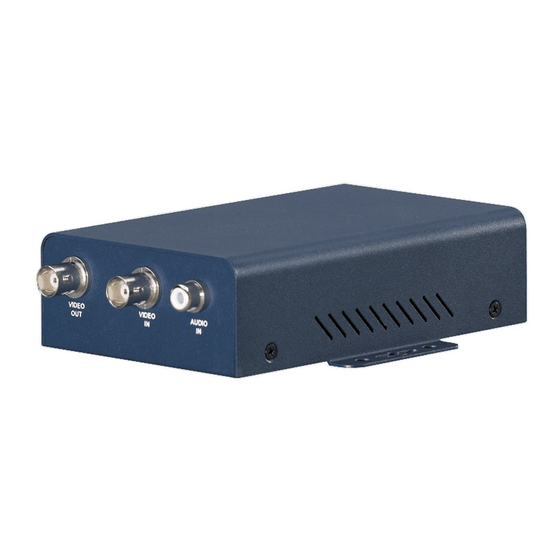
Physical Description Front Panel BNC video input The 75Ohms resistance video port should be used for connecting an external camera. To ensure that the video modulation type is properly detected, the camera should be attached and powered on before the DDK-3000 Video Encoder is powered on. -
Page 6: Rear Panel
Rear Panel Ethernet 10/100 socket The RJ45 port should be used to connect the DDK-3000 Video Encoder to an Ethernet network via a UTP category 5 cable. Ensure that the encoder is connected to the local area network before applying power to the unit. -
Page 7: Installation
Installation Hardware installation Before installing one or more DDK-3000 Video Encoders at their desired locations, the administrator should record the serial numbers that can be found on both the unit and on the packing carton. Cable connection To install the DDK-3000 Video Encoder, the unit should first be connected to a network switch via the RJ45 socket. -
Page 8: Initial Access To The Video Encoder
Initial Access to the Video Encoder Check Network Settings Once the Installer program has been used to assign an IP address to the DDK-3000 Video Encoder, the unit can be accessed immediately over the local network. The Administrator should complete the network settings on the configuration page of the unit, including the correct subnet mask and IP address of gateway and DNS. -
Page 9: How To Use
How to Use Authentication After the user opens the Web browser and enters the URL of the DDK-3000 Video Encoder, an authentication window will appear requesting a username and password. Upon connection, the following images are displayed. The first image below shows the login address window and the second shows the authentication screen. The user may check the option box to save the password for future convenience. -
Page 10: Installing Plug-In
Installing Plug-in During initial access to the DDK-3000 Video Encoder in Windows, the web browser will normally prompt for permission to install a pop-up plug-in for the DDK-3000 Video Encoder. The permission request depends on the Internet security settings of the user’s PC or notebook. If the highest security level is selected, the computer may prohibit installation of the plug-in. -
Page 11: User Accessibility
User Accessibility Main screen with camera view The main page layout has two parts: • Configuration functions: The encoder can be configured using this interface. • Camera View: What the camera sees. Click on the configuration link to the left of the image window to enter the configuration page. Digital Zoom Selecting the magnifier icon under the camera view will enable the digital zoom control. - Page 12 Client settings When first accessing the “Connection type” page in Windows, the web browser will prompt the user for a new plug-in installation to support the DDK-3000 Video Encoder. This plug-in has been registered for certification and is required to change the PC parameters at the client’s site. The user should click to install the plug-in.
- Page 13 There are two options listed on the Client settings page: • Media Option, which allows users to specify if audio should be muted • Protocol Option, which lists the available communication protocols that can be established between the client and the encoder There are three protocols choices to optimize usage: •...
-
Page 14: Administrator Accessibility
Administrator Accessibility Fine-tuning for Optimum Performance Optimum performance of the DDK-3000 Video Encoder generally equates to having a high frame rate, high-resolution video image at the lowest possible network bandwidth. The three factors, “Maximum frame rate,” “Fix bit rate,” and “Fix quality,” on the Video Configuration page, should be adjusted to achieve the best possible performance based on the available bandwidth. - Page 15 Optimum Quality Images To achieve the best video quality, the “Fix quality” setting should be “Detailed” or “Excellent,” and the “Maximum frame rate” should match your network’s bandwidth. If your network is slow and you encounter distortion in the video images, go to the TCP protocol in “Connection type” and choose a different mode of transmission.
- Page 16 More flexible options for viewers As indicated in section 4 above, options are available to accommodate additional users. Selecting the first option will allow anyone using “demo” as the user name to connect without a password. The Administrator can also decide if additional users should be allowed to access the video when the number of simultaneous users exceeds the limit.
- Page 17 To change the font color 1. Click “Configuration” on homepage. 2. Click “Homepage layout” in the left column. 3. Find “Font color” and pull down the list to choose a color. 4. Click the “Save” button. * The font color you select should contrast against the background. To change the background 1.
- Page 18 To change the image logo at the upper left corner of the homepage: 1. Click “Configuration” on the homepage. 2. Click “Homepage layout” in the left column. To remove any logo: 1. Find “Logo graph” and choose “blank.” 2. Click the “Save” button. To use an image from another web site as your logo: 1.
- Page 19 How to design a homepage to replace the current one 1. Prepare a homepage with size less than 65000 bytes and rename it to “user.htm.” 2. Insert the html codes of the video object, the bold text in the following example, into the appropriate position in user.htm.
- Page 20 If the customized homepage goes wrong and cannot display, link to the “Homepage layout” page, “http://<IP address of DDK-3000 Video Encoder>/setup/layout.html,” to disable “Use the customized homepage.” Build a multimedia web attraction site Demo on multiple sites – mid-scale service The DDK-3000 Video Encoder can support up to 10 users simultaneously.
- Page 21 5. Click “Application” in the left column. 6. Select the weekday and daily schedule you want to upload the pictures. 7. Select “Sequential operation” and set the interval. 8. Select FTP without date time suffix as the upload method and click on save. 9.
- Page 22 ****** Example homepage begin ****** <html> <head> <title>Example - auto refresh</title> </head> <body background="/pic/wallppr.jpg"> <p align=left> <font size="7" face="Comic Sans MS" color="#FF0000"> DDK-3000 Video Encoder Demo </font> </p> <p align=left> <!-- Begin of scripts to auto refresh the image. Change the IP address in the image URL and refreshrate if necessary.
- Page 23 1. Click “Configuration” on homepage. 2. Click “Application” in the left column. 3. Check the weekdays as needed and insert a desired time in the “Snapshots begin” and “Snapshots end” fields to monitor the trigger conditions every day. 4. Check the “Event operation.” The trigger condition can be set to respond to detected motion or status of the attached device.
- Page 24 Send snapshots when motion is detected If no external sensor is available, the Administrator can use the built-in motion detection to monitor any movement and send snapshots via email for security check. 1. Click “Motion detection” in the left column. 2.
-
Page 25: Configuration Settings
Configuration Settings Only the Administrator can access system configuration. Each category in the left column will be explained in the following pages. The bold texts represent the specific phrase on the Option pages. The Administrator may type the URL below the figure to enter the frame page of configuration directly. If the Administrator also wants to set certain options through the URL, read the reference appendix for details. -
Page 26: Security Settings
NTP Encoder. Assigns the IP address or domain name of the time server. Leaving the text box blank connects the DDK-3000 Video Encoder to the default time server. Time zone. Adjusts the time with that of the time servers for local settings. Remember to click on to validate the changes immediately. - Page 27 1st SMTP (mail) Server. The domain name or address of the destination e-mail server. 1st SMTP account name. The applicable user name on the destination e-mail Encoder. 1st SMTP password. The applicable user password on the destination e-mail server. 1st Recipient e-mail address. The e-mail address of the recipients of snapshots or log file. Multiple recipients must be separated by a semi-colon (;).
- Page 28 HTTP HTTP port. This can be any value other than the default port 80. Once the port is changed, users must be notified of the change in order for the connection to be successful. For instance, when the Administrator changes the HTTP port of the DDK-3000 Video Encoder whose IP address is 192.168.0.100 from 80 to 8080, the users must type in the web browser: instead of http://192.168.0.100:8080...
-
Page 29: Ddns And Upnp Settings
DDNS and UPnP settings Enable DDNS. Turns on the DDNS function. Provider. The provider list contains four hosts that offer Dynamic DNS services. It is recommended that you connect to the service provider’s website to determine the service charges. Host name. If users want to use DDNS service, this field must be completed. Input the hostname that is registered in the DDNS Encoder. - Page 30 There are three dependent parameters provided for video performance adjustment: • Maximum frame rate. Limits the maximum refresh frame rate, which can be combined with the “Video quality control” to optimize the bandwidth utilization and video quality. If the user wants to fix the bandwidth utilization regardless of the video quality, choose “Fix bit rate”...
-
Page 31: Motion Detection
Motion detection Enable motion detection. Turns on motion detection. Adds a new window. A maximum of three windows can exist simultaneously. Use the mouse to click, hold, and drag the window frame to resize, or the title bar to move. Click the ‘X’ in the upper right- hand corner of the window to delete the window. -
Page 32: Application Settings
Application settings Weekly schedule Sun ~ Sat. Selects the days of the week to perform the following operations. Snapshots begin at. Sets the time to start operations. Snapshots stop at. Sets the time to stop operations. Setting identical begin time and stop time indicates 24-hour operation. All the time except for the above schedule. -
Page 33: Homepage Layout Settings
FTP put snapshots with date and time suffix. Sets up the snapshot capture date and time, which can be used to differentiate the snapshot file names easily in either the sequential or event operation. For instance, “video@20030102030405.jpg” means the JPEG image was captured in the year 2003, January the 2 , at 3 o’clock, 4 minute, and 5 second. -
Page 34: Viewing System Log
Viewing system log Click the link on the configuration page to view the system log file. The content of the file provides useful information about configuration and connection after system boot-up. Viewing system parameters Click on this link on the configuration page to view the entire system’s parameter set. The content is the same as those in CONFIG.INI. -
Page 35: Appendix
Appendix A. Troubleshooting Status LED After powering up, the DDK-3000 Video Encoder performs a self-diagnostic to detect any hardware defects. The following table lists the normal LED patterns. In case of any fatal error, the LED will blink in a pattern other than those below. Condition LED color During self-diagnostic after power on... -
Page 36: Frequently Asked Questions
B. Frequently asked questions Q What if I forget my password? A After the Administrator’s password is assigned, access to the DDK-3000 Video Encoder needs authentication. If you are one of the managed users, you should request the password from the Administrator. - Page 37 Q I cannot hear any sound while watching. A If “V_ONLY” appears above the image, click on connection type to uncheck “Disable audio.” If “V” appears instead of “AV,” the sound card in your PC may not be properly installed. If “AV” displays, check the audio source of the DDK-3000 Video Encoder.
-
Page 38: Url Commands Of The Video Encoder
C. URL commands of the Video Encoder For some customers who already have their own web site or web control application, the DDK-3000 Video Encoder can be easily integrated through convenient URLs. This section lists the commands in URL format corresponding to the basic functions of the erase DDK-3000 Video Encoder. Capture update Snapshot of JPEG image /cgi-bin/video.jpg The DDK-3000 Video Encoder will return the most up-to-date snapshot in JPEG format. - Page 39 security option /setup/security. html network option /setup/network. html video option /setup/video. html motion detection /setup/motion. html image quality option /setup/image. html application option /setup/app. html homepage layout option /setup/layout. html system log /setup/logfile. html system parameters /setup/parafile. html set factory default /setup/factory.
- Page 40 NAME VALUE DESCRIPTION host <text string shorter than 15 characters> system name Ledoff turn off front LED turn on front LED method keep keep date and time unchanged auto use NTP Encoder to synchronize manu directly adjust date and time date <yyyy/mm/dd>...
- Page 41 NAME VALUE DESCRIPTION disable installation at next boot <IP address> Network Camera’s IP address subnet <IP address> subnet mask router <IP address> default gateway domain <text string shorter than 40 characters> domain name of Network Camera Dns1 <IP address> primary DNS Encoder Dns2 <IP address>...
- Page 42 NAME VALUE DESCRIPTION access FTP Encoder in active mode http <number less than 65535> HTTP port cport <number less than 65535> control Channel port aport <number less than 65535> audio Channel port vport <number less than 65535> video Channel port band optimal for the low bandwidth keep the original way...
- Page 43 NAME VALUE DESCRIPTION text <text string shorter than 15 characters> enclosed caption color monochrome <other than B/W> color Size half half x 2 normal normal x 2 double mode Auto auto detect the camera type NTSC set the camera type to NTSC set the camera type to PAL quality fixb...
- Page 44 NAME VALUE DESCRIPTION set maximum frame rate to 3 fps set maximum frame rate to 5 fps set maximum frame rate to 10 fps set maximum frame rate to 15 fps set maximum frame rate to 20 fps set maximum frame rate to 25 fps set maximum frame rate to 30 fps flip flip image...
- Page 45 NAME VALUE DESCRIPTION smethod mail upload snapshots by email upload snapshots by FTP suffix <not required> FTP file with date and time suffix delay <integer> seconds delay to detect next event inter <integer> seconds delay to capture post-event dihigh < not required > set DI high as trigger condition dilow <...
- Page 46 NAME VALUE DESCRIPTION cusback blank hide background image use default background use image from URL backurl <text string shorter than 80 characters> URL of image for background fcolor <0 ~ 15> color index for font bcolor <0 ~ 15> color index for background - 45 -...
-
Page 47: Technical Specifications
D. Technical specifications System CPU: Trimedia PNX1300 RAM: 8MB SDRAM ROM: 2MB FLASH ROM Networking Protocol TCP/IP, HTTP, SMTP, FTP, Telnet, NTP, DNS, DHCP, DRM, DDNS and UPnP Physical 10BaseT Ethernet or 100BaseT Fast Ethernet Video Algorithm supported MPEG4(short header mode) Video Inputs 1 BNC composite video input NTSC/PAL auto-sensing... - Page 48 General I/O 1 sensor input(max. 12VDC 50mA) 1 relay output(max. 24VDC 1A, 125VAC 0.5A) LED indicator Dual color status indicator Dimension 130mm(L) * 80mm(W) * 35mm(H) Weight NET. 356g Power Consumption: near 5.4W Universal switching power supply included Input: 100-240VAC, 50/60Hz, 0.4A Output: 12VDC, 1.5A Operating Environment Temperature: 0-50°C/32-122°F...