Table of Contents
Advertisement
Advertisement
Table of Contents
Troubleshooting

Summary of Contents for AOHUA VET-OR1200HD
- Page 2 Please keep all instruction manuals in a safe, accessible place. ⚫ Contact AOHUA for any questions or comments about this instruction manual. Shanghai AOHUA Photoelectricity Endoscope Co., LTD. Address: No. 66, Lane 133, Guangzhong Road, Minhang District, Shanghai, 201108, P.R.China...
-
Page 3: Table Of Contents
Contents Important Information — Please Read Before Use Intended use Instruction manual User qualifications Ancillary equipment Instrument compatibility Spare equipment Repair and modification Signal words Dangers, warnings and cautions Labels and symbols Chapter 1 Checking the Package Contents Checking the package contents list Chapter 2 Nomenclature and Functions Nomenclature and functions Front panel... - Page 4 Moiré remove (only for VET-OR1200R)…………………………………………………. 28 4.4.14 Switch operation mode (only for VET-OR1200R) ……………………………………… 29 4.4.15 Battery usage check (only for VET-OR1200HD-Li) …………………………………… 29 4.4.16 Termination of the operation Fuse replacement (only for VET-OR1200HD,VET-OR1200R) ………………………………... 31 Maintenance, storage and disposal of the imaging processor Maintenance 4.7.1...
-
Page 5: Important Information - Please Read Before Use
Section 1.1, “Checking the package contents list” after purchase. If any item is missing or damaged, contact AOHUA or distributor immediately. Prior to the first time use of a new endoscope imaging processor, carefully clean the endoscope imaging processor and accessories. -
Page 6: Signal Words
− Keep fluids away from all electrical equipment. If fluids are spill on or into the unit, stop operation immediately and contact AOHUA. − Avoid preparing, inspecting or using the instrument with wet hands. - Page 7 Important Information — Please Read Before Use ⚫ This device must be operated by a medical practitioner capable of safely performing endoscopy after operation technique training. Do not use this instrument for any purpose other than its intended use. ⚫ Do not use the instrument in any place where it exposed to strong electromagnetic radiation. Otherwise, this may impair the performance of the instrument.
-
Page 8: Labels And Symbols
Important Information — Please Read Before Use Labels and Symbols Type BF applied part Protective earth(ground) Caution Equipotentiality Refer to instruction manual Date of manufacture Manufacturer Keep dry Use-by date Keep away from sunlight Serial Number Fragile, handle with care Stacking limit by number Temperature limit This way up... -
Page 9: Chapter 1 Checking The Package Contents
⚫ Check all items in the package against the components listed below. If any component is missing or damaged, do not use the item; please contact AOHUA immediately. Accessories below in the list are only for the reference. Please refer to the packing list/ shipping list included in each shipment. -
Page 10: Chapter 2 Nomenclature And Functions
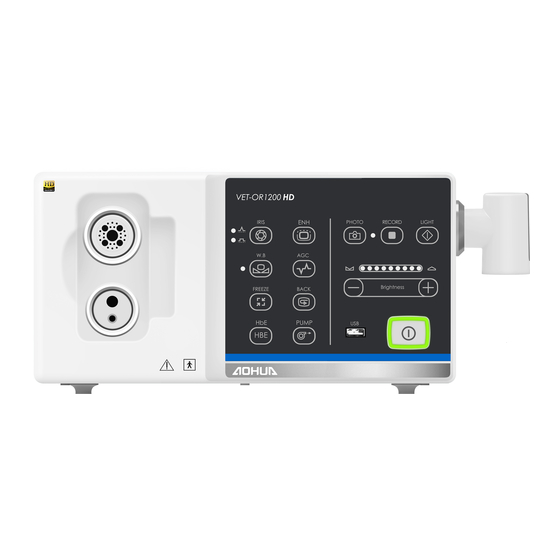
Nomenclature and Functions 2.1 Nomenclature and Functions Front panel 2.1.1 VET-OR1200HD, VET-OR1200HD-Li (Figure 2.1.1a Front panel of VET-OR1200HD, VET-OR1200HD-Li) Nomenclature Description W.B Button press it for 2~4 seconds to perform white balance adjustment. IRIS mode Button Press to select average IRIS mode or peak IRIS mode. - Page 11 This socket provides light and airflow to the endoscope. Endoscope Connector The endoscope connector of flexible endoscope is connected to Socket this socket. Battery life indicator (only The remaining battery life is indicated here. for VET-OR1200HD-Li) For veterinary use only - 7 -...
- Page 12 Nomenclature and Functions VET-OR1200R (Figure 2.1.1b Front panel of VET-OR1200R) Nomenclature Description IRIS mode Button Press to select average IRIS mode or peak IRIS mode. Press to adjust the endoscopic image brightness within four levels MODE Button under rigid endoscope operation mode. Press to reduce the moiré...
- Page 13 Nomenclature and Functions cap. Brightness Adjustment Press the “+”/ “-” button to increase/decrease emitting light Button brightness. Nomenclature Description Power Switch and Indicator Press to turn the endoscope imaging processor ON or OFF. OTV Connector Connect the rigid camera head here. BACK Button Press this button to replay frozen images.
-
Page 14: Rear Panel
Nomenclature and Functions Rear panel 2.1.2 o VET-OR1200HD (Figure 2.1.2a Rear penal of VET-OR1200HD) Nomenclature Description AV Video Output Terminal Outputs the AV video signals. Connects equipment compatible with the DVI (Digital Visual DVI Video Output Terminal Interface). Outputs DVI video signals. - Page 15 Nomenclature and Functions o VET-OR1200HD-Li (Figure 2.1.2b Rear penal of VET-OR1200HD-Li) Nomenclature Description AV Video Output Terminal Outputs the AV video signals. Connects equipment compatible with the DVI (Digital Visual DVI Video Output Terminal Interface). Outputs DVI video signals. Connect this equipment to the computer workstation through this USB port terminal by using the type D USB cable.
- Page 16 Nomenclature and Functions o VET-OR1200R (Figure 2.1.2c Rear penal of VET-OR1200R) Nomenclature Description Provides necessary relevant information of the imaging processor on Nameplate the nameplate. Ventilation grills The fan inside ventilates while the equipment is running. Insert compatible portable memory into this port to save images and USB2 port videos.
-
Page 17: Product Characteristics
Nomenclature and Functions Product characteristics This equipment is classified as class I. The ingress protection rating of the imaging processor is common device. Manufacturer: Shanghai AOHUA Photoelectricity Endoscope Co., Ltd Product name: Endoscope imaging processor; Model: VET-OR1200HD,VET-OR1200R,VET-OR1200HD-Li. Operating mode: continuous running. -
Page 18: Specifications
This endoscope is intended to be used with endoscopes and other ancillary equipment that comply with relevant regulations and standards. CAUTION ⚫ All interconnected devices shall comply with the relevant requirements for safety use. Technical specifications 2.4.3 Specifications Item VET-OR1200HD-Li VET-OR1200HD VET-OR1200R Dimension 360mm*300mm*160mm Correlated Color Temperature (CRI) Correlated Color Temperature 3000K-7000K... -
Page 19: Chapter 3 Installation And Inspection
Users need to provide 100-240V AC and 50/60 Hz power supply; if the voltage is not stable, automatically regulated power supply must be provided (over 1000W, residential used voltage regulator shall not be used.) Contact AOHUA for any questions. The same voltage regulator cannot be shared with other electrical products with large electricity consumption. - Page 20 CAUTION ⚫ For ancillary devices, such as recorders, printers, computer work stations etc., Consult AOHUA to confirm equipment compatibility. AOHUA is not responsible for any consequences caused by using of unapproved device. ⚫ When install the imaging processor, keep it away from equipment with high energy and high...
-
Page 21: Inspection Of The Power Supply
If the equipment fails to be turned ON, turn the endoscope imaging processor OFF. For VET-OR1200HD and VET-OR1200R: Confirm that the power cord is firmly connected. For VET-OR1200HD-Li: Confirm that the battery is normally working by checking the battery indicator as described in the section 4.4.13. -
Page 22: Inspection Of The Brightness Adjustment
3.4 Inspection of the brightness adjustment Confirm that the brightness of the examination lamp can be manually adjusted. ⚫ Do not look directly into the distal end of the endoscope when it is emitting light. Eye injury may result. Confirm that the endoscope is connected to the imaging processor, and the power switch is turned ON. Press the Light button on the front panel to ignite the examination lamp. -
Page 23: Inspection Of The Operation Mode Switch (Only For Vet-Or1200R)
Confirm that the endoscope imaging processor is turned OFF and the power indicator dims. ⚫ If the power indicator remains illuminated after turning the endoscope imaging processor OFF, do not use it, unplug the power cord from the wall mains outlet and contact AOHUA. For veterinary use only - 19 -... -
Page 24: Chapter 4 Operation
Operation The operator of the endoscope imaging processor must be a medical practitioner capable of safely performing endoscopy after operation technique training. This manual does not explain or discuss clinical endoscopic procedures. It only describes basic operation of the endoscope imaging processor. Before using the endoscope, ensure to perform preparation and inspection on the endoscope imaging processor as described in Chapter 3, “Installation and inspection”. -
Page 25: Adjusting The White Balance
Operation 4.3 Adjusting the white balance The white balance adjustment is used to display the correct image color on the monitor. Always adjust the white balance in the following cases: Before observation Any irregularities observed on the color of the image Check if the color of the endoscope image on the monitor is normal. -
Page 26: Schematic Diagram Of Panel
The schematic diagram of the panel button layout of the VET series imaging processor is shown in the Figure 4.4.1. Press the panel buttons to perform panel operations. a. VET-OR1200R b.VET-OR1200HD, VET-OR1200HD-Li ( Figure 4.4.1 Schematic diagram of the panel buttons) Examination lamp ignition 4.4.2... -
Page 27: White Balance Adjustment
Press and hold the W.B button or the “OTV W.B” button (for rigid endoscopes), the white balance adjustment indicator illuminates. Automatic white balance adjustment will be performed. (See the Figure 4.4.3) a. VET-OR1200R b.VET-OR1200HD, VET-OR1200HD-Li (Figure 4.4.3) Illuminated red indicator indicates the successful adjustment. -
Page 28: Automatic Gain Control (Agc)
Press the AGC button (See the Figure 4.4.5) to activate or deactivate the AGC function. Press this button again to switch the AGC level in the cycle of “1”, “2”, “3”, “0”,. The current status is shown on the monitor. a. VET-OR1200R b.VET-OR1200HD, VET-OR1200HD-Li (Figure 4.4.5) Hemoglobin enhancement 4.4.6 This operation can enhance the display of the blood vessels. -
Page 29: Freezing The Image
4.4.7 The endoscopic image can be frozen by this operation. Press the FREEZE button (See the Figure 4.4.7) to freeze image or release frozen image. a. VET-OR1200R b.VET-OR1200HD, VET-OR1200HD-Li (Figure 4.4.7) Image replaying 4.4.8 The frozen images can be replayed by this operation. -
Page 30: Iris Mode Setting
Press the IRIS button (See the Figure 4.4.9) to switch the IRIS mode to peak mode or average mode. The IRIS indicator will indicate the present statue of the IRIS mode a. VET-OR1200R b.VET-OR1200HD, VET-OR1200HD-Li (Figure 4.4.9) Video recording 4.4.10 The captured video can be recorded by this operation. -
Page 31: Taking Photo
USB flash drive. (The portable storage device must be inserted into the USB port of the imaging processor. Otherwise, this function is not available) a. VET-OR1200R b.VET-OR1200HD, VET-OR1200HD-Li (Figure 4.4.11) Air feeding 4.4.12 This operation feed the air through the endoscope into the target area. -
Page 32: Mode Selection (Only For Vet-Or1200R)
Operation MODE selection (only for VET-OR1200R) 4.4.13 Press the MODE button (See the Figure 4.4.13) several times to switch the brightness within four levels. (Figure 4.4.13) Moiré remove (only for VET-OR1200R) 4.4.14 Press the MORIE button(See the Figure 4.4.14) to activate the moiré remove function. Press this button again to deactivate this function. -
Page 33: Switch Operation Mode (Only For Vet-Or1200R)
Meanwhile, the illuminated green indicator turns to red, suggesting successful switch. (Figure 4.4.15) Battery usage check (only for VET-OR1200HD-Li) 4.4.16 The remaining battery life indicator is indicated on the front panel. See the Figure 4.4.16. (Figure 4.4.16) - Page 34 Operation CAUTION ⚫ Always check the battery life indicator before operation. Otherwise, patient injury may be caused. ⚫ When the usage of the battery meets the minimum usage limits, stop using this endoscope immediately for safety and charge the battery by using the battery adapter. For veterinary use only - 30 -...
-
Page 35: Fuse Replacement (Only For Vet-Or1200Hd,Vet-Or1200R)
Confirm that the power cord is unplugged from the power inlet before fuse replacement to prevent electric shock. ⚫ Never install a fuse that has not been approved by AOHUA or not fulfill the required specifications. Damage to the imaging processor, malfunction, electric shock or a fire may result. -
Page 36: Maintenance, Storage And Disposal Of The Imaging Processor
If any spare parts or electronic components of the endoscope imaging processor are broken, please be sure to use the spare parts or electronic components provided by AOHUA. AOHUA is not responsible for any damages caused by using spare parts or electronic components from the other companies. -
Page 37: Storage And Disposal
⚫ If the imaging processor has abnormal situations, please instantly stop using it, shut OFF the grid power supply and contact AOHUA. ⚫ When this product and its internal components are scrapped, please handle them as per the relative national regulations of waste disposal. -
Page 38: Chapter 5 Troubleshooting
Consult AOHUA. Otherwise, damages to the operator and/or the patient may result. NOTE ⚫ If an accessory of the endoscope imaging processor needs to be replaced, contact AOHUA to purchase a replacement. If any of the following irregularities is observed, do not use the imaging processor and solve the problem as described in the following table. -
Page 39: Troubleshooting
CAUTION ⚫ AOHUA is not responsible for any injuries to the human or damages to the imaging processor resulted from repair activities attempted by non-AOHUA personnel. ⚫ If any spare part or electronic component of the imaging processor is damaged, only use the spare parts or electronic components provided by AOHUA. -
Page 40: Chapter 6 Other Information
CAUTION ⚫ Before operation, inspect this instrument daily to ensure all technical requirements are fulfilled. If any nonconformity or damage is observed, contact AOHUA. NOTE ⚫ The warranty period of the imaging processor is 1 year. After replacement, fuse and other consumables can function normally. -
Page 41: Warranty Card Of Product
Shanghai AOHUA Photoelectricity Endoscope Co., LTD. Warranty policy : Provide the original invoice (or copy) of the product and contact AOHUA. Be sure to send the warranty card of the product within one month after purchasing this product. Warranty conditions: Within half year after purchasing, any quality failure of this product is warranted by AOHUA free of charge.
Need help?
Do you have a question about the VET-OR1200HD and is the answer not in the manual?
Questions and answers