Table of Contents
Advertisement
Quick Links
Advertisement
Table of Contents

Summary of Contents for Moss LED PixlArt 416
- Page 1 ARDWARE ANUAL V1.1...
-
Page 2: Table Of Contents
Contents Contents ..............................1 1 – Introduction ............................3 2 – Safety Notes ............................4 2.1 – Supplying Power ......................... 4 3 – Installation............................5 3.1 – Power ............................5 3.1.1 - Output Fuses ........................5 3.1.2 - Logic Power .......................... 5 3.2 - Control Data .......................... - Page 3 8.2 - No Status/Power LEDs On ......................15 8.3 – No Pixel Control ........................15 8.4 - Other Issues ..........................15 8.5 - Reset to Factory Defaults ......................15 9 - Warranty and Service........................17 © 2018 Moss LED Inc. PixlArt416 V1.0 User Manual V1.1...
-
Page 4: Introduction
PixlArt controllers in general. Please refer to the Diode Manager manual available on the PixlArt416 product page on our website. PixlArt416 V1.0 User Manual V1.1 © 2018 Moss LED Inc. -
Page 5: Safety Notes
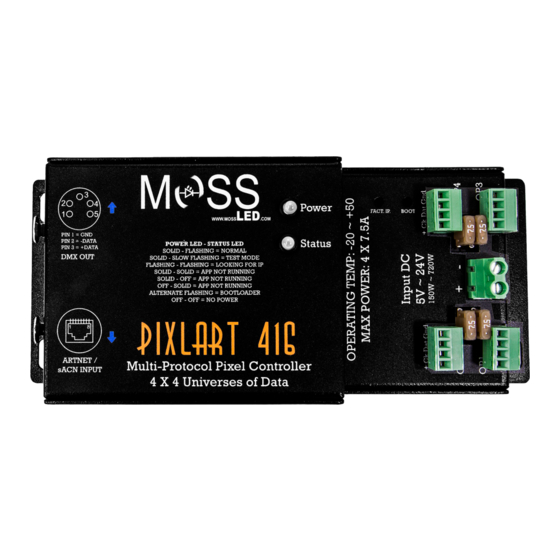
The total maximum allowable current through the controller is 30 Amps. Pixel Output 1 Pixel Output 2 Power Input Pixel Output 4 Pixel Output 3 Figure 1 PixlArt416 V1.0 User Manual V1.1 © 2018 Moss LED Inc. -
Page 6: Installation
Figure 2 on the following page. We recommend connecting all outputs to the PixlArt 416 de-energized to reduce the chance of an over-current surge which may cause the output fuse to ‘blow'. - Page 7 Warning: It is very important not to short +Ve onto the clock or data lines when using pixels greater than 5v. Note that this can also happen from poor waterproofing when rain shorts the higher voltage onto either of those wires in your pixels/wiring. PixlArt416 V1.0 User Manual V1.1 © 2018 Moss LED Inc.
-
Page 8: Network Configuration
IGMP snooping enabled network switch and router. In a single controller installation, it may be preferable to connect the controller directly to the host machine’s network adapter. PixlArt416 V1.0 User Manual V1.1 © 2018 Moss LED Inc. -
Page 9: Ip Addressing
IP address other than the default. Figure 5 shows a screenshot of typical computer network settings to communicate with a PixlArt416 for the first time without a router. PixlArt416 V1.0 User Manual V1.1 © 2018 Moss LED Inc. -
Page 10: Forcing The Default Ip Address
IP settings to what you prefer. After changing the settings or if you power the controller off and on again, the controller will revert to using the saved settings. PixlArt416 V1.0 User Manual V1.1 © 2018 Moss LED Inc. -
Page 11: Operation
Higher speed chips will result in higher refresh rates. PIXELS WITH NO CLOCK LINE ARE SLOW. The refresh rates on these pixels is unavoidably slower than clocked pixels. Moss LED recommends the use of clocked pixels whenever using a large number of sequential pixels on any output. Typically, the refresh rate can vary from 20 fps at the low end and up to 100 fps at the higher end. -
Page 12: Hardware Test Pattern
The hardware test requires that the pixel driver chip type and number of pixels per output are set correctly in the configuration. In this way you can test if that part of your configuration is correct and isolate other possible problems with the incoming Ethernet data side. PixlArt416 V1.0 User Manual V1.1 © 2018 Moss LED Inc. -
Page 13: Firmware Upgrades
4.1.1. 6.2 - Obtaining New Firmware For the latest firmware please visit MossLED website and visit the PixlArt 416 product page. The file you need comes in a “.hex” format that must be first unzipped from the “.zip” file you download. -
Page 14: Performing A "Forced Boot" Update
If you have performed a forced update and there are still problems, then you should try a factory reset as described in section 8.5. This will reset all settings back to the factory default ones after you’ve updated already to the latest firmware. PixlArt416 V1.0 User Manual V1.1 © 2018 Moss LED Inc. -
Page 15: Specifications
+/-5% Logic Current +/-10% Consumption (@ 5V) Aux Output Max +/-10% Operating +/-5% -40 to +80 °C Temperature Storage +/-5% -50 to +150 °C Temperature Individual Outputs (Max) Table 1 PixlArt416 V1.0 User Manual V1.1 © 2018 Moss LED Inc. -
Page 16: -Troubleshooting
Please refer to the table below for condition codes for the Ethernet jack status LEDs. LINK LED (GREEN) DATA LED (YELLOW) CONDITION CONNECTED OK, RECEIVING SOLID RAPID FLASHING DATA SOLID CONNECTED OK, NO DATA NO LINK ESTABLISHED, OR POWER IS OFF Table 3 PixlArt416 V1.0 User Manual V1.1 © 2018 Moss LED Inc. -
Page 17: No Status/Power Leds On
2. Power up the board. 3. Wait for both LEDs to flash together. 4. Release both buttons. 5. Power cycle (turn power off, wait 5 seconds then turn it on again). PixlArt416 V1.0 User Manual V1.1 © 2018 Moss LED Inc. -
Page 18: Warranty And Service
You may then either return the device to a local distributor or return it to us directly for warranty services. The PixlArt416 is supplied with a full 1-year factory warranty. PixlArt416 V1.0 User Manual V1.1 © 2018 Moss LED Inc.
Need help?
Do you have a question about the PixlArt 416 and is the answer not in the manual?
Questions and answers