Table of Contents
Advertisement
Quick Links
Advertisement
Table of Contents

Related Manuals for PHI VILLA AH-FP-28FC


Summary of Contents for PHI VILLA AH-FP-28FC
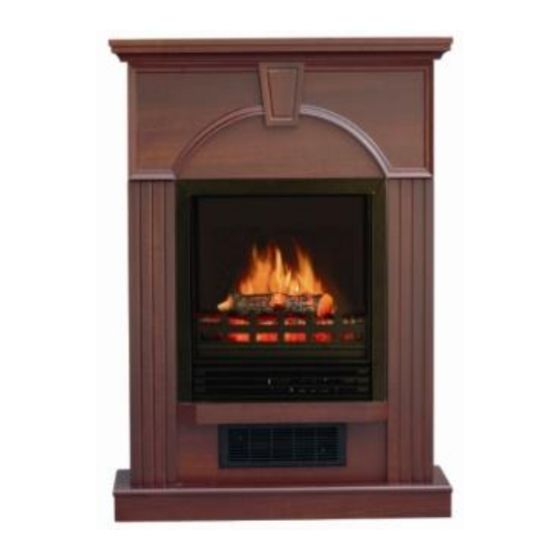
- Page 1 INSTRUCTION MANUAL ELECTRIC FIREPLACE HEATER Model:AH-FP-28FC (Insert No.NDF-65NB) ATTENTION: 1. Find a location for the electric heater that is protected from direct sunlight. 2. Do not plug the electric heater into the power outlet before you read all instructions.
-
Page 2: Important Safety Instructions
IMPORTANT SAFETY INSTRUCTIONS SAVE THESE INSTRUCTIONS FOR FUTURE USE WHEN USING ELECTRICAL APPLIANCES, BASIC PRECAUTIONS SHOULD ALWAYS BE FOLLOWED TO REDUCE THE RISK OF FIRE, ELECTRIC SHOCK, AND INJURY TO PERSONS, INCLUDING THE FOLLOWING: Read all instructions before using this heater. Failure to follow these important safety instructions may cause fire, electric shock or damage. - Page 3 used as a drying rack for clothing. Do not hand any decorations on the heater. 14)Do not modify this heater. Use this heater only as described in this manual. Any other use not recommended by the manufacturer may cause fire, electric shock, or injury to persons.
- Page 4 60 min Weight Limitation (Evenly) 44 lb 44lb...
-
Page 5: Parts List
Parts list TOOL REQUIRED: PHILLIPS HEAD SCREWDRIVER... -
Page 6: Installation
Installation: WARNING: Make sure the fireplace INSERT controls are in the OFF position and the INSERT is NOT plugged in. CAUTION: Place a piece of cardboard or protective sheet on the floor in order to avoid scratching the decorative surface of your mantle during assembly. Please DO NOT fully tighten the KD screws until all panels are assembled. - Page 7 Step 2: Attach the LEFT SIDE PANELS [H and K] to the LEFT FRONT PANELS [F] using 1 KD SCREW. Attach the RIGHT-SIDE PANEL [G and J] to the RIGHT FRONT PANEL [E] using 1 KD SCREW. See Fig. B. Fig.
- Page 8 Step 4: Place the LOWER FRONT PANEL [D] in between the lower section of 2 FRONT PANELS [E and F] and attach with 2 Large KD SCREWS [P] (1 screw for each side) See Fig. D. Fig. D Step 5: Place the UPPER FRONT PANEL [C] in between the upper section of 2 CONNECTORS [S] and attach with 4 Large KD SCREWS [P] (2 screw for each side) See Fig.E.
- Page 9 Step 6: Install the TOP PANEL [A] to the unit as shown and attach with 3 KD SCREWS. See Fig.F. Fig. F Step 7: Tighten all KD SCREWS. Step 8: Attach the LEGS [Q] to the INSERT with 8 LEG SCREWS [R] (4 screw for each side).
- Page 10 Step 9: Carefully place the INSERT into the unit opening. The front of INSERT should be flush with the front of the mantel. Once the INSERT is in place, attach 2 MOUNTING BRACKETS [V] with 2 KD SCREWS onto the bottom of insert. (1 screw for each bracket) See Fig.F.
- Page 11 After reading complete instructions, confirm all controls on fireplace are in the OFF position. Plug the fireplace into a 15AMP/120Volt outlet. If the cord does not reach, you may use an extension cord rated for a minimum of 1875 WATTS. Once the fireplace insert has been properly connected to a grounded, electrical outlet, it is ready to operate.
-
Page 12: Maintenance
Temperature Control: To adjust the temperature to your individual requirements, turn the temperature control dial to the right (clockwise) to increase the desired temperature and to the left for lower temperature. This temperature control dial can only be used while the O/I switch and 750W & 1500W switches are in the ON position. When the heater reaches the desired temperature, the heater and 750W/1500W indicator light will turn off but the fan will continue to operate. - Page 13 Cleaning: Before cleaning any parts of the fireplace make sure to first turn off the controls and then unplug the unit from power source. CAUTION: Wait until the unit has completely cooled before attempting any cleaning. Cleaning Glass Panel Remove dust with clean dry cloth. Remove fingerprints and other marks from glass door by using a clean damp cloth.
Need help?
Do you have a question about the AH-FP-28FC and is the answer not in the manual?
Questions and answers