Table of Contents
Advertisement
Quick Links
Advertisement
Chapters
Table of Contents

Related Manuals for Philips VTR8060


Summary of Contents for Philips VTR8060
- Page 1 使用手册 User manual...
-
Page 3: Table Of Contents
目录 6 手机 APP 智能操控 6.1 安装 APP 1 欢迎 6.2 网络设置 1.1 产品特点 6.3 启动 APP 6.4 APP 功能介绍 2 重要须知 2.1 安全 7 语音播放模式 2.2 听力保护 7.1 语音播放 7.2 循环模式 3 您的数码录音笔 3.1 供货范围 8 音乐播放模式 3.2 概览 8.1 音乐播放... - Page 4 9.5 文件夹选择 12.3 系统要求 9.6 录音类型 12.4 录音 9.7 背光时间 12.5 运行条件 9.8 录音背光 9.9 自动关机 9.10 语言选择 9.11 固件版本 9.12 恢复出厂设置 9.13 格式化设备 10 资源管理器模式 10.1 播放文件 10.2 文件删除 11 常见问题 11.1 录音笔无法录音 11.2 录音笔无法播放录音 11.3 手机 APP 无法使用 12 技术参数...
-
Page 5: 产品特点
1 欢迎 • 支持扩展 TF 卡 欢迎来到飞利浦世界!您能选择和购买飞利浦的产品,我们非 常高兴。您可在我们的官方网站上获得飞利浦公司的全方位技 术支持,如:使用手册、软件下载、保修信息等。 www.philips.com 1.1 产品特点 • 一键录音:“录音”键上推即可实现录音,下推则进入当前 录音播放暂停界面。 • 数字降噪:能有效地对录音环境周围的噪声给予滤除,从而 可以清晰地记录有效的声音。(此功能只建议在嘈杂的环境 中使用) • 支持 WIFI。 • 通过手机 APP 智能操控,实现远距离控制录音、录音保存等。 • 通过手机 APP 进行文件上传,快速传输分享。 • 通过手机 APP 对上传的文件文本转换,方便工作、学习。 • 高品质录音,最高采样率可达 192Khz。 • 以常见的 WAV 格式录音。... -
Page 6: 重要须知
2 重要须知 2.2 听力保护 使用耳机时请遵守下列原则: 2.1 安全 调整至合适的音量,切勿长时间使用耳机。 64GB 内存卡,请先在本机格式化后再使用。 特别需要注意,切勿将音量调至耳朵所能承受的范围之外。 为了避免短路,切勿将产品放置在触水受潮处。 切勿将音量调至盖过周边环境的声音。 不要将产品放在加热设备附近或阳光直射的地方。 在危险情况下请小心或暂停使用耳机。 请注意,切勿挤压电缆,特别是插头处。 在驾驶汽车、骑自行车、玩滑板时,切勿使用耳机。否则会导 特别声明:使用本产品前请仔细阅读本说明书,如因人为操作 致交通意外,且违反相关法律法规。 或不可抗力因素而导致数据丢失,本公司一概不予负责。特别 提醒用户小心操作,注意将资料另外备份。 小心 • 特别声明:使用本产品前请仔细阅读本说明书,如因人为 操作或不可抗力因素而导致数据丢失,本公司一概不予负 责。特别提醒用户小心操作,注意将资料另外备份。 • 图像仅作参考。飞利浦保留更改颜色 / 外观 / 设计 / 参数 / 产品功能的权利, 硬件、 软件、 APP 如有更新, 恕不另行通知。... -
Page 7: 您的数码录音笔
3 您的数码录音笔 3.2 概览 3.1 供货范围 Line in 接口 耳机接口 开机、关机、锁定键 复位键孔 TF 卡插槽... - Page 8 左内置麦克风 右内置麦克风 返回键 菜单、确认键 显示屏 播放键 上一曲、快退、音量加键 音量键 下一曲、快进、音量减键 一键 WIFI 键 一键录音键 喇叭 USB 接口...
-
Page 9: 开始使用
4 开始使用 4.1 开 / 关机 向下滑动开机键 2 到 3 秒钟后,本机立即自动开机或关机,然 后显示“PHILIPS 开关机图标”,如下图所示。 注意 • 除了录音过程中,在其他任何界面下,短按“ ”键即可 返回到上一个操作界面。 4.2 按键锁定(HOLD 功能) 然后机器进入主界面,主界面中包含有四个模块。下面四张图 片分别代表:音乐播放、设置、资源管理器、语音播放。 (1) 将开机键向上推至锁定位置,锁定录音笔上除了拨动录音 键的所有按键。 然后屏幕上显示 “锁定图标” , 如下图所示。 (2) 要解除按键锁定,请将开机键向下推至中间位置。... -
Page 10: 连接电脑
4.3 连接电脑 录音笔可作为大容量的 USB 存储设备,并可方便地对文件进行 存储、备份和移动。可使用 USB 数据线将录音笔与电脑相连, 且无须安装软件,录音笔会自动显示为可移动设备,连接电脑 图标如下图所示。 提示 • 在文件移入或移出录音笔时,请不要断开录音笔与电脑的 连接。 • 当录音笔与电脑连接时,对录音笔的手动操作将无效。 • 机器处于录音状态,连接电脑是不会变成可移动设备的, 请保存录音后再连接电脑。... -
Page 11: 一键录音模式
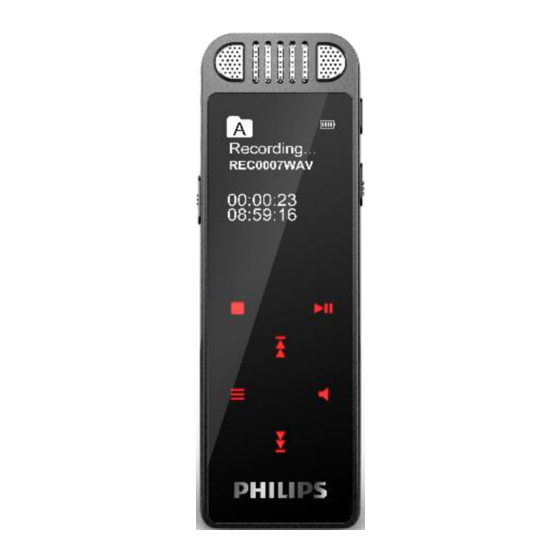
5 一键录音模式 录音界面说明 : 当您初次使用录音笔录音时,请注意本节中的内容说明! (1) 上推“录音”键开始录音,进入录音界面; 录音过程中请 将内置麦克风对准音源。 (2) 录音状态下,长按“ ”键 2~3 秒暂停录音,显示屏显示 录音状态图标显示暂停。 (3) 再次触摸“ ”键,继续录音。 (4) 下推“录音”键结束录音,并回到当前录音文件的播放暂 停界面。 当前文件夹 录音参考界面如下所示: 录音文件名 当前录音时间 电量提示 录音状态 剩余录音时间... - Page 12 提示 • 录音前,请先在系统设置模式设置所需的录音类型和录音 存储路径。注意:在系统设置模式的文件夹选择菜单里, “ ” 和 “ ” 触摸 键,可以在 A,B,C,D 四个文件夹之间 进行转换。录音文件可以在 A,B,C,D 这四个文件夹中进 行存储,每个文件夹最多可以录 99 个文件,存储满一个文 件后,系统会把随后录入的文件自动存储在下一个文件夹 中,如果,四个文件夹全部录满,要再进行录音,请先删 除一些不必要的文件再录。 • 请先测试录音,以确保录音笔设置正确。 • 机 器 支 持 外 置 存 储 卡, 最 大 支 持 64GB, 如 果 存 储 卡 为 64GB,...
-
Page 13: 手机 App 智能操控
机器第一次连接手机 WIFI 热点时,必须要进行热点连接配置, (1) 国内下载 如果机器与手机已连接过,则不需要配置,机器开机后直接长 Android 按“ ”键 2 秒直接连接。如果更换手机后,则需要再次配置。 • 可通过扫描二维码下载 • 可通过扫描二维码下载 配置方法 • 在 App Store 搜索“Philips VTR8060”下载 (2) 国外下载 先打开手机下载安装好的“VTR8060”APP,然后去打开机器端 Android 的 wifi 连接。 • 可通过扫描二维码下载 安卓手机 • 可通过扫描二维码下载 1、安装完成 APP 后,打开 APP。 在 App Store 搜索“Philips VTR8060”下载... - Page 14 • 少部分安卓手机跟 IOS 手机一样,需要自己去设置热点名 称和密码,具体操作参考苹果手机的网络配置。 苹果手机 1、苹果手机:APP 没有权限修改 IOS 手机的热点名称和密码, 因此需要手动去设置。 热点名称修改设置 : 在 “设置” 菜单 “通 如果 WIFI 图标变成“ ”,表示机器连接不上手机。参考界 用” “关于本机” “名称”修改为 VTR8060。热点密 面如下图所示 码修改设置:在“设置”菜单 “个人热点” 选择打开, “wifi 密码”修改为:12345678。 2、打开 APP。 “ ” 和 “ ” 3、按 选择“连接手机”, 按“...
- Page 15 果 WIFI 图标变成“ ”,说明机器已经连上手机。参考 设备 ID 界面如下图所示: 当机器连接上手机后,选择“设备 ID”选项,按“ ”键确认, 将会显示本机的设备 ID,这个地址是唯一的,参考界面如下图 所示: 如果 WIFI 图标变成“ ”,表示机器连接不上手机。参考界 面如下图所示: 同时如果有机器连接上了手机 APP,APP 上也会显示一个设备 ID,可以查看所连接的机器。 注意 注意 • 在 WIFI 连接的过程中不要查看设备 ID,连接上手机或者连 接失败后再查看设备 ID。 • 如果 WIFI 图标一直闪动超过一分钟后仍未连接上,请关闭 WIFI,然后重复上面的操作。 • 在初次使用 APP 时留意提示信息。 关闭...
-
Page 16: 启动 App
控制机器录音 6.3 启动 APP 机器与手机连接好后,在手机 APP 主界面点击“录音”,机器 在 手 机 桌 面 上 点 击 应 用“ ”, 将 会 启 动 VTR8060 配 备 的 就会自动进去录音, 手机 APP 里可以控制机器录音、 保存等操作, APP,参考界面如图所示: 方便远程操控机器。 (1) 可 以 设 置 录 音 品 质, 录 音 品 质 类 型:8Khz/16bit、... - Page 17 提示 • APP 与 机 器 连 接 时, 请 先 打 开 手 机 端 APP, 再 打 开 机 器 wifi。 • 拷备文件到机器上时不要放在根目录下,请先创建一个文 件夹拷备到文件夹里面,或拷备到机器自带的 ABCD/MUSIC 文件夹里面,否则会影响 APP 的正常使用。 • 当机器与手机 APP 连接后,机器就处于手机 APP 控制操作, 机器端除了录音操作以外的其他操作功能不响应。 • 如果 APP 提示了目录满或者内存满,请先删除一些不必要 的文件再录。...
- Page 18 (2) 选择所需要下载的文件,然后点击文件右边的“ ”下载 (1) 点击“A”文件夹后进入下载目录文件列表界面如下图所示: 按钮,手机端会显示下载进度,参考界面如下图所示:...
- Page 19 (3) 下载完成后,手机端参考界面如下图所示:...
- Page 20 注意 • 下载目录最多只能存放 99 个文件,如果文件夹中超过 99 个文件,请先删除请先删除一些不必要的文件再录。 • 如果是拷贝到机器的文件,格式只能是 MP3 或者 wav 格式, 文件名只能是英文字母和符号,否则无法显示和下载。 • 手机操控机器端录音,连接超出有效距离时,手机端提示 断开,机器端还在继续录音时,可以拨上录音键再拨下来 保存当前文件。 语音转文本 手机 APP 可以将下载到手机的音频文件进行转文本。在机器处 于连接手机的情况下,在 APP 主界面点击“文本转换”将会打 开语音转文本功能,参考界面如下: 点击需要转换为文本的音频文件后,进入语音播放的界面,并 默认进行录音文件转文本,也可以选择不转文本,参考界面如 下图所示:...
-
Page 22: 语音播放模式
7 语音播放模式 7.1 语音播放 (1)在语音播放过程中,短按“ ”键暂停播放,再次按下“ “ ” 和 “ ” 在主界面通过 键选择“语音模式”,然后短按 ”键将继续先前位置的播放。 “ ”键确认进入,语音模式参考界面如下图所示: “ ” 和 “ ” (2)短按 键选择上一曲或者下一曲; “ ” 和 “ (3)短按“ ”键,将会显示音量图标,此时短按 ” 可以调整音量值,再按一次“ ”键退出音量调整。 “ ” 和 “ ” (4)播放时长按 键可快退或者快进当前正在播放 的文件。 (5)播放时短按“... - Page 23 (1)目录循环:循环播放选中目录的文件。 (2)单曲循环:一直循环播放选中的当前文件。 提示 • 录音文件在电脑上播放,因为比特率高,不建议用系统自 带的播放器播放,可用迅雷或者暴风影音等。 • 192Khz 录音文件,本机播放不支持快进快退。...
-
Page 24: 音乐播放模式
8 音乐播放模式 音乐播放界面说明: “ ” 和 “ ” 在主界面通过 键选择“音乐播放”,然后按“ “ ” 和 ”键进入音乐播放歌曲列表界面。在此界面下可以通过 “ ” 键选择所需要播放的音乐文件,然后短按“ ”键确认选 择进入音乐播放界面,音乐播放参考界面如下图所示: 当前文件名 歌曲频谱 当前播放时间 文件总播放时间 音效 注意 总文件数 • 音乐文件只能放在“MUSIC”文件夹里面进行播放。 当前文件序数 循环模式 电量指示... -
Page 25: 音乐播放
8.1 音乐播放 (1)在音乐播放过程中,短按“ ”键暂停播放,再次按下“ ”键将继续先前位置的播放。 “ ” 和 “ ” (2)按 键选择上一曲或者下一曲; “ ” 和 “ ” (3)按“ ”键,将会显示音量图标,此时按 可 以调整音量值,再按一次“ ”键退出音量调整。 “ ” 和 “ ” (4)播放时长按 键可快退或者快进当前正在播放 (1) 目录循环:循环播放选中目录的文件。 的文件。 (2) 单曲循环:一直循环播放选中的当前文件。 (5)播放时短按“ ”键停止播放,并立即返回音乐播放歌曲 列表界面 。 8.3 音效模式 8.2 循环模式... -
Page 26: 删除文件
注意 • 除了录音过程中,在其他任何界面下,触摸“ ”键即可 返回到上一个操作界面。 “ ” 和 “ ” 按 选择是否删除文件,然后短按“ ”键确认。 8.4 删除文件 (1)在音乐播放列表界面,选中要删除的歌曲,长按“ ” 键 2~3 秒松开后弹出“删除”选项 , 参考界面如下图所示:... -
Page 27: 系统设置
9 系统设置 “ ” 和 “ ” 在主菜单下,按 键选择“设置”,再按“ ”键 将会进入系统设置界面。系统设置界面相关参考图片如下图所 示,包括:系统时间、WLAN、放音设置、内存选择、文件夹选择、 录音类型、 背光时间、 录音背光、 自动关机、 语言选择、 固件版本、 恢复出厂设置、格式化设备。 9.1 系统时间 系统时间设置参考界面如下:... -
Page 28: Wlan
9.4 内存选择 使用此功能,你可以使用本机内存或外置卡内存来工作。 注意 • WIFI 和外置卡不能同时使用,在使用外置卡时,打开 WIFI 将会自动断开外置存储卡。 “ ” 和 “ 短按 “ ” 键选择所要调整的年、 月、 日、 时、 分, 按 ” 改变相应位置的数值,按“ ”确认并返回上一级菜单。 9.5 文件夹选择 在 文 件 夹 选 择 菜 单 中, 你 可 以 选 择 录 音 文 件 保 存 的 路 径, 9.2 WLAN 文件夹选择参考路径如下:... -
Page 29: 录音类型
9.6 录音类型 在 录 音 类 型 选 择 菜 单 中, 你 可 以 选 择 不 同 的 录 音 类 型, 它 们 分 别 是:96Khz/24bit、96Khz/16bit、192Khz/16bit、 8Khz/16bit、 RNC 共五种类型。 录音类型选择菜单参考界面如下: 9.8 录音背光 本机可以设置录音时是否将背光恒亮, 可以试试查看录音状态, “ ” 和 “ ” 录音默认背光恒亮。按... -
Page 30: 语言选择
9.12 恢复出厂设置 使用此功能,你可以选择是否恢复系统默认参数。 9.13 格式化设备 使用此功能,你可以格式化本机器内存和外置卡内存。 9.10 语言选择 在语言选择菜单中,你可以选择一种语言作为系统语言。语言 选择参考界面如下: 9.11 固件版本 使用此功能,你可以随时查看当前固件版本信息。... -
Page 31: 资源管理器模式
10 资源管理器模式 10.1 播放文件 “ ” 和 “ ” 在文件夹列表界面按 键选择需进入的文件夹,然 该模式可以查看和管理系统中的所有音乐文件和录音文件。在 后短按“ ”键进入文件列表界面,参考界面如下图所示: “ ” 和 “ ” 主菜单下,按 键选择“资源管理器”,再按“ ”键将会进入资源管理器界面,参考界面如下图所示: “ ” 和 “ ” 在文件列表界面按 键选择要播放的文件,然后按 短按“ ”键后可以看到“A”, “B”, “C”, “D”和“MUSIC” “ ”键进入播放。 五个文件夹,其中“MUSIC”文件夹下保存了系统中的所有音乐 文件,“A”、“B”、“C”和“D”文件夹下保存系统中所有 的录音文件。界面如下图所示: 10.2 文件删除 “... - Page 32 “ ” 和 “ ” 在文件列表界面按 键选择要删除的文件,然后长 按“ ”键进入删除。参考界面如下图所示: “ ” 和 “ ” 按 选择是否删除文件,然后短按“ ”键确认。...
-
Page 33: 常见问题
安卓手机:请去设置 - 应用程序权限,查看 Philips VTR8060 的权限。 苹 果 手 机: 请 去 设 置 查 看 Philips VTR8060 的 权 限。 并 且 检 查 热 点 名 称 是 否 已 经 更 改 为“VTR8060”, 密 码 是 否 更 改 为 “12345678”。... -
Page 34: 技术参数
12 技术参数 8Khz/16bit: 比特率为 8Khz,格式为 WAV RNC: 比特率为 48Khz,格式为 WAV. 12.1 存储器 12.5 运行条件 内置存储器类型:EMMC 闪存 温度:5° ~–45° C 移动存储器:Micro SD, 最高支持 64GB 空气湿度:10% – 90%, 不凝结 12.2 尺寸和重量 宽 × 高 × 深:34×104×10.2(mm) 重量 (含电池):56g 12.3 系统要求 操作系统:Windows 10/8/7/XP/Vista/2000,Linux 接口:USB 接口... - Page 35 Content 6.4 Introduction to the APP functions 7 Play mode 1 Welcome 7.1 Voice play 1.1 Product features 7.2 Playback mode 2 Important Reminders 8 Music mode 2.1 Safety 8.1 Music play 2.2 Hearing Protection 8.2 Playback mode 8.3 Sound effect mode 8.4 Delete Files 3 Your Voice digital recorder 3.1 What’s in the gift box?
- Page 36 10.1 File play 10.2 File delete 11 Frequently Asked Questions 11.1 Recording cannot be started 11.2 Playback cannot be started 12 Technical parameters 12.1 Memory 12.2 Size and weight 12.3 PC Interface 12.4 Recording 12.5 Operating conditions...
-
Page 37: Welcome
• Access to the audio file and data by using high-speed USB 2.0. Welcome to the world of Philips! We are honored by your • It is able to be used as a large capacity USB storage device choice and purchase of Philips’ products. You can have Philips’... -
Page 38: Important Reminders
• Attention! Before using the device please read this User Manual carefully. Philips shall not be liable for any data loss due to erroneous operation or causes of a force majeure 2.2 Hearing Protection nature. -
Page 39: Your Voice Digital Recorder
3 Your Voice digital recorder 3.2 Overview 3.1 What’s in the gift box? Line in Jack Headphone Jack Power On, Power Off, HOLD Reset TF card Slot... - Page 40 Left built-in Microphone Right built-in Microphone Back Key Confirm Key Display Screen Play Previous Track, FR Volume Next Track, FF WIFI One-touch recording Speaker...
-
Page 41: Start To Use
4 Start to Use 4.1 Power On/Off Slide down and hold POWER button for 2 seconds, the device will start or shutdown and then displays “PHILIPS”, as shown below. Then, enter the main interface which contains four modules as shown below, which represent respectively: play music,... -
Page 42: Keypad Lock (Hold Function)
Reminder 4.3 Connection to Computer • Short press the “ ” key under any other interface to When TF card is inserted or without TF card, the device can return to the main interface except in the process of be used as a USB mass storage device to conveniently store, recording. -
Page 43: One-Touch Recording Mode
5 One-touch Recording Mode Explanation of the recording interface: Please Reminder the instructions in this chapter for first use of the device. (1)Slide up the “Record” key to enter the recording interface to start recording. Please direct the built-in microphone to the audio source during recording. - Page 44 Reminder • Before recording, enter the system settings module to set the required recording type and storage path. Reminder: In the folder selection menu of the system settings mod- ule, touch the “ ” and “ ” keys to switch between the four folders of A, B, C, and D, which are used to store the recording files.
-
Page 45: Smart Control By Mobile Phone App
“ ”for 2 second for For IOS: direct connection. • Download by scanning QR code • Search for “Philips VTR8060” in App Store and download (2) Download in Foreign Country Configuration method For Android: • Download by scanning QR code In the main “menu,press “... - Page 46 IOS phones, the user needs to set them manually. To revise hotspots, go to General on the setup menu and change the name of the device to VTR8060. To revise a hotspot password, open “Hotspot” on the setup menu and change the wifi password to...
-
Page 47: Run The App
When WIFI is on, long press “ ”to disconnect WIFI. 6.3 Run the APP Click the icon of “ ” to run the APP of VTR8060, the interface is shown below: 6.4 Introduction to the APP functions Controling recording with the device When the device is connected to the phone, it may be re- motely controlled by clicking “Record”... - Page 48 Downloading recorded files (2)Click“Start recording”and the device will start recording. The recording interface on the phone is shown below: The phone APP may be used to upload the audio files on the device to the phone memory. When the device is connected to the phone, click “files download”.
- Page 49 (1)Click “A” to enter a file folder for uploading, as shown (2)Select a file for uploading, click “Downloading”on the right below: side of the file, as shown below:...
- Page 50 (3)After downloading, the interface on the phone will be Reminder shown below: • The uploading folder can hold a maximum of 99 files. In case the folder reaches maximum, some unnecessary files should be deleted before uploading. Voice to text The APP on the phone may be used to convert voice files into text.
- Page 51 Click an audio file to convert to text and enter the following voice play interface to start converting, as shown below:...
-
Page 53: Play Mode
7 Play mode 7.1 Voice play (1)While in play,short press “ ” to pause,press again to In the main menu, press “ ” or “ ” to select“voice resume playing. mode”,then short press “ ” to enter, as shown below: (2)Short press “... - Page 54 (1)Directory loop: Loop play the selected files in the directory. (2)Single loop: Loop play the current file.
-
Page 55: Music Mode
8 Music mode Description of the interface is as follow: In the main menu, press “ ” or “ ” to select“music play”,then press “ ” to enter the music play folder. In this folder, press “ ” or “ ” to selct a music file,then short press “... -
Page 56: Music Play
8.1 Music play (1)While in play,short press “ ” to pause,press “ ” again to resume playing. (2)Short press “ ” or “ ” to select previous track or next track. (3)Short press“ ”to display volume icone,then press “ ” and “... -
Page 57: Delete Files
“delete”,choose the “OK” to complete the deletion of the selected music. Or choose in order of: Resource Manager-》VTR8060(C:)-》MUSIC,press the “menu” key to enter the playlist,long press the “menu” key to pop up the “delete”,choose the “OK” to complete the... -
Page 58: System Settings
9 System Settings Under the main menu, select the system setting mode, and then press the menu key to enter the system settings interface. The pictures of system settings interface are shown below, including: system time, WLAN, playback settings, folder selection, recording type, backlight time,Back Light Recording, timed shutdown, language selection, initialization, factory reset, and format memory. -
Page 59: Wlan
9.4 Folder Selection In the menu of folder selection, you can select the storage path to save the recording file. The reference path of the folder selection is as follow Under this menu, press “ ” to select time and date, press “ ”... -
Page 60: Backlight Time
9.7 Auto off If no operation to the device within the set time, the system will shut down. The reference interface is as follow: 9.6 Backlight time Backlight time is available in five durations: 15 seconds, 30 seconds, and 45 seconds, 1 minute and off (0 second). If no operation to the device within the set time, the backlight will turn off. -
Page 61: Firmware Version
9.9 Firmware Version You can check the information of current firmware version at any time through this function. 9.10 Factory Reset You can choose whether to reset the system default parame- ters through this function,. 9.11 Format You can format the internal or external storage through this function. -
Page 62: File Explorer
In this mode, you can check and manage all the music and recordings in the system. Choose in the order of: the File Explorer Mode - 》VTR8060 (C:), touch the “menu” key, you can see two folders of “MUSIC” and “Flash Memory”, where “MUSIC”... -
Page 63: File Delete
10.2 File delete Under the folders menu, press “ ” or “ ” to select a folder,then short press “ ” to enter. The interface is shown below: Press “ ” or “ ” to select a file,then long press “ ”... -
Page 64: Frequently Asked Questions
If the problem cannot be solved, please contact the dealer or visit our official web- site: www.philips.com/support 11.1 Recording cannot be started Please delete some recordings or replace the TF card if the maximum storage capacity of the device is exceeded. -
Page 65: Technical Parameters
12 Technical parameters RNC : Bit rate is 48khz in WAV format 12.5 Operating conditions 12.1 Memory Temperature: 5°–45°C Built-in storage type: EMMC flash memory Air humidity: 10% – 90%, non-condensing USB Portable Disk : Yes Max: Support 64GB SD card 12.2 Size and weight Width ×... - Page 67 VTR8060...
- Page 70 Register your product and get support at © 2019 Speech Processing Solutions GmbH. 版权所有文档版本 1.1, 2019/11/29 www.philips.com/welcome...
Need help?
Do you have a question about the VTR8060 and is the answer not in the manual?
Questions and answers