Advertisement
Table of Contents
- 1 Important Operation Notes
- 2 Getting Started
- 3 Setup Sensors
- 4 Important Notes
- 5 System Start
- 6 Specifications
- 7 General Information
- 8 System Requirements
- 9 Installation of the "Easyweather" Software
- 10 Basic Settings of the "Easyweather" Software
- 11 System Option
- 12 Record Option
- 13 What to Do if Graph Function Is Not Working
- 14 Help Option
- 15 Legal Notes
- Download this manual
About this manual
Thank you and congratulations on selecting this professional weather station! We are positive you will
enjoy the benefits of accurate weather readings and the precise radio controlled time information that
our instruments offer.
This manual will guide you step-by-step through setting up your WS-1081PC Touch Screen Weather
Station device.
Use this manual to become familiar with your professional weather station, and
save it for future
reference.
Glossary of Common Terms
LCD
"LCD" is an acronym for "Liquid Crystal Display". This is a common type of display screen used in
televisions, computers, watches, and digital clocks.
BAROMETER & BAROMETRIC PRESSURE
A barometer is a device that measures the pressure of the air pushing on it—this measurement is
called the barometric pressure. We don't actually feel the barometric pressure because the air
pressure is pushing equally in every direction.
RELATIVE AIR PRESSURE
Relative air pressure is the same as the barometric pressure. The calculation of relative air pressure
is a combination of the absolute air pressure and the altitude.
ABSOLUTE AIR PRESSURE
Absolute air pressure is the actual air pressure on the barometer without regard to altitude.
INCHES OF MERCURY (inHg)
Inches of Mercury are the common unit of measurement for air pressure in the United States.
HECTOPASCALS (hPa)
Hectopascals are the common units of measurement for air pressure in the International System (SI)
of measurement. The hectopascal holds the same value
Important Note:
Before inserting batteries, please carefully read the operation manual.
The touch screen weather station includes a base station (receiver), a transmitter unit, one wind
direction sensor, one wind speed sensor, one rain gauge, USB cable and a PC software package on
CD-ROM.
The Base Station is equipped with a Touch Screen LCD Monitor and allows the display of a large
variety of time and weather data.
Left Top LCD:
Right Top LCD:
Left Middle LCD:
Right Middle LCD:
Bottom Line LCD:
Note: The presence of the "Alarm-On icon" in the section means that the particular alarm has been
enabled.
TOUCH SCREEN WEATHER STATION
(WIND AND AIR PRESSURE)
Operation Manual
IN-OUT temperature and humidity
Wind and Rain measurement
Weather Forecast (Tendency)
Air Pressure and Air Pressure History
Time and Date, Memory Data Usage
WS 1081PC
-
- 1 -
Advertisement
Table of Contents

Summary of Contents for Maxkon WS-1081PC
- Page 1 This manual will guide you step-by-step through setting up your WS-1081PC Touch Screen Weather Station device. Use this manual to become familiar with your professional weather station, and save it for future reference.
-
Page 2: Important Operation Notes
An added feature of the Weather Station is the readout of all measured and displayed time and weather data on a PC. Important Operation Notes All actions and functions of the weather station are started on the touch screen by slightly touching (not pressing!) the related areas, touch the flashing +, ON/OFF or –... - Page 3 ③ ⑤ ④ - 3 -...
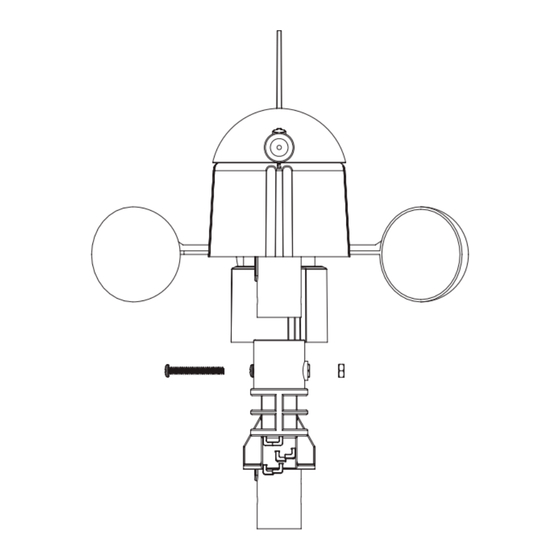
- Page 4 The wind gauge’s cable is connect to the input on the wind direction sensor The wind direction sensor’s cable is connected to the input marked Wind on the thermo-hygro sensor (see fig.6) The rain sensor’s cable is connected to the input marked Rain on the thermo-hygrosensor(see fig.7) - 4 -...
-
Page 5: Important Notes
⑧ Important Notes: On the edge of wind direction sensor, there are four alphabet letter of “N”,”E”,”S”and “W” representing for the direction of North, East, South and West. Wind direction sensor has to be adjusted so that the directions on the sensor are matching with your real location. Permanent wind direction error will be introduced when the wind direction sensor is not positioned correctly during installation. - Page 6 Positioning Once you have verified that all of the components of the weather station are working, they can be positioned in their permanent places. Before permanently mounting, make sure that all components work properly together at their chosen mounting or standing locations. Note: Commonly the radio communication between receiver and transmitter in the open field can reach a distance of up to 330 feet providing that there are no interfering obstacles such as buildings, trees, vehicles, high voltage lines, etc.
- Page 7 5)Touch the INDOOR TEMPERATURE section the fifth time to display minimum indoor temperature record, the minimum records will be flashing, MIN icon will light up as well. Hold the flashing min value for 3s, the minimum value will be reset to current reading. outdoor temperature Activate the outdoor temperature related setting by 1)Touch the OUTDOOR TEMPERATURE section, + button and –...
- Page 8 Activate the indoor humidity related setting by 1)Touch the INDOOR HUMIDITY section again to set the indoor humidity high alarm function, the +, ON/OFF and – button will be flashing, HI AL icon will light up. Touch the+ button or – button to change the value, hold the+ button or –...
- Page 9 Rain Activate the rain related setting by 1)Touch the rain section, + button and – button will be flashing. Touch the + button or – button to Shift the display between 1h,24h,week,month and total rain. 2)Touch the rain section again, + button and – button will be flashing. Touch the + button or – button to select rain fall unit between mm,inch.
- Page 10 Pressure 1)Touch the PRESSURE section, + button and – button will be flashing. Touch the + button or – button to Shift the display between Absolute pressure and Relative pressure. 2)Touch the PRESSURE section again, + button and – button will be flashing. Touch the + button or –...
- Page 11 or – button to set the DST ON or OFF(this function is only available for WWVB version, while for DCF version, this feature is not activated). 5)Touch the TIME section the fifth time to set the hour, the + and – button will be flashing. Touch the+ button or –...
- Page 12 PC Connection As an important feature in addition to the display on the Touch Screen, the Weather Station allows the read-out of all measured and displayed time and weather data in form of complete history data sets on a Data Storage For a comprehensive weather history, the Base Station allows the internal storage of up to 4080 complete sets of weather data with time and date.
-
Page 13: Specifications
When memory is full, it will take about two minutes to upload all history data into PC and it takes another two minutes to process all history data for graphic display. Further detailed PC software user manual can be found from the help menu. Specifications - 13 -... - Page 14 Remark: where outdoor temperature is lower than -20˚C, make sure proper type of batteries to be used to assure that the device can get enough power to maintain its function properly. Normal alkaline batteries is not allow to be used since when outdoor temperature is lower than -20 ˚C, the battery’s discharging capability is greatly reduced.
-
Page 15: General Information
EasyWeather PC Software User Manual 1.0 General Information This Weather Station is a high quality, easy to use weather monitoring system that reads, displays and records the weather data from internal as well as external sensors. Besides the internally measured values for indoor temperature, indoor humidity and air pressure the outdoor sensor will take data for temperature and humidity, wind and rainfall. -
Page 16: Basic Settings Of The "Easyweather" Software
4.0 Basic Settings of the “EasyWeather” Software After the “EasyWeather.exe” program has been started, the following main window will appear on the PC screen: All the settings from the base unit is mirrored into the PC software, so once you have done your setting on the base unit, then you don’t need to make any setting changes on the PC software. -
Page 17: System Option
4.1 System option 4.1.1 Click System button, enters the Setting menu This section is used to set up PC software display, base station units. Once you made your choice, press Save to make the setting effective. - 17 -... - Page 18 Click Alarm button, enters the Alarm menu 4.1.2 This section is used to set the desired time, high or low alarm value for the base unit, as well as able or disable the corresponding alarm function. Once you made your choice, choose Save to make the setting effective.
-
Page 19: Record Option
4.1.4 Click Language button, enters the Language menu 4.2 Record option 4.2.1 Click History button, enters the History menu This section is used to display recorded history data in a spread sheet. If you wanted to see all history data in a desired time period, choose the time duration and press Search to reload the history data. With the Export button, you can export the selected history data into excel format file for other application purpose. - Page 20 The software version 6.2 use .dat file format, the software version above 6.2 use .mdb format. Press the Import button, you can import the old version data to the new version data to migrate the two different data base data. When memory on base station is full, press “Clear Memory”...
- Page 21 With the Export as image button, you can export the selected graph into .jpeg format file. You can change the Y axel by scrolling the mouse up and down roller. - 21 -...
-
Page 22: What To Do If Graph Function Is Not Working
What to do if graph function is not working This is the most encountered problem with this software. To make the graph function working properly, please check the following step: 1, find the folder where the “EasyWeahter.exe” file is located 2. - Page 23 4.3 Upload option 4.3.1 Click Upload button, enters the upload menu User can upload data to website. www.wundergound.com or their own website. If user choose www.wundergound.com, he do not need to set the server, server type and port. If user choose custom, he need to set the server, server type and port.
-
Page 24: Help Option
Note: How to create a Wunderground.com® account and station ID. 1. Join the wunderground.com® Community. Visit: https://www.wundergro und.com/members/signup.asp and sign up with wunderground.com®. 2. Join the Personal Weather Station (PWS) network. Visit: http://www.wunderground.com/weatherstation/about.asp and Get Started! to add your weather station and you will receive a Station ID. Enter the Station ID obtained and password you use to log into wunderground.com®...
Need help?
Do you have a question about the WS-1081PC and is the answer not in the manual?
Questions and answers