Table of Contents
Advertisement
Quick Links
CONTENTS
F/HF RADIO EQUIP ENT
* Operating method of the distress alarm signal transmit
RG-400
1.1 Features ·······························································································································································1
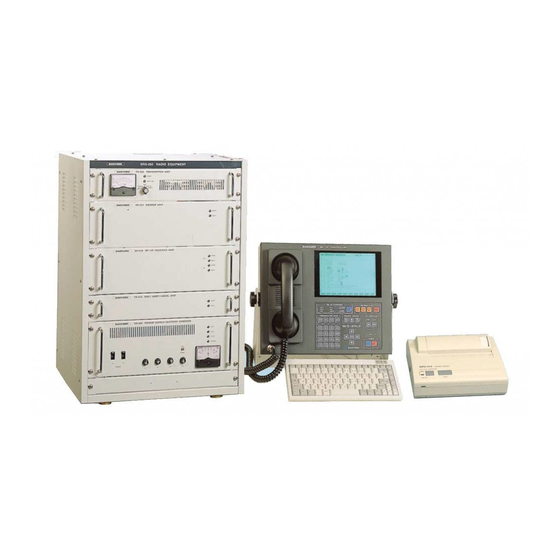
1.2 Basic configuration ·······································································································································2
2.1 General pecifications ······································································································································4
2.2 MF/HF Transmitter (TR-326) ···················································································································· 4
nstruction Manual
2.3 MF/HF Receiver ( R-510) ··························································································································· 5
2.4 MF/HF Controller (REM-250) ····················································································································· 6
2.5 Printer (DPU-414) ··········································································································································· 7
2.6 D C/NBDP/LOCAL(TR-346) ······················································································································· 7
2.7 Turn on Power ················································································································································ 8
2.8 Operating with AC power ·························································································································· 8
2.9 Operating with DC(Battery Power) ··········································································································· 8
2.10Battery charger( R-308 Power supply by Battery charger) ······························································ 8
3.1 Power input ........................................................................................................................................................ 11
3.2 Operating on AC power ································································································································11
3.3 Operating on DC power(Battery) ················································································································11
3.4 Charge the battery ··········································································································································11
4.1 Communication mode selection ··················································································································13
4.2 Normal keys ···················································································································································13
4.3 peaker control ··············································································································································13
4.4 D C Watchkeeping ·······································································································································13
4.5 Transmitting distress alert signal ············································································································13
4.6 Power control ·················································································································································13
4.7 DC operation ···················································································································································14
4.8 Other controls ·················································································································································14
4.9 Keyboard ····························································································································································14
4.10 LCD ···································································································································································14
4.11 Class of LCD screen ····································································································································14
5.1 electing TEL Mode ······································································································································21
5.2 Initial screen of TEL Mode ·························································································································22
5.3 etting Transmit and Receiving Frequencies ·························································································23
Advertisement
Table of Contents

Subscribe to Our Youtube Channel
Summary of Contents for Samyung ENC SRG-400
-
Page 1: Table Of Contents
CONTENTS F/HF RADIO EQUIP ENT * Operating method of the distress alarm signal transmit 1. OVERVIEW RG-400 1.1 Features ·······························································································································································1 1.2 Basic configuration ·······································································································································2 2. SPECIFICATIONS 2.1 General pecifications ······································································································································4 2.2 MF/HF Transmitter (TR-326) ···················································································································· 4 nstruction Manual 2.3 MF/HF Receiver ( R-510) ··························································································································· 5 2.4 MF/HF Controller (REM-250) ·····················································································································... - Page 2 5.4 etting Transmitter ········································································································································25 7.13 et up TELEX mode ···································································································································86 5.5 Tuning the Antenna ·······································································································································25 7.14 The test of TELEX mode ··························································································································88 5.6 etting Receiver ··············································································································································26 7.15 NAVTEX(Marine transportation broadcast) receiving ········································································89 5.7 Communications ···············································································································································28 8. RADIOTELEGRAPHY (CW) ODE 5.8 canning the received signal........................28 5.9 Registering stations and frequencies ·········································································································28 8.1 electing Radiotelegraphy (CW) Mode ·····································································································91 5.10 Printing out station and frequency ··········································································································29...
-
Page 3: Overview
12.10 Dimmer set ·················································································································································120 12.11 Memory clear ·············································································································································121 12.12 Clear data for storage ······························································································································121 12.13 ROM Version ·············································································································································121 OVERVIEW... -
Page 4: Features
1.2 Basic configuration . OVERVIEW S G-400 consists of following modules, which divided into two lists : standard configuration and optional configuration. eliable GMDSS (Global Maritime Distress and Safety System) communication requires improved technology through automation and digital electronics. S G-400 MF/HF adio Equipment, designed and <<... -
Page 5: Specifications
2. SPECIFICATIONS 2.1 General Specifications S G-400 MF/HF adio equipment has been tested according to the IMO Performance Standard for GMDSS. ◦ Frequency range : Transmitting 1.6MHz 27.5MHz, 100Hz Steps ~ eceiving 1.6MHz 27.5MHz, 10Hz Steps ~ ◦ Frequency stability : Synthesizer method, Within 10Hz (0.3ppm max.) ±... -
Page 6: Mf/Hf Controller (Rem-250)
at F1B/J2B b) The detailed characteristics of 0.3KHz filter (for DSC, NBDP) The passband below 6dB is 270Hz 300Hz 138Hz : 15dB or more ~ Attenuation at 380Hz is 30dB or more ± 276Hz : 31dB or more Attenuation at 550Hz is 60dB or more ±... -
Page 7: Printer (Dpu-414)
key jack, dimmer Output level : Maximum + 10dBm (600 ohm unbalanced / balanced) ◦ ◦ Dimensions : 295mm(W), 215mm(D), 75mm(H) Demodulator : Input frequency : 1700Hz 85Hz ± ◦ Weight : 3Kg approx. Input level : -20dBm +5dBm (600 ohm unbalanced / balanced) ~... -
Page 8: Turn On Power
2.7 Turn ON POWE a) Connect AC & DC POWE from Ditribution of power. b) Turn on the AC lever switch of main unit. c) Waitting for until turn lighting green LED lighter of DSC WATCHKEEPING part from Front PANEL of the EMOTE CONT OLLE . -
Page 9: Operating On Ac Power
3. OPERATING THE POWER SUPPLY 3.1 Turning on the system a) Be connect AC/DC power from front of the ship b) Switch on the AC toggle switch of the main unit c) Wait until the green LED on the front panel of the DSC watchkeeping is on d) Press the [PW ] key on the front panel 3.2 Operating on AC power When AC power is supplied to the main unit, the S G-400 works automatically on AC power. -
Page 10: Communication Mode Selection
4. FRONT PANEL [TX] : supply high-voltage power to the transmitter (when this switch is on, the battery charger is turned off) 4.1 Communication mode selection Composed of 4 switches as below, which set up the communication mode 4.7 DC operation [ E ] LED : when operating on DC power, indicates the supply of power to outer device [TEL] : communication through B radio telephone... - Page 11 ...
- Page 12 ...
-
Page 13: Ssb Radio Telephone (Tel) Ode
... -
Page 14: Electing Tel Mode
5. SSB RADIO TELEPHONE (TEL) ODE 5.1 Selecting TEL Mode 5.2 Initial screen of TEL Mode (1) electing by [TEL] key * Following the instructions in 5.1, you will find the initial screen of TEL mode as below. In communication mode on the controller, press the [TEL] key to select the [TEL] mode. (2) electing by keyboard a) Press the [F10] key on the keyboard to display main menu as follows. -
Page 15: Etting Transmit And Receiving Frequencies
∙ PgUp : Change the current channel to the next registered channel (3) etting Transmit/Receive frequencies using 'COMM'. ∙ PgDn : Change the current channel to the previous registered channel a) Press the [F3] key on the keyboard to display the following screen. [ ub Menu] ∙... -
Page 16: Etting Transmitter
5.4 etting the Transmitter (2) Manual Tuning a) Press [F5] key to display previous screen. (1) et the transmitting frequency. b) select Manual Mode using the up/down arrow keys and press the [ENT] key to display the following screen. (2) etting Transmitting power a) Move the cursor to Tx Power with the up/down arrow keys. -
Page 17: Communications
(5) etting AGC 5.7 Communications a) Press [F9] key on the keyboard to call sub-menu, then following screen displays. (1) After completing the above settings, press the [TX] key on the controller. (2) When high-voltage power is supplied to the Transmitter, the TX LED indicator is on. (3) Use the handset for communications. -
Page 18: Printing Out Station And Frequency
c) Move the cursor to a desired station with the up/down arrow keys and press the [ENT] d) Press [F5] key to print out the registered frequencies. key to display following screen. d) Move the cursor to tation and press the [ENT] key. e) Enter the name of a station and press the [ENT] key. -
Page 19: Dsc Ode
6. DSC ODE 6.1 electing D C mode (1) electing by [D C] key In the communication mode on the controller, press the [D C] key. (2) electing by keyboard a) Press the F10 key on the keyboard to display the main menu as follows. DSC ODE b) Press the [F2] key to select D C mode. -
Page 20: Initial Screen Of D C Mode
6.2 Initial screen of D C mode * When the D C mode is selected, the initial screen will be displayed as follows. [ ub Menu] ∙ Distress msg edit : for the distress call ∙ Individual msg edit : for an individual call or coastal station call ∙... -
Page 21: Etting The Transmitting And Receiving Frequencies
6.3 etting the transmitting and receiving frequencies b) elect the desired station with the arrow keys and press the [ENT] key. Then information of the selected station is shown as follows. * Frequencies are set by KHz (1) etting Transmitting frequencies a) Press [F7] key on the keyboard. -
Page 22: Tuning The Antenna
6.5 Tuning the Antenna 6.6 etting Receiver (1) Automatic Tuning (1) et Receiving frequencies. a) Press the [F5] key to display the following screen. (2) Adjusting RF gain a) Move the cursor to RF gain with the right/left arrow keys. b) Use the up/down arrow keys to increase or decrease RF gain. -
Page 23: Distress Call
(6) etting Bandwidth 6.7 Distress Call a) Press [F9] key to call sub-menu. (1) et up distress call b) Move the cursor to Band width with the up/down arrow keys and press [ENT] key. a) Follow procedure 6.1 to display the D C intial screen c) Use the right/left arrow keys to select a desired Bandwidth. - Page 24 Wxxx.xx - west longitude (000.00 ~ 180.00) (6) After completing each item, press following function keys to save, print and send. ∙ * When GP device is connected, the position is automatically set F3 tore - store the edited D C message ∙...
-
Page 25: Individual Call
6.8 Individual call (3) etting the PARTY ID a) Move the cursor to 'PARTY ID' with the up/down arrow keys. (1) et up individual call b) Press [ENT] key or right arrow key a) Follow procedure 6.1 to display the D C intial screen c) Input ID number using the numerical keys b) Press [F9] key to call sub-menu. -
Page 26: Group Call
6.9 Group Call (10) Printing out the message (1) et up group call * Follow the above (1) to (7) procedures, then the next steps a) Follow procedure 6.1 to display the D C intial screen a) Press [F5] to start printing b) Press [F9] key to call sub-menu. - Page 27 (3) etting the PARTY ID a) Move the cursor to 'PARTY ID' with the up/down arrow keys. (10) Printing out the message b) Press [ENT] key or right arrow key * Follow the above (1) to (7) procedures, then the next steps c) Input ID number using the numerical keys a) Press [F5] to start printing * If the wrong ID number is entered, press the Back pace key on the keyboard or [CLR]...
-
Page 28: All Ship Call
6.10 All ship call * If the wrong ID number is entered, press the Back pace key on the keyboard or [CLR] key on the controller. (1) et up the All ship call d) Press [ENT] key a) Follow procedure 6.1 to display the D C intial screen b) Press [F9] key to call sub-menu. -
Page 29: Auto/ Emi-Auto Call
(10) end message 6.11 Auto/ emi-auto Call * Follow the above (1) to (6) procedures, then the next steps (1) et up Auto / emi-auto Call a) Press [F7] key to display the following screen a) Follow procedure 6.1 to display the D C intial screen b) Press [F9] key to call sub-menu. - Page 30 (3) etting TEL CMD 1 (10) end message a) Move the cursor to 'TEL CMD 1' with the up/down arrow keys. * Follow the above (1) to (6) procedures, then the next steps b) Press [ENT] key or right arrow key a) Press [F7] key to display the following screen c) elect the desired telecommand with the up/down arrow keys.
-
Page 31: Geography Call
6.12 Geography call (2) etting the category a) Move the cursor to 'CATEGORY' with the up/down arrow keys. (1) et up the Geography call b) Press [ENT] key or right arrow key a) Follow procedure 6.1 to display the D C intial screen c) elect the desired category with the up/down arrow keys b) Press [F9] key to call sub-menu. -
Page 32: Distress Acknowledge And Distress Relay
(8) toring the message 6.13 Distress Acknowledge and Distress Relay * Follow the above (1) to (6) procedures, then the next steps (1) et up the Distress Acknowledge and Distress Relay a) Press [F3] key. a) Follow procedure 6.1 to display the D C intial screen b) Press [F9] key to call sub-menu. - Page 33 (4) etting the PARTY ID (10) end message a) Move the cursor to 'PARTY ID' with the up/down arrow keys. * Follow the above (1) to (6) procedures, then the next steps b) Press [ENT] key or right arrow key a) Press [F7] key to display the following screen c) Input ID number using the numerical keys * If the wrong ID number is entered, press the Back pace key on the keyboard or [CLR]...
-
Page 34: Ordinary Acknowledge
6.14 Ordinary acknowledge (5) etting the TEL CMD 2 a) Move the cursor to 'TEL CMD 2' with the up/down arrow keys. (1) et up the Ordinary acknowledge b) Press [ENT] key or right arrow key a) Follow procedure 6.1 to display the D C intial screen c) elect the desired telecommand with the up/down arrow keys. -
Page 35: Display And Send Message
(11) end message 6.15 Display and end Message * Follow the above (1) to (7) procedures, then the next steps a) Press [F9] key to call sub-menu. a) Press [F7] key to display the following screen b) Move the cursor to the 'Display & end Message' using up/down arrow keys. c) Press [ENT] key to display the following screen elect the desired station using the up/down arrow keys and press [ENT] key, then following screen displays. -
Page 36: Registering Station And Frequencies
6.17 Registering stations and frequencies 6.18 Printing out station and frequency a) Press [F9] key to call sub-menu. a) Press [F9] key to call sub-menu. b) Move the cursor to tation Edit with the up/down arrow keys and press the [ENT] key to b) Move the cursor to tation Print with the up/down arrow keys and press the [ENT] key display the following screen. -
Page 37: Register Telephone Number
∙ 6.20 Register telephone number ID Printing - Output to printer own station ID (2) etting the elf-ID a) Move the cursor to 'Telephone No memory' and press [ENT] key to display the follow screen. * et when installation, any user cannot modify. (3) etting the Group-ID * et when installation, any user cannot modify. - Page 38 (7) Remote Distress & Alarm test * Follow the above (1) procedure then the next steps a) Move the cursor to 'Printer test' with the up/down arrow keys and press [ENT] key. b) Press the Distress key of Remot Distress & Alarm, when be displaying the "Press Remote-Distress- key"...
-
Page 39: Telex(Nbdp) Ode
7. TELEX(NBDP) ODE 7.1 electing TELEX mode (1) electing by [TLX] key In the communication mode on the controller, press the [TLX] key. (2) electing by keyboard a) Press the F10 key on the keyboard to display the main menu as follows. TELEX (NBDP) ODE b) Press the F3 key to select TELEX mode. -
Page 40: Initial Screen Of Telex(Nbdp) Mode
∙ 7.2 Initial screen of TELEX(NBDP) mode PgDn : Change the current channel to the previous registered channel * When TELEX mode is selected the initial screen will be displayed as below. [ ub Menu] ∙ [ARQ] : communicate through Automatic Repeat Request Mode ∙... -
Page 41: Etting Transmitter
(3) etting Transmit/Receive frequencies using 'COMM'. 7.4 etting the Transmitter a) Press the [F3] key on the keyboard to display the following screen. (1) et the transmitting frequency. (2) etting Transmitting power a) Move the cursor to Tx Power with the right/left arrow keys. b) Choose a power mode with the up/down arrow keys. - Page 42 (2) Manual Tuning (5) etting AGC a) Press [F5] key to display previous screen. a) Press [F9] key on the keyboard to call sub-menu, then following screen displays. b) select Manual Mode using the up/down arrow keys and press the [ENT] key to display the following screen.
-
Page 43: Arq] Mode
7.7 [ARQ] mode e) Then, the initial screen of [ARQ] mode displays as below. Call up the station with the frequency of selected channel (1) Connect to a station with ARQ mode * Press [F8] key during the calling to return to the initial screen of Telex mode * connect with current channel a) Press [F2] key on the keyboard, then following screen displays and connet to station with ARQ mode with currnet channel. -
Page 44: Fec] Mode
a) Press the [F4] key b) Move the cursor to the file you want to transmit using up/down arrow keys and press [ENT] key. c) If the file contents appear on the screen it will be transmitted * Press the [F8] key to stop transmitting (5) Transmitting a Macro Command * Follow the above (1) procedure then the next steps a) Press the [F5] key... -
Page 45: Canning The Received Signal
* usable ABCDEFGHIJKLMNOPQR TUVWXYZ1234567890 characters -?( ). , ' =+abcdefghijklmnopqrstuvwxyz *Back space erase the left one character from the cursor * Enter transmit a line change the language(English, Russian) ☞ *Left hift+ pace warning!!)can be change the language, when setting on the present language to "Russion"(attention to setting the using language 12.9) * F2 : 'Hereis' transmit one's own Answer back code... -
Page 46: Printing Out Station And Frequency
display the following screen. c) Move the cursor to a desired station with the up/down arrow keys and press the [ENT] key to print out the frequencies of the station. c) Move the cursor to a desired station with the up/down arrow keys and press the [ENT] d) Press [F5] key to print out the registered frequencies. -
Page 47: The Test Of Telex Mode
b) Press [ENT] key. c) Input Code and then press [ENT] key. (8) etting Maximum FEC Error rate * After previous (1), operate as follows. a) Move the cursor to the Maximum FEC Error Ratio using up/down arrow keys. b) Press [ENT] key. c) Input error rate(1-100) by number key and then press [ENT] key. -
Page 48: Radiotelegraphy (Cw) Ode
∙ Loop test - test the Loop of NBDP RADIOTELEGRAPHY (CW) ODE ∙ Print test - test the printer (2) Testing Mark transmission. * After previous (1), operate as follows. a) Move the cursor to the Mark transmission using up/down arrow keys and press [ENT] key. -
Page 49: Electing Radiotelegraphy (Cw) Mode
8. RADIOTELEGRAPHY (CW) ODE [ creen] ∙ CH : Calling channel and displays the current channel ∙ TX : etting the transmitting frequency 8.1 electing Radiotelegraphy (CW) Mode ∙ RX : etting the receiving frequency ∙ [CW] Indication Bar : Indicate the current RF Gain on the indication bar Press the key of the communication mode on the controller to select CW mode ∙... -
Page 50: Etting Transmit /Receiving Frequencies
8.3 etting Transmit and Receiving Frequencies * Frequencies are set by KHz (1) etting Transmitting frequencies a) Press the [F7] key on the keyboard. b) Input frequencies with the numerical keys. * Use the right/left arrow keys to move the cursor. c) Press the [ENT] key. -
Page 51: Etting The Receiver
a) Move the cursor to RF gain with the right/left arrow keys. b) Use the up/down arrow keys to increase or decrease RF gain. * RF gain status is indicated on indication bar and it is adjusted linearly up to 64 steps linearly. -
Page 52: Communications
a) Press [F9] key to call sub-menu. b) Move the cursor to Attenuator with the up/down arrow keys and press [ENT] key. c) Use the right/left arrow keys to select a desired mode. On - for signals that are received from nearby stations or are distorted due to their strength Off - for normal signals. -
Page 53: A Reception Ode
A RECEPTION ODE c) Move the cursor to a desired station with the up/down arrow keys and press the [ENT] key to print out the frequencies of the station. - 99 - - 100 -... -
Page 54: Initial Screen Of Am Reception Mode
9. A RECEPTION ODE ∙ RX : etting the receiving frequency ∙ Indication Bar : Indicate the current RF Gain on the indication bar ∙ RF gain : Adjust the RF gain 9.1 Selecting AM eception Mode ∙ Clarify : Adjust the Clarification of received siganl (1) electing by keyboard ∙... -
Page 55: Etting Transmit And Receiving Frequencies
9.3 etting Transmit and Receiving Frequencies 3) etting Transmit/Receive frequencies using 'Channel' * Frequencies are set by KHz a) Press [F6] key or '/' key on the keyboard or press '#' key on the front panel. b) Enter ITU channel or user channel with the numerical keys. (1) etting Receiving frequencies c) Press the [ENT] key. -
Page 56: Canning The Received Signal
Off - for faint sound or for any other cases, when AGC is not required. d) Press [ENT] key. (6) etting Bandwidth a) Press [F9] key to call sub-menu. b) Move the cursor to Band width with the up/down arrow keys and press [ENT] key. c) Use the right/left arrow keys to select a desired Bandwidth. -
Page 57: Editor Ode
EDITOR ODE c) Move the cursor to a desired station with the up/down arrow keys and press the [ENT] key to print out the frequencies of the station. d) Press [F5] key to print out the registered frequencies. - 107 - - 108 -... -
Page 58: Electing Editor Mode
10. EDITOR ODE -?().,'=/+abcdefghijklmnopqrstuvwxyz (2) Description of keys on keyboard 10.1 Selecting Editor mode * Ins : toggle between insert and overwrite typing mode. A typing mode is shown on the top (1) electing by keyboard right of the screen such as [Insert] or [Overwrite]. a) Use the [F10] key on the keyboard to display the main menu as following. -
Page 59: Editing
10.3 Editing b) Enter a file name and press [ENT] key to display the following screen. Use the various functions on the initial screen of Editor or on editing. (1) Loading a file a) Press the [F1] key to display the following screen. c) Move the cursor to the desired slot and press the [ENT] key to save the file. -
Page 60: Sending Distress Signals
. SENDING DISTRESS SIGNALS 11.1 Sending 2182KHz distress alert signal a) Press the [2182] key of the DIST ESS ALE T menu on the front panel to display the following screen. SENDING DISTRESS SIGNALS b) Move the cursor to Tx Power with the right/left arrow keys. -
Page 61: Initial Setting Ode
12. INITIAL SETTING ODE 12.1 electing initial setting mode (1) electing by keyboard a) Press the [F10] key to display the main menu as below. INITIAL SETTING ODE b) Press the [F9] key to select initial setting mode. You can also select initial setting mode by followings : move the cursor to 'F9 : Initial' with the arrow keys and press the [ENT] key. -
Page 62: Elf Test
∙ can peed - set the converting time at scanning c) Input current date with the numerical keys and press the [ENT] key. ∙ peaker et - set the power of audio signal ∙ Language et - select the language ∙... -
Page 63: Watch Keeper Canning Speed Set
12577.0 - On/Off changeable 12.9 Language set 16804.5 - On/Off changeable a) elect Initial setting mode as 12.1. b) elect Language et using the up/down arrow keys and press the [ENT] key to display the following screen. 12.7 Watchkeeper scanning speed set a) elect Initial setting mode as 12.1. - Page 64 12.11 Set LCD Backlight Dimmer a) elect Initial setting mode b) elect Dimmer et using the up/down arrow keys and press the [ENT] key to change the dim of the LCD backlight. lear data for storage 12.12 a) elect Initial setting mode as 12.1 b) elect Data Clear using the up/down arrow keys and press the [ENT] key to display the following screen.
Need help?
Do you have a question about the SRG-400 and is the answer not in the manual?
Questions and answers