
Subscribe to Our Youtube Channel
Related Manuals for ATOMSTACK M40

Summary of Contents for ATOMSTACK M40
- Page 1 English Deutsche Français note: (The picture is for reference only, actual product shall prevail)
- Page 2 Part 1: Security Statment and warning Before Using the laser engraving, please read this safety guide carefully, it mentions situations that require special attention and includes warnings of unsafe practices that can cause damage to your property or even endanger your personal safety.
- Page 3 4. The laser itself has a protective cover, the protective cover is fastened by screws. When the laser is installed on the laser engraver, the protective cover should be checked to be reliably locked, and can not be removed in the energized state. 5.
-
Page 4: Part 2: Disclaimer And Warning
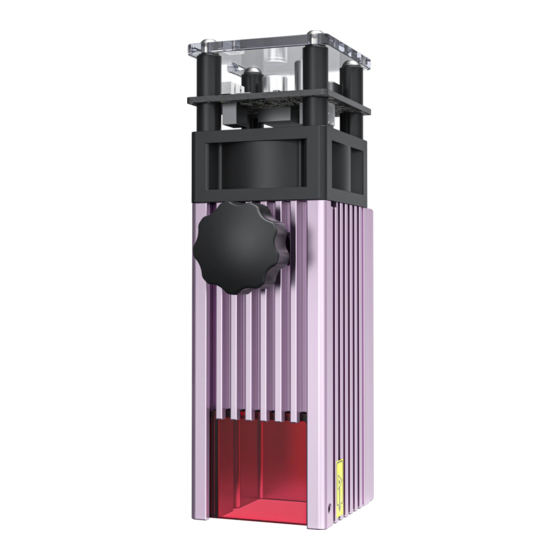
You understand and agree that AtomStack may not be able to provide you with the cause of the damage or accident and provide you with AtomStack's after-sale service unless you provide the original engraving or cutting files, engraving software configuration parameters used, operating system information, video of the engraving or cutting process, and operational steps prior to the occurrence of a problem or failure. - Page 5 Part 3:Laser Module Instruction Wavelength:455±5nm Laser emitter Beam Divergence:0.2 Laser slide Pulse Duration:1ms Frequency:1kHz Maximum power output:5W Plum blossom handle Slide mounting hole Protective cover Signal input...
- Page 6 Part 4: Function description of adapter board ②.DC auxiliary power terminal: when the auxiliary laser power is insufficient, the compensation power is 12V 3A, ③.2PIN signal input: this interface is for power compensation, and it is 2PIN signal input from connected to the backup power supply when needed.
- Page 7 P a r t 5 : i n s t a l l a t i o n s t e p s ① ② ④ ③ ①.Install the slider ②.Tighten the slide rail ③.Insert the laser into ④.Tighten the laser lock screw and tighten it locking screws the slider...
- Page 8 P a r t 6 : C a u t i o n s L A S E R B E A M C A N D A M A G E E Y E S Laser Light can damage the human eyes and skin. Do not expose the eye or skin to laser light directly. This Laser product has an optical lens and emits a collimated laser beam.
- Page 9 P a r t 7 : M a i n t e n a n c e i n s t r u c t i o n s a n d w a r n i n g T h i s p r o d u c t u s e s a h i g h l y i n t e g r a t e d d e s i g n a n d r e q u i r e s n o m a i n t e n a n c e . H o w e v e r , i f t h e l a s e r s y s t e m i n s t a l l e d w i t h t h i s p r o d u c t n e e d s t o b e r e p a i r e d o r t u n e d , p l e a s e : 1 .
- Page 10 Customer Service: Scan the code to enter the engraving machine discussion group Scanner APPLICATION: QR code reader Ø For detailed warranty policy,please visit our official / Barcode scanner www.atomstack3d.com website at: or any APP with scanner Ø For Laser Engraver technical support and service,please email : support@atomstack3d.com...
Need help?
Do you have a question about the M40 and is the answer not in the manual?
Questions and answers