Advertisement
Quick Links
Advertisement

Related Manuals for Cablematic WX082

Summary of Contents for Cablematic WX082
- Page 1 Guideline of PIR Alarm WIFI KIT V1.01 1 / 17...
- Page 2 Catalogue Ⅰ.Brief introduction Ⅱ.product description Ⅲ.WIFI Kit connection diagram Ⅳ.HDD installation Ⅴ.Connection setting Ⅵ.Setting of other function Ⅶ.How to use mobile software Ⅷ.FAQ Help Ⅰ.Brief introduction: Smart PIR Alarm cctv kit is the new product,which integrates burglar alarm and video surveillance. It is designed to prevent and intimidate intruders and protect users' property and life.
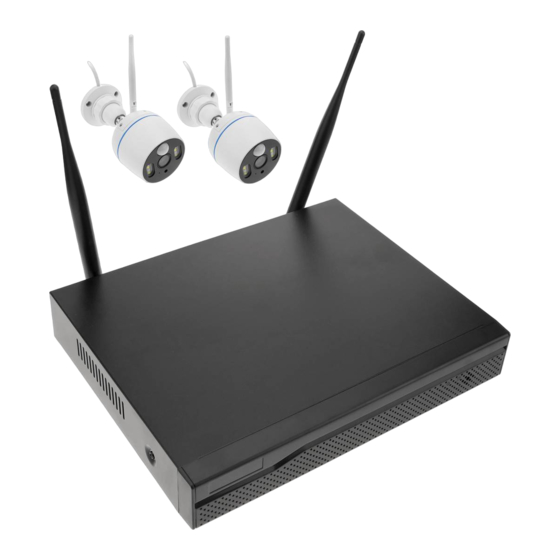
- Page 3 Ⅱ.Product Introduction A,Smart Alarm NVR power:DC12V/2A, USB:to connect mouse or usb drive, Net port:to connect net line, VGA/HDMI port:used to connect display, WIFI aerial:in order to connect wifi camera. B,Smart PIR Alarm camera IR LED:In Dark,fill light automatically. White LED:Once both detected heat and motion,it will light up. PIR Detector:Search human heat.
- Page 4 TF card:Max support 128G. Attention: Installation height and direction of PIR infrared detection camera: the installation height should not exceed 3-4 meters (best within 3 meters); the installation direction is preferably horizontal installation (the installation position will directly affect the sensitivity of the PIR detector. When the camera is oriented The detection sensitivity is highest when the person's walking direction is 90 degrees.) C,PIR Alarm camera picture IR LED: In Dark,fill light automatically。...
- Page 5 Connection step: 1,all cameras connect to power,DC12V/1A. 2,Display connect to NVR HDMI or VGA port. 3,Mouse connect to the USB port. 4,NVR connect Power,DC12V/2A. 5,If you want to see the video by Mob/PC remotely,the net pot need to connect the router. Ⅳ.HDD Installation(If already finished,ignore)...
- Page 6 Ⅴ.Setting guideline Click the right mouse button to enter the menu list. (Default login username: admin, no password). 1).Split screen selection: single screen / multi screen selection 2).Video Management: Used to add a code/delete camera channel. 3)System settings: Recording Settings / Network Settings / User Management / Hard Disk Management / Factory Reset and more.
- Page 7 Clicking setup wizard 1, mobile APP: use the mobile phone to scan the corresponding Android or Apple QR code, you can download the APP to the phone. (The cloud ID QR code on the right is added to the mobile app, which will be used later in the APP operation).
- Page 8 3, general settings: adjust the time and local time is correct. Click Next step. 4, one-click Internet access: used to diagnose whether the Internet status is normal. (You can skip this step if you are not connected to the network). Click next step. 5,HDD settings: After installing the hard disk, it will display the hard disk capacity, usage, status information.
- Page 9 B,Screen resolution setting: System Settings—General Settings—Screen Settings. (The default resolution is 1280*1024. If you are connected to a 1080P HD display, you can modify the resolution to 1080P, and the monitor screen will be clearer; if you are not sure if your monitor resolution is 1080P, please do not modify it.) C,Video settings: System Settings - Recording Settings - Recording Plan.
- Page 10 D,PIR function settings: System Settings - Channel Settings - Video Detection. Remark:A camera with a PIR function needs to be ticked after the PIR is turned on, and a normal camera needs to be turned off. (Firstly, look at which channel the camera is equipped with PIR, and which channel camera does not have PIR.
- Page 11 Ⅶ,The using of mobile APP Ⅶ-1:Download and install APP Search”Pro 3.0”on the Google play store,then download and install it,or you can scan the following QR code to download. Ⅶ-2:Mobile APP operation 1).Sign in First time using need register it,then sign in. 2).add Device ,...
- Page 12 ,of upper right corner,Following, click (“adding Second way:click equipment”),then choose to scan the LAN,you will find the camera ID,finally,connect it. Ⅶ-3:Preview and video palyback 12 / 17...
-
Page 13: Button Function Description
Button function description: Button Function Switch image definition,HD is High definition switch button Definition,SD is Standard Definition. Speaker button Play sound around the camera or not. Full screen or not,the left one is the full Full screen or not screen button. Audio control:... - Page 14 image capture image capture. Recording the video currently you see from video recording: you mobile phone. Video playback channel Video playback channel switching. switching The date of recording Used to switch date when playback. Video backup Download the backup video to your Mobile. Ⅶ-3,Mob Alarm push setting In the phone settings, select the notification and status bar (the name may be different in each person's phone settings, but probably the same meaning), then select Apply Notification Management, select Pro 3.0, as shown in...
- Page 15 Ⅶ-3,Device sharing function In the main APP interface,Click on the top right corner ,Chooses sharing. 1).Sharing rights can be selected: video preview; video playback 2).QR code expiration date: 5 minutes by default, customizable time. ,it will generate a QR code,share it to somebody you want to share with . 3).Click on the top right corner Ⅷ,FAQ: Q:My Mobile can not receive the message of alarm push.
- Page 16 Q: How to turn on motion detection alarm for ordinary camera? System Settings - Channel Settings - Video Detection. As shown above,PIR default setting ticked,but for normal camera,no need this choice. Q:How can I only turn on the camera's infrared or white light? Help:As shown above,default setting is smart mode,if choose IR mode,only IR Led light up at night,if choose color mode,just only white led light up at night.
- Page 17 Check the original channel status. If "Disconnect" is displayed, "Connection failed",etc, select the channel with the mouse and click Delete Channel. Then click Refresh button,the connected camera IP address will appear in the list above. Following, click on the code to add. After the addition is successful, you can unplug the network cable. 17 / 17...
Need help?
Do you have a question about the WX082 and is the answer not in the manual?
Questions and answers