Table of Contents
Advertisement
Available languages
Available languages
Quick Links
Advertisement
Table of Contents

Related Manuals for Intelbras TI 5000

Summary of Contents for Intelbras TI 5000
- Page 1 Manual do usuário TI 5000...
-
Page 2: Português
Este guia contém informações sobre instalação, operação e funções do seu Terminal Inteligente (TI). Os terminais inteligentes Intelbras garantem agilidade, conforto e praticidade ao seu dia a dia. São compatíveis com toda a linha de centrais Impacta e apresentam um conjunto de teclas programáveis pelo usuário, que terá... -
Page 3: Table Of Contents
Índice Português 1. Especificações técnicas 1.1. Sinalização do terminal ..............8 1.2. - Page 4 5.10. Operação da agenda quando o PABX estiver em subsistema .........29 5.11.
- Page 5 10.9. Configurar faixas de teclas programáveis ............44 10.10.
- Page 6 5. Phone Book 5.1. Accessing the phone book ..............66 5.2.
- Page 7 9. Reminder 9.1. Add a new reminder ............... .78 9.2.
-
Page 8: Especificações Técnicas
Temperatura 0 °C a 37 °C. 1.7. Alimentação -24 Vdc a -36 Vdc (±7%). 1.8. Dimensões Modelo Altura Largura Profundidade Peso MOD 115 125 mm 57 mm 154 mm 150 g TI 5000 135 mm 210 mm 154 mm 710 g... -
Page 9: Potência Máxima
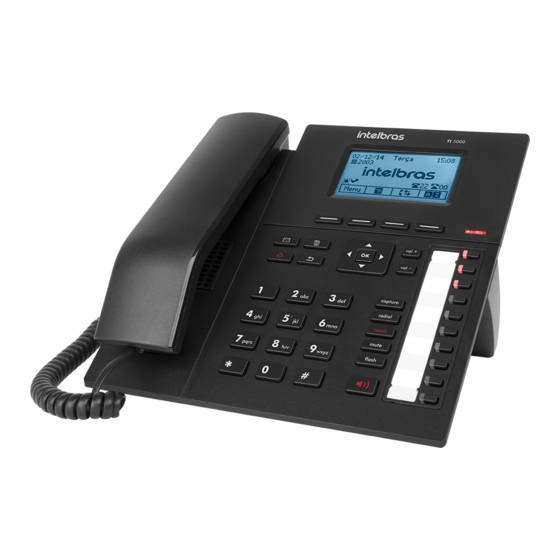
1.9. Potência máxima » MOD 115: 0,744 W. » TI 5000: 1,44 W. 2. Funções 1. Display. 2. Teclas de seleção: se adaptam ou trocam de valor, conforme o menu em que o usuário se encontra. 3. Indicação luminosa: sinaliza que o terminal está recebendo uma chamada ou que existem chamadas novas não atendidas a serem visualizadas. -
Page 10: Display
10. O gancho do Terminal Inteligente funciona através de um sistema infravermelho que, ao sofrer interrupção de um feixe de luz entre o ponto A e B, avisa ao TI 5000 que o monofone está no gancho. Esta interrupção pode ocorrer colocando o próprio monofone no gancho ou encostando o seu dedo indicador na área sinalizada por um círculo. - Page 11 Ícones das teclas de seleção Indica as funções acessadas através das teclas de seleção. Essas funções variam com a operação do terminal, que quando está em repouso às teclas de seleção acessam: Menu do TI 5000 Menu ações Registro de chamadas Agenda do TI 5000 Ícones de turno...
-
Page 12: Instalação
3. Instalação 3.1. Conexões 1. Conexão para ramal. 2. Conexão para monofone. 3. Conexão para módulo de teclas. 4. Sensor de movimento¹: permite o monitoramento de ambientes através de um sensor infravermelho instalado no pé do terminal. Após a detecção de um movimento no ambiente, o terminal poderá emitir um aviso sonoro, realizar uma chamada para um número predeterminado (interno ou externo ), enviar um SMS1 ou acionar uma Atuação Externa 5. -
Page 13: Montagem Da Base
3.3. Montagem do módulo MOD 115 Caso você tenha adquirido um módulo de teclas MOD 115, para acoplá-lo ao terminal digital TI 5000 de forma correta, siga os procedimentos: 1. -
Page 14: Operação
4. Operação 4.1. Operação através do fone A operação do terminal através do fone é idêntica à operação de um telefone comum. Para realizar chamadas, basta retirar o fone do gancho e digitar o número desejado ou acionar uma das teclas programadas. Durante uma conversação através do fone, o usuário poderá... -
Page 15: Rechamada
Se o ramal não possuir categoria para realizar chamada externa, ao tentar este tipo de acesso será exibida na tela do terminal uma mensagem seguida de um bipe. Chamada externa negada Se as linhas da rota estiverem bloqueadas para acesso externo a mensagem seguida de um bipe será: Todas as linhas da rota estão ocupadas 4.4. -
Page 16: Recebendo Chamadas
Para cancelar uma rechamada, pressione novamente a tecla Recall . A rechamada será cancelada, sendo exibida por 3 segundos na tela a seguinte mensagem: Rechamada desprogramada com sucesso 4.5. Recebendo chamadas Ao receber chamadas internas ou externas, o terminal apresenta ao usuário, se disponível, o número do chamador ou seu nome (caso esteja registrado na agenda). -
Page 17: Atendimento Encadeado De Chamada Externa
Para o controle de acesso às chamadas, o terminal dispõe de um cursor sob os ícones da fila de chamadas em espera. Com o posicionamento do cursor é possível controlar a chamada que deseja atender, utilizando as teclas de navegação. 1. -
Page 18: Retenção De Chamada
4.9. Retenção de chamada Para reter uma chamada em andamento pressione a tecla correspondente ao menu ações, e com o cursor, selecione a opção Reter , automaticamente a chamada será retida. Ao esgotar o tempo de retenção, o terminal emitirá um bipe de aviso indicando que a chamada foi encaminhada para a fila (última posição). -
Page 19: Utilizando As Teclas Programáveis Para Acesso Às Funções Do Pabx
Pressione a tecla de seleção Ok para desativar o não perturbe ou pressione tecla de seleção Voltar para cancelar a operação. Se o usuário pressionar a tecla de seleção Ok o terminal emitirá um bipe seguido da mensagem: Não perturbe desprogramado 4.12. -
Page 20: Cadeado
Numa tecla programada como acesso a grupo de ramais, o indicador luminoso associado pode apresentar os seguintes estados: » LED piscando: chamada externa ou interna para grupo. » LED apagado: nenhuma chamada externa ou interna para o grupo. Ao ser acionada esta tecla, uma mensagem na tela do terminal indica o número do grupo que está sendo chamado. Quando um dos ramais do grupo atender a chamada, o seu número será... - Page 21 Se o ramal onde está instalado o terminal estiver programado com a opção para requisitar senha, será solicitada a senha do ramal. O display exibe um aviso de que o ramal está bloqueado: Ramal programado com cadeado O ramal com a facilidade cadeado programada receberá tom de discar interno com advertência (tom contínuo seguido de bipes a cada segundo).
- Page 22 Enquanto esta facilidade estiver ativa, o usuário poderá, além de escutar, conversar com quem está no ambiente monitorado. Se o ramal que está sendo monitorado for um terminal, será exibida a mensagem: Monitoramento de ramal ativado Para acessar esta facilidade é preciso ter categoria no PABX Para desativar a monitoração não é...
- Page 23 Ativa autoatendimento Esta facilidade permite atender as chamadas automaticamente. Quando chegar uma chamada para o terminal, este emite um bipe e atende automaticamente a chamada pelo viva-voz (é necessário verificar se com o headset o autoatendimento não habilita o headset automaticamente). »...
- Page 24 Para desbloquear o teclado, basta pressionar a tecla * por 3 segundos. A mensagem será exibida: Teclado do terminal desbloqueado Obs.: durante o período em que o terminal estiver atendendo uma chamada, o teclado será desbloqueado. Consultando a configuração das teclas programáveis do terminal e dos módulos Para uma consulta sobre a configuração de uma tecla programável deve-se entrar no menu Configura tecla , escolher a tecla que se deseja consultar e navegar até...
- Page 25 Mensagens durante a inicialização do terminal e ocorrência de falhas Mensagens durante a inicialização do terminal As seguintes mensagens são exibidas de forma sequencial durante a inicialização do terminal: Terminal inicializando Mensagens de falha durante a inicialização do terminal Mensagem que indica que o terminal não pode ser iniciado pois o PABX já está operando com o número máximo permitido de Terminais Inteligentes: Número máximo de terminais na central conectados Mensagens de falha e manutenção durante a operação...
-
Page 26: Agenda
Esta mensagem aparecerá quando o terminal não estiver recebendo quaisquer informações do PABX (perda de comunicação). Terminal sem comunicação com o PABX 5. Agenda O terminal possui uma agenda alfanumérica que permite registrar números internos e externos, bem como o nome associado a cada número. -
Page 27: Inclusão De Um Novo Registro Na Agenda
5.3. Inclusão de um novo registro na agenda A inclusão de um novo registro na agenda pode ocorrer em 2 situações distintas: » Inclusão de um novo registro através do menu da agenda. » Inclusão de registro, com número proveniente da lista de chamadas recebidas ou originadas. 5.4. -
Page 28: Consulta Dos Registros Da Agenda Do Terminal
5.6. Consulta dos registros da agenda do terminal Ao pressionar a tecla de seleção , o terminal apresentará o menu da agenda, entrando, automaticamente no modo de consulta. O primeiro registro (ordem alfabética) da agenda é exibido. Para consultar um registro o usuário tem as seguintes opções: Através da tecla de navegação para baixo , pode-se fazer a pesquisa em ordem alfabética crescente (de A a Z);... -
Page 29: Operação Da Agenda Quando O Pabx Estiver Em Subsistema
4. Com o número selecionado, pressione a tecla de seleção Discar para iniciar a discagem; 5. Para gravar o nome/número consultado da agenda do PABX na agenda do terminal: Após selecionar o nome na agenda do PABX, pressione a tecla de seleção . -
Page 30: Chamadas Originadas Através Da Agenda
5.11. Chamadas originadas através da agenda Após selecionar o registro desejado na agenda, pressione a tecla de seleção Discar para iniciar a discagem. » Se a consulta à agenda ocorreu com o monofone no gancho, o terminal aciona o viva-voz, se o headset estiver conectado este será... -
Page 31: Consulta À Lista De Mensagens
Caso não exista nenhum registro de chamada ou mensagem, será exibida a mensagem: Não há ligações registradas na lista selecionada Qualquer que seja o tipo de chamada escolhida o terminal exibe o número existente de chamadas na memória por 2 segundos. Para obter maiores informações sobre as ligações recebidas ou efetuadas pressione a tecla Ok sobre um registro. -
Page 32: Programação De Ramal
7. Programação de ramal O TI 5000 disponibiliza uma interface de alto nível para as programações de ramal do PABX. 7.1. Senha do ramal Permite incluir ou alterar a senha do ramal. Como acessar: 1. Pressione a tecla Menu . O terminal entrará no menu principal;... -
Page 33: Desvio Se Não Atende
7.5. Desvio se não atende Opções para este menu: » Se não atende para ramal: selecione o campo com o número de segundos (10 a 80) que a chamada irá tocar antes de ser desviada e preencha o número do ramal desejado. »... -
Page 34: Hotline
» Cadeado Celular DDI. » Cadeado Celular DDD. » Cadeado Celular Regional. » Cadeado Celular Local. » Cadeado Total. » Cancela Todos Cadeados. 5. Para cada uma das opções, com exceção da última, pode-se escolher entre Habilitar ou Desabilitar o cadeado posicionando o cursor com as teclas e pressionando a tecla Ok . -
Page 35: Despertador
7.12. Despertador Para programar qualquer tipo de despertador: 1. Pressione a tecla Menu . O terminal entrará no menu principal; 2. Procure por Facilidades e pressione a tecla Ok ; 3. Procure por Despertador utilizando as teclas e , e pressione a tecla Ok . Utilize as teclas para visualizar as opções de Despertador, que podem ser: e ... -
Page 36: Programando O Calendário Do Pabx
7.14. Programando o calendário do PABX Permite programar o calendário (Data e Hora) do PABX. o usuário só poderá executar esta programação quando o terminal estiver instalado num ramal com categoria de Obs.: mesa operadora. 1. Pressione a tecla Menu . O terminal entrará no menu principal; 2. -
Page 37: Mensagens
Para desativar o acionamento, basta pressionar novamente a tecla programável para efetuar o desbloqueio da função. Obs.: com a função ativa o teclado do TI 5000 é bloqueado. Para voltar a utilizar o terminal normalmente, pressione novamente a tecla programada para a função. -
Page 38: Mensagens De Aviso
8. É possível ler as SMS envidas através da opção Ler SMS enviado, e apagá-los pela opção Apagar todos SMS . Uma mensagem de erro poderá ser apresentada no display do TI 5000, caso não consiga enviar o SMS para o destinatário. -
Page 39: Lembrete
9. Lembrete Lembretes são pequenas mensagens que o usuário pode programar, para que o terminal possa exibir no seu display conforme a data e hora marcada para sua exibição. O lembrete pode ser programado para ser apresentado uma única vez ou ser repetido a cada período definido. -
Page 40: Consultar Lembrete Programado
9.3. Consultar lembrete programado 1. Pressione a tecla Menu . O terminal entrará no menu principal; 2. Procure por Lembrete e pressione a tecla Ok ; 3. Procure por Consulta através das teclas e , e pressione a tecla Ok ; 4. -
Page 41: Backlight
5. Para obter uma breve demonstração do tipo de campainha, para ligações internas e externas, selecione os 10 tipos disponíveis (1 a 10) através das teclas de navegaçãoe ; 6. Selecione a campainha desejada e pressione a tecla Ok ; 7. -
Page 42: Configurar Headseat
10.6. Configurar headseat Permite configurar o terminal para operar com o fone de ouvido com ou sem haste. Diferenciado pela sensibilidade do microfone. 1. Pressione a tecla de seleção Menu . O terminal entrará no menu principal; 2. Procure por Perfil através das teclas e . Pressione a tecla Ok ; 3. - Page 43 Configurar tecla para acessar uma determinada rota Selecione a opção Tecla Acessar Rota através das teclas , e selecione através das teclas , o número da rota e e que se deseja associar à tecla. Configurar tecla para acessar um determinado grupo Selecione a opção Tecla Acessar Grupo através das teclas digite o número do grupo que deseja associar à...
-
Page 44: Configurar Faixas De Teclas Programáveis
Quando esta facilidade estiver ativa, o LED da tecla programada ficará piscando. Quando o terminal estiver com o headset conectado, o mesmo atende a chamada. Selecione a opção Tecla Ativa Autoatendimento através das teclas . Pressione Ok para confirmar. e Configurar tecla como toque geral de grupo O grupo toque geral é... -
Page 45: Configurar Serviço Chamadas
10.10. Configurar serviço chamadas Definir tipos de chamadas que irão ser registradas Através desta opção, o usuário pode selecionar o tipo de chamadas que serão armazenadas no terminal. 1. Pressione a tecla de seleção Menu . O terminal entrará no menu principal; 2. -
Page 46: Tecla Capturar
5. Preencha o número da conta e a senha, através do teclado numérico. Após, pressione a tecla Ok para confirmar a programação; 6. Para cancelar a alteração e manter a informação anterior, pressione a tecla Atenção: pode-se ativar o código de conta no terminal e não programar a conta e/ou a senha. Neste caso, no momento da discagem aparecerá... -
Page 47: Termo De Garantia
(48) 2106-0006 ou 0800 704 2767 (de segunda a sexta-feira das 08 ás 20h e aos sábados das 08 ás 18h) ou através do e-mail suporte@intelbras.com.br. 9. LGPD - Lei Geral de Proteção de Dados Pessoais: a Intelbras não acessa, transfere, capta, nem realiza qualquer outro tipo de trata- mento de dados pessoais a partir deste produto. -
Page 48: English
This guide contains information on the installation, operation, and functions of your Smart Terminal (TI). Intelbras smart terminals guarantee agility, comfort, and practicality to your daily routine. They are compatible with the entire line of Impacta exchanges and feature a set of user-programmable keys, which will give you quick access to extensions, lines, and several features that the PABX offers. -
Page 49: Technical Specifications
1.7. Dimensions Model Height Width Depth Weight MOD 115 125 mm 57 mm 154 mm 150 g TI 5000 135 mm 210 mm 154 mm 710 g 1.8. Maximum power » MOD 115: 0.744 W. » TI 5000: 1.44 W. -
Page 50: Functions
2. Functions 1. Display. 2. Selection keys: they adapt or change value, depending on which menu the user is in. 3. Light indication: signals that the terminal is receiving a call or that there are new unanswered calls to be viewed. 4. -
Page 51: Display
10. The hook of the Smart Terminal works through an infrared system that, when suffering an interruption of a light beam between point A and B, tells the TI 5000 that the handset is on hook. This interruption may occur by placing the handset on the hook or by placing your index finger on the area marked by a circle. -
Page 52: Installation
Programmed reminder Selection key icons Indicates the functions accessed through the selection keys. These functions change with the operation of the terminal, which, when idle, the selection keys access: Menu for TI 5000 Actions Menu Call Log TI 5000 Phone book... -
Page 53: Assembling The Base
The headset’s pinning must follow the TX-, RX-, RX+ and TX+ standard, as shown in the following image: Headset Headset Pinning 3.2. Assembling the base 1. Connection cable between the TI 5000 board and the motion sensor¹. 2. Foot of the terminal. 3. Motion sensor board1. 4. Base hooking. -
Page 54: Mod 115 Module Assembly
3.3. MOD 115 module assembly If you have purchased a MOD 115 key module, to attach it to the TI 5000 digital terminal correctly, follow these procedures: 1. Position the slot over the module’s mounting region on the terminal; 2. Adjust the position of the module, then tighten the screws to secure it to the TI 5000 digital terminal. -
Page 55: Recall
When the called extension is busy and there is no answer queue or it is full, the following message will appear on the terminal display: Busy extension If the busy extension is a terminal, the terminal will display for 3 seconds the following message: Notification message that extension X called If the extension does not have an external call category, when attempting this type of access a message followed by a beep will be displayed on the terminal screen. -
Page 56: Receiving Calls
The following message will appear on the display for 3 seconds: Successfully programmed recall When the recall function is executed, the following message will be displayed: Terminal performing the recall To cancel a recall, press the Recall key again. The recall will be canceled and the following message will appear on the screen for 3 seconds: Recall successfully deprogrammed 4.5. -
Page 57: Answering Calls From The Call Queue
The handset icon indicates the call the terminal is answering. To answer a call that is queued, use the navigation keys to select the call. Pressing the selection key for Ok or ·, the selected call is answered and the current call is placed at the end of the queue. -
Page 58: Call Hold
» Pendulum: this feature makes it possible to exchange the current call for another one in the queue, whether these calls are internal or external. » Retain: makes it possible to hold the call for a predetermined time. » Parking: allows you to park the call in progress. »... -
Page 59: Using Programmable Keys To Access Pabx Functions
To release the extension, press the key corresponding to the actions menu , and select the Do not disturb option. You will see the message: Cancel Do Not Disturb Press the Ok selection key to disable do not disturb or press the Back selection key to cancel the operation. If the user presses the Ok selection key the terminal will beep followed by the message: Do not disturb unprogrammed 4.12. - Page 60 The indicator light will show the following states: » LED is off: free channel. » LED is on: busy channel. » LED flashing: channel with a call to be answered. » LED flashing slowly: channel with a call in parking. Access to the routes Allows access to the programmed route.
-
Page 61: Padlock
4.13. Padlock Allows you to block the extension so it cannot generate external calls. To program the padlock, press the key that has been programmed for this function. In this case, the terminal will be programmed in padlock mode with total blocking. To program padlock with intermediate options, such as blocking only IDD calls, you must access extension programming from the terminal settings menu. - Page 62 Extension in conversation While this feature is active, the user can, besides listening, talk to whoever is in the monitored environment. If the extension being monitored is a terminal, the following message will be displayed: Extension monitoring enabled To access this feature you must have a category in the PABX To deactivate the monitoring, no programming is required, just place the handset on the hook or press the Speakerphone key.
- Page 63 Call Parking If an external call is in progress, you can park this call so that it becomes available to all terminals. » Placing a call in parking : during a call, press the key programmed as Call Park, then put the handset on-hook, turn off the speakerphone or headset.
- Page 64 To unlock the keyboard, simply press the * key for 3 seconds. The message will appear: Unlocked terminal keyboard Note: while the terminal is on a call, the keyboard will unlock. Consulting the configuration of the programmable keys of the terminal and the modules For a query about the configuration of a programmable key you must enter the Key Configuration menu, choose the key you want to query and navigate to the Verify key configuration option.
- Page 65 Messages during terminal startup and fault situations Messages during terminal startup The following messages are displayed in succession during the terminal´s startup: Initializing terminal Failure messages during the terminal´s startup Message indicating that the terminal cannot be started because the PABX is already operating with the maximum number of Smart Terminals allowed: Maximum number of connected terminals in the exchange Fault and maintenance messages during operation...
-
Page 66: Phone Book
This message will appear when the terminal is not receiving any information from the PABX (loss of communication). Terminal without communication with the PABX 5. Phone Book The terminal has an alphanumeric phone book that allows you to register internal and external numbers, as well as the name associated with each number. -
Page 67: Adding A New Record To The Phone Book
5.3. Adding a new record to the phone book Adding a new record to the phone book can take place in 2 different situations: » Adding a new record using the phone book menu. » Adding a record, with a number from the list of incoming or outgoing calls. 5.4. -
Page 68: Consulting The Terminal's Phone Book Records
5.6. Consulting the terminal’s phone book records By pressing the selection key , the terminal will display the phone book menu, automatically entering the query mode. The first record (in alphabetical order) in the agenda will be displayed. To query a record the user has the following optionss: Through the navigation down key , the search can be made in ascending alphabetical order (from A to Z);... -
Page 69: Operation Of The Phone Book When The Pabx Is In Subsystem
After selecting the name in the PABX’s phone book, press the selection key . In this situation, the terminal goes directly to the option of adding a record to the terminal’s phone book, and the screen with the name that was selected in the PABX’s phone book search is displayed. -
Page 70: Speed Dialing (Shortcut)
5.12. Speed dialing (shortcut) To perform speed dialing, you must associate the 0 to 9 keys with the phone numbers in the phone book. With the handset off-hook, speakerphone/headset active, or with the terminal idle, press and hold the desired number key (0 to 9) for 2 seconds until the name/number is shown on the display. -
Page 71: Message List Query
When adding the provider code the user can manually type it. 7. Extension Programming The TI 5000 provides a high-level interface for PABX extension programming. 7.1. Extension Password Allows you to include or change the extension’s password. -
Page 72: Enable Extension Password For Access To The Features Sub Menu And Actions Menu
7.2. Enable extension password for access to the Features sub menu and actions menu password to access the Programming This programming defines whether or not the terminal should require the extension Features submenu and the Actions menu. How to access: 1. -
Page 73: Always Forward
7.6. Always forward Options for this menu: » Always to extension: fill in the number of the desired extension. » Always to external number: select the Route and fill in the field with the desired external number. » Always to VoIP: fill in the field with the desired VoIP number. »... -
Page 74: Hotline
7.9. Hotline Hotline is a feature programmed in the extension to make automatic calls to extensions, VoIP numbers, or external numbers. The user simply lifts the handset and the call will be placed automatically to the desired number, after a period of time defined in the programming (0 to 7 seconds). -
Page 75: Telemarketing Extension
» Wake up on weekdays: using the keys and fill in the fields with the hour and minute when you wish to be woken on weekdays and press the Ok key. The alarm will sound at the programmed time only on weekdays. For this type of alarm to work, the working days and holidays must be previously programmed in the PABX. - Page 76 To deactivate the triggering, simply press the programmable key again to unlock the function. Note: with the function active the TI 5000 keyboard is locked. To use the terminal normally again, press again the key programmed for the function.
-
Page 77: Messages
Important: the functions regarding the motion sensor, index 7.15, will only be available if your product has the motion sensor installed. 8. Messages There are three types of messages: Custom Messages and Warning Messages, which allow extensions with Smart Terminals (TIs) to send text messages to other extensions that also have terminals installed, and SMS messages, which can be sent from Smart Terminals (TIs) to cell phones (check if your PABX has this feature and if it has a GSM card). -
Page 78: Sending Sms Messages
8. It is possible to read the sent SMS through the Read sent SMS option, and delete them through the Delete all SMS option. An error message can appear on the TI 5000 display, if it is unable to send the SMS to the recipient. In this situation, the terminal returns to the messages screen. -
Page 79: Change A Reminder
Attention: if you fill in the fields day, month and year, the item Day of Week will be discarded. Therefore, to run several times, use only the Day of Week field. 7. Using the alphanumeric keyboard, type the reminder text (max. 23 characters); 8. -
Page 80: Configuration
6. Press the Ok key to confirm the setting. The following message will be displayed: 10. Configuration Allows the user to configure the terminal according to his preferences. 10.1. Language Allows you to select the operation language of the Smart Terminal; select Portuguese or Spanish. To do so, follow these procedures: 1. -
Page 81: Beep Volume Configuration
(One beep every 3 seconds): occurs when the handset is left off-hook. If the handset is not on-hook, after 2 » minutes the beeps will sound. Factory default: mute. » (Three beeps): these happen when there is an alarm present. The alarm occurs when the exchange in which the terminal is installed changes from day to night state. - Page 82 5. Press the programmable key you wish to configure; 6. Select one of the options described in the following subsections and, after making the specific settings for each case, press the Ok key to confirm the setting. To cancel the setting, press the key to cancel or the Back section key;...
- Page 83 The edit field accepts the following keys and their corresponding screen representations: » 0..9 and # » * ? ( ) , ; » f (Flash) Note: up to 16 digits/characters can be programmed for each key. » Application example: automatic dialing of branch and current account numbers in telebalance services. Attention: never program any key with passwords or credit card numbers as other people may see the key configuration.
-
Page 84: Configure Programmable Key Ranges
Cancel the key configuration This function cancels the configuration of the selected key. Select the option Cancel Key Configuration using the keys . Press Ok to confirm. and 10.9. Configure programmable key ranges Allows you to configure the programmable keys of the terminal and of the module(s) installed in the terminal to access and signal Line, E1 Channel or Extension. -
Page 85: Account Code Configuration
4. Select the desired type using the keys and ; 5. Press the Ok key to confirm. Factory Default: Signaling on. Configure the route for outgoing calls from the calls menu Through this option, you define a route to make calls to the numbers registered in the Calls service . 1. -
Page 86: View Version
It is also possible to program the Capture key by pressing it for 3 seconds. Once the key has been configured, simply press the key once for the selected option to be executed. 10.13. View version It allows you to see the version of the Smart Terminal and the version of the PABX. 1. -
Page 87: Warranty Terms
7. Intelbras is not responsible for the installation of this product, nor for any attempts of fraud and/or sabotage on its products. Keep the software updates and applications used up-to-date, if relevant, as well as the network protections required for protection against intrusions (hackers). - Page 88 Onde comprar? Quem instala?: 0800 7245115 Otros países / Other countries soporte@intelbras.com Producido por: / Produced by: Intelbras S/A – Indústria de Telecomunicação Eletrônica Brasileira 01.21 Rodovia SC 281, km 4,5 – Sertão do Maruim – São José/SC – 88122-001 Indústria brasileira CNPJ 82.901.000/0014-41 –...
Need help?
Do you have a question about the TI 5000 and is the answer not in the manual?
Questions and answers