
Subscribe to Our Youtube Channel
Related Manuals for Hisense H20MOWS3


Summary of Contents for Hisense H20MOWS3
- Page 1 User and Installation Manual Microwave Oven Model: H20MOWS3 H20MOBS3 H20MOMS3 Before installing or using the appliance, please read the manual carefully, and keep it for future reference.
-
Page 3: Table Of Contents
Thank you for choosing Hisense. We are sure you will find your new Microwave oven a pleasure to use. However, before you use the appliance, we recommend that you read through these instructions carefully, which provide details about installing and using the product. Please keep a copy for future reference. -
Page 4: Precautions To Avoid Possible Exposure To Excessive Microwave Energy
Precautions to Avoid Possible Exposure to Excessive Microwave Energy 1. Do not attempt to operate this oven with the door open since open-door operation can result in harmful exposure to microwave energy. It is important not to defeat or tamper with the safety interlocks. 2. - Page 5 6. To reduce the risk of fire in the oven cavity: a) When heating food in plastic or paper container, keep an eye on the oven due to the possibility of ignition; b) Remove wire twist-ties from paper or plastic bags before placing bag in oven. c) If smoke is observed, switch off or unplug the appliance and keep the door closed in order to stifle any flames.
- Page 6 supply network which supplies buildings used for domestic purposes. 17. This appliance is not intended for use by persons (including children) with reduced physical, sensory or mental capabilities, or lack of experience and knowledge, unless they have been given supervision or instruction concerning use of the appliance by a person responsible for their safety.
-
Page 7: Installation Guide
knowledge if they have been given supervision or instruction concerning use of the appliance in a safe way and understand the hazards involved. Children shall not play with the appliance. Cleaning and user maintenance shall not be made by children unless they are aged from 8 years and above and supervised. 38. -
Page 8: Grounding Instructions
Grounding Instructions This appliance must be grounded. This oven is equipped with a cord having a grounding wire with a grounding plug. It must be plugged into a wall receptacle that is properly installed and grounded. In the event of an electrical short circuit, grounding reduces risk of electric shock by providing an escape wire for the electric current. -
Page 9: Before Calling For Service
Before Calling For Service Before asking for service, please check each item below: ⚫ Check to ensure the oven is plugged in securely. If not, remove the plug from the outlet, wait 10 seconds, and plug it in again securely. ⚫... -
Page 10: Cooking Utensils Guide
Cooking Utensils Guide 1. Microwave cannot penetrate metal. Only use utensils that are suitable for use in microwave ovens. Metallic containers for food and beverages are not allowed during microwave cooking. This requirement is not applicable if the manufacturer specifies size and shape of metallic containers suitable for microwave cooking. -
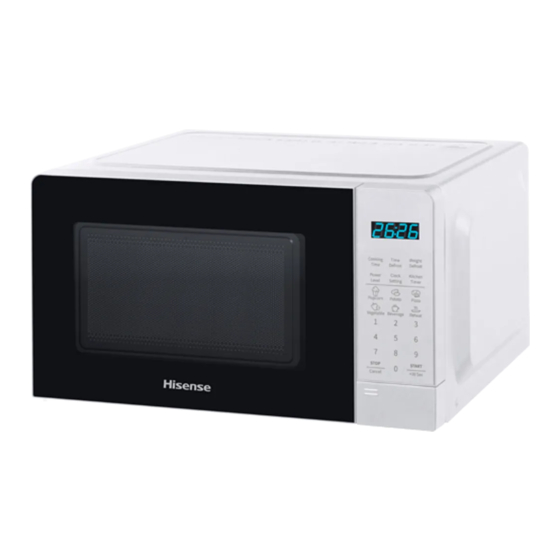
Page 11: Specifications
Specifications 230~240V~ 50Hz Rated Voltage/Frequency Rated Input Power 1100W(Microwave) Rated Output Power 700W(Microwave) Microwave Frequency 2450MHz Oven Capacity Ø245mm Turntable Diameter Dimensions W446xD323xH243mm External Net Weight Approx.9.4kg Product Diagram 1. Door Safety Lock System 2. Oven Window 3. Shaft 4. Roller Ring 5. -
Page 12: Control Panel
Control Panel ⚫ DISPLAY Cooking time, power level, action indicators, and clock time are displayed. ⚫ COOKING TIME Press to set microwave cooking program. ⚫ TIME DEFROST Press to set defrost program based on time. ⚫ WEIGHT DEFROST Press to set defrost program based on weight. ⚫... -
Page 13: Operation Instructions
Operation Instructions ➢ When the oven first plugged in, beep will sound and the display will show "1:01". ➢ In the process of setting, broke about 30 seconds the oven will return to standby mode. ➢ During cooking, if press STOP/CANCEL button once, the program will be paused, then press START/+30 SEC button to resume, but if press STOP/CANCEL button twice, the program will be canceled. - Page 14 1. In standby mode or during cooking, press KITCHEN TIMER button once, the display will show “ : ”. 2. Use number buttons to enter desired time. The longest time is 99 minutes and 99 seconds. 3. Press START/+30 SEC button to confirm, then start countdown. NOTE: When the countdown ends, the buzzer will beep to remind you.
- Page 15 Weight Defrost The defrosting time and power level are automatically set once the food weight is programmed. The frozen food weight ranges from 100 g to 1800 g. , the display will show ” 0 ”. 1. Press WEIGHT DEFROST button once 2.
- Page 16 Auto Cook For food or the following cooking mode, it is not necessary to program the cooking time and power. It is sufficient to indicate the type of food that you want to cook as well as the weight or servings of this food. 1.
-
Page 17: Cleaning And Care
Cleaning and Care Turn off the oven and remove the power plug from the wall socket before cleaning. Keep the inside of the oven clean. When food splatters or spilled liquids adhere to oven walls, wipe with a damp cloth. Mild detergent may be used if the oven gets very dirty.
Need help?
Do you have a question about the H20MOWS3 and is the answer not in the manual?
Questions and answers