
Related Manuals for Opencockpits B737 MAX AFT Overhead


Summary of Contents for Opencockpits B737 MAX AFT Overhead
- Page 1 Manual de Instalación y uso Installation & user`s Manual B737 MAX AFT Overhead...
- Page 2 Índice / Index Datos Técnicos Technical Introducción Montaje Data Introduction Assembly / Caution Precaución Configuración /Maintenance Configuration Mantenimiento...
- Page 3 [MEC-ESTDBOV7] y muestra total compatibilidad con el resto de módulos y tarjetas Opencockpits. The Overhead can be integrated both in our Opencockpits cabin frame B737 [MEC-SHELL73] and in our metallic structure for Overheads 737 [MEC-ESTDBOV7] and shows full compatibility with the rest of Opencockpits modules and cards.
- Page 4 2- Indicador IRS con retroiluminación BKI y conexión IDC, teclado retroiluminado, display de 7 segmentos con sus indicadores decimales y de grados, así como carácteres especiales para N,W,S,E. IRS indicator with BKI backlight and IDC connection, backlit keyboard, 7-segment display with decimal and degree indicators, as well as special characters for N, W, S, E.
- Page 5 7- Conjunto de tarjetas IOCards para gestionar todo el módulo con 2 conectores tipo USB. Set of IOCards to manage the entire module with 2 USB type connectors. 8- Caja de madera reforzada para transporte de 76X44X28 cm con un peso total embalado de 22 Kg. Reinforced wooden box for transport of 76X44X28 Cm.
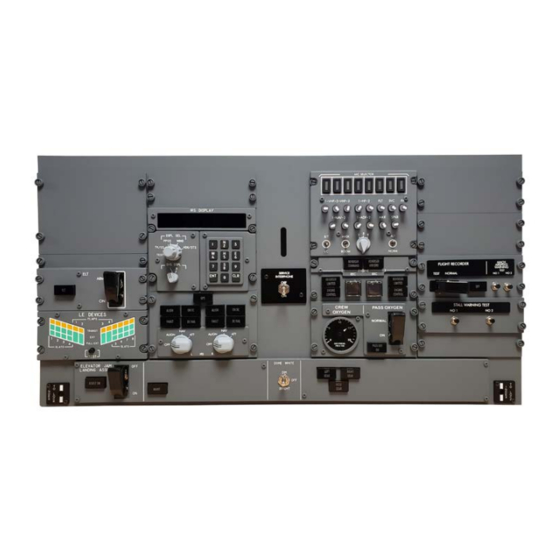
- Page 6 Los paneles incluídos son: The panels included are: -1 Panel Le Devices. - 1 Le Devices Panel. -1 Panel ELT. - 1 ELT Panel. -1 Panel IRS. - 1 IRS Panel. -1 Panel Audio. - 1 Audio Panel. -1 Panel Engines. - 1 Engines Panel.
-
Page 7: Datos Técnicos
Datos técnicos / Technical data Aspecto y medidas / Appearance, Measurements Las medidas del modulo (ancho x alto x profundidad) son: 66 cm x 34 cm x 11 cm. Aproximadamente 18 cm de profundidad con IOCards y componentes. The measurements of the module (width x height x depth) are: 66 cm x 34 cm x 11 cm. -
Page 8: Montaje
Los componentes electrónicos incluidos son los siguientes: Included electronics are as follows: Fuente de alimentación con salidas de 3.3V, 5V y 12V. Power supply with 3.3V, 5V and 12V outputs. 1 USB Expansion Card. 2 Master Card. ... - Page 9 Once we have seen the technical data of the AFT Overhead, we proceed to assemble it in its location. The AFT Overhead can be installed both in the metallic structure for Overheads 737 [MEC-ESTDBOV7] and in our cabin frame B737 [MEC- SHELL73].
- Page 10 En los orificios se colocan los tornillos incluidos y a su vez, se introducen en las ranuras de los soportes de la Estructura de overhead y se desplazan lateralmente. The included screws are placed in the holes and in turn are inserted into the slots of the supports of the Overhead Structure and moved laterally.
- Page 11 2-MONTAJE EN ARMAZON CABINA 737 FRAME CAB 737 MOUNT El chasis de nuestro AFT Overhead viene provisto de cuatro orificios, dos en la parte izquierda y dos el la derecha. The chassis of our AFT Overhead is provided with four holes, two on the left and two on the right.
- Page 12 Por último, se aprietan los tornillos una vez colocado el AFT Overhead en la posición deseada. The included screws are placed in the holes, then the AFT Overhead is placed in its location in the 737 cabin frame. The screws are inserted into the grooves of the cockpit frame stiffeners and moved laterally.
- Page 13 Next we will explain the wiring of the electronics and assembly of the IDC panels. El AFT Overhead lleva integrado una Expansión Card con dos Master Card. La Master Card 1 gestiona las Input Card y el conector output 2 de la Tarjeta Overhead AFT.
- Page 14 Para esta configuración, las variables de entradas y salidas serían las siguientes (el listado pertenece a la definición del 6_13_MAX_B737_ OVHAFT_PROSIM de Opencockpits basado en la tarjeta OVERHEAD AFT). For this configuration, the input and output variables would be the following (the list belongs to the definition of 6_13_MAX_B737_ OVHAFT_PROSIM from Opencockpits based on the OVERHEAD AFT card).
- Page 15 //**************** //* OUTPUTS-LEDS * //**************** // ******* // * ELT * // ******* VAR 6000, NAME ELT_O, STATIC, LINK IOCARD_OUT, DEVICE 6, OUTPUT 93 // ************** // * LE DEVICES * // ************** VAR 6002, NAME SLAT1TRANS, STATIC, LINK IOCARD_OUT, DEVICE 6, OUTPUT 11 VAR 6004, NAME SLAT1EXT, STATIC, LINK IOCARD_OUT, DEVICE 6, OUTPUT 12 VAR 6006, NAME SLAT1FULL, STATIC, LINK IOCARD_OUT, DEVICE 6, OUTPUT 13 VAR 6008, NAME SLAT2TRANS, STATIC, LINK IOCARD_OUT, DEVICE 6, OUTPUT 14...
- Page 16 VAR 6054, NAME FLAP2TRANS, STATIC, LINK IOCARD_OUT, DEVICE 6, OUTPUT 25 VAR 6056, NAME FLAP2EXT, STATIC, LINK IOCARD_OUT, DEVICE 6, OUTPUT 26 VAR 6058, NAME FLAP3TRANS, STATIC, LINK IOCARD_OUT, DEVICE 6, OUTPUT 27 VAR 6060, NAME FLAP3EXT, STATIC, LINK IOCARD_OUT, DEVICE 6, OUTPUT 28 VAR 6062, NAME FLAP4TRANS, STATIC, LINK IOCARD_OUT, DEVICE 6, OUTPUT 29 VAR 6064, NAME FLAP4EXT, STATIC, LINK IOCARD_OUT, DEVICE 6, OUTPUT 30 // *******************************...
- Page 17 VAR 6098, NAME AO1_MIC_VH1, STATIC, LINK IOCARD_OUT, DEVICE 6, OUTPUT 75 VAR 6100, NAME AO1_MIC_VH2, STATIC, LINK IOCARD_OUT, DEVICE 6, OUTPUT 76 VAR 6102, NAME AO1_VOL_VH1, STATIC, LINK IOCARD_OUT, DEVICE 6, OUTPUT 77 VAR 6104, NAME AO1_VOL_VH2, STATIC, LINK IOCARD_OUT, DEVICE 6, OUTPUT 78 VAR 6106, NAME AO1_VOL_NV1, STATIC, LINK IOCARD_OUT, DEVICE 6, OUTPUT 79 VAR 6108, NAME AO1_VOL_NV2, STATIC, LINK IOCARD_OUT, DEVICE 6, OUTPUT 80 VAR 6110, NAME AO1_VOL_AD1, STATIC, LINK IOCARD_OUT, DEVICE 6, OUTPUT 81...
- Page 18 // * AFT GEARS * // ************* VAR 6142, NAME AFT_LGEAR_O, STATIC, LINK IOCARD_OUT, DEVICE 6, OUTPUT 109 VAR 6144, NAME AFT_RGEAR_O, STATIC, LINK IOCARD_OUT, DEVICE 6, OUTPUT 92 VAR 6146, NAME AFT_NOSEGEAR_, STATIC, LINK IOCARD_OUT, DEVICE 6, OUTPUT 111 // ******************* // * FLIGHT RECORDER * // *******************...
- Page 19 VAR 6168, NAME IRS_KEY1_I, STATIC, LINK IOCARD_SW, DEVICE 6, INPUT 36 VAR 6170, NAME IRS_KEY2_I, STATIC, LINK IOCARD_SW, DEVICE 6, INPUT 44 VAR 6172, NAME IRS_KEY3_I, STATIC, LINK IOCARD_SW, DEVICE 6, INPUT 42 VAR 6174, NAME IRS_KEY4_I, STATIC, LINK IOCARD_SW, DEVICE 6, INPUT 38 VAR 6176, NAME IRS_KEY5_I, STATIC, LINK IOCARD_SW, DEVICE 6, INPUT 40 VAR 6178, NAME IRS_KEY6_I, STATIC, LINK IOCARD_SW, DEVICE 6, INPUT 46 VAR 6180, NAME IRS_KEY7_I, STATIC, LINK IOCARD_SW, DEVICE 6, INPUT 43...
- Page 20 // ********* VAR 6214, NAME AI1_MIC_VH1, STATIC, LINK IOCARD_SW, DEVICE 6, INPUT 54 VAR 6216, NAME AI1_MIC_VH2, STATIC, LINK IOCARD_SW, DEVICE 6, INPUT 55 VAR 6218, NAME AI1_VOL_VH1, STATIC, LINK IOCARD_SW, DEVICE 6, INPUT 56 VAR 6220, NAME AI1_VOL_VH2, STATIC, LINK IOCARD_SW, DEVICE 6, INPUT 57 VAR 6222, NAME AI1_VOL_NV1, STATIC, LINK IOCARD_SW, DEVICE 6, INPUT 58 VAR 6224, NAME AI1_VOL_NV2, STATIC, LINK IOCARD_SW, DEVICE 6, INPUT 59 VAR 6226, NAME AI1_VOL_AD1, STATIC, LINK IOCARD_SW, DEVICE 6, INPUT 60...
- Page 21 VAR 6254, NAME STALLWT1_I, STATIC, LINK IOCARD_SW, DEVICE 6, INPUT 90 VAR 6256, NAME STALLWT2_I, STATIC, LINK IOCARD_SW, DEVICE 6, INPUT 91 // SERVO VAR 6258, NAME SERVO_OXY, STATIC, LINK USB_SERVOS, DEVICE 13, OUTPUT 1, POSL 150, POSC 512, POSR 1023, TYPE 1 // ************** // * IRS DIGITS * // **************...
- Page 22 VAR 6262, NAME IRS_R_1, STATIC, LINK IOCARD_DISPLAY, DEVICE 6, DIGIT 1, NUMBERS 6 VAR 6264, NAME IRS_EW, STATIC, LINK IOCARD_DISPLAY, DEVICE 6, DIGIT 7, NUMBERS 1 VAR 6266, NAME IRS_LCONV, STATIC IF &IRS_TEST_I = 1 &IRS_NS = 8 // NORTE/NORTH OFF &IRS_L_1 = 88888 ELSE IF &IRS_TEST_I = 0...
- Page 23 Configuration Configuración / El AFT Overhead 737 MAX se envía completamente ensamblado y listo para ser alimentado y conectado al ordenador (Tarjetas USB Expansion Card y USB Servo Plus Card). The Overhead AFT 737 MAX is shipped fully assembled and ready to be powered and attached to the computer (USB Expansion Card and USB Servo Plus Card).
- Page 24 Hacer clic en la opción Open Scrp. Dir. Click in the SIOC option Open Scrp. Dir.
- Page 25 Opencockpits, podrá encontrar los scripts que se actualizarán para los addons disponibles. In the Overhead Aft 737 Max product sheet on the Opencockpits website, you can find the scripts that will be updated for the addons available. Clic en SIOC en Multiple Scripts...
- Page 26 Cargar el codigo Script y luego guardar y salir. Load the script code and then save & exit.
- Page 27 Hacer clic en la opción de Config Devices de SIOC. Click in the SIOC Option Config Devices. Enlazar el hardware, en primer lugar el dispositivo USB-Expansion. Link the hardware, first the USB-Expansion device. 1 Seleccione el dispositivo conectado. Select the Device connected (USB Expancion). 2 Seleccione el script (IDX = 6).
- Page 28 5 Haga clic en OK. Click in OK. 6 Haga clic en SAVE &Exit. Click in Save & Exit Proceder de la misma forma con la tarjeta USB Servo Card. Proceed in the same way with the USB Servo Card.
- Page 29 Una vez configuradas las tarjetas, podemos comprobar todos los elementos del Overhead aft 737 Max como interruptores, codificadores, indicadores y dígitos. Usaremos para esto el SIOC Monitor. Once we have configured the cards we can check all elements of the Overhead 737 Max such as switches, encoders, indicators and digits.
- Page 30 Complementos / addons: Debido a la gran multitud de complementos disponibles, no podemos especificar la configuración de cada una de ellas. Sin embargo, sirva de ejemplo los pasos a seguir en la configuración del hardware en ProSim: Due to the large multitude of plugins available, we cannot specify the settings for each of them.
- Page 31 ProSim config.xml file under the <mappings> tab. It is very important that ProSim is not running to make these changes. If you prefer to do the process automatically, skip to step <config> <container name="Opencockpits AFT Overhead"> <mappings> <mapping connection="ELT"> <iocp serial="0" port="6000" />...
- Page 32 <mapping connection="Slats extended 4"> <iocp serial="0" port="6022" /> </mapping> <mapping connection="Slats extended 5"> <iocp serial="0" port="6028" /> </mapping> <mapping connection="Slats extended 6"> <iocp serial="0" port="6034" /> </mapping> <mapping connection="Slats extended 7"> <iocp serial="0" port="6040" /> </mapping> <mapping connection="Slats extended 8"> <iocp serial="0"...
- Page 33 <iocp serial="0" port="6024" /> </mapping> <mapping connection="Slats fullExtended 5"> <iocp serial="0" port="6030" /> </mapping> <mapping connection="Slats fullExtended 6"> <iocp serial="0" port="6036" /> </mapping> <mapping connection="Slats fullExtended 7"> <iocp serial="0" port="6042" /> </mapping> <mapping connection="Slats fullExtended 8"> <iocp serial="0" port="6048" /> </mapping>...
- Page 34 </mapping> <mapping connection="Slats transit 5"> <iocp serial="0" port="6026" /> </mapping> <mapping connection="Slats transit 6"> <iocp serial="0" port="6032" /> </mapping> <mapping connection="Slats transit 7"> <iocp serial="0" port="6038" /> </mapping> <mapping connection="Slats transit 8"> <iocp serial="0" port="6044" /> </mapping> <mapping connection="Flaps extended 1"> <iocp serial="0"...
- Page 35 <mapping connection="Flaps transit 1"> <iocp serial="0" port="6050" /> </mapping> <mapping connection="Flaps transit 2"> <iocp serial="0" port="6054" /> </mapping> <mapping connection="Flaps transit 3"> <iocp serial="0" port="6058" /> </mapping> <mapping connection="Flaps transit 4"> <iocp serial="0" port="6062" /> </mapping> <mapping connection="Landing Assist On"> <iocp serial="0"...
- Page 36 <iocp serial="0" port="6078" /> </mapping> <mapping connection="IRS Panel dot 2"> <iocp serial="0" port="6076" /> </mapping> <mapping connection="IRS Panel dot 3"> <iocp serial="0" port="6074" /> </mapping> <mapping connection="IRS Panel dot 4"> <iocp serial="0" port="6072" /> </mapping> <mapping connection="IRS Panel dot 5"> <iocp serial="0"...
- Page 37 </mapping> <mapping connection="IRS left align"> <iocp serial="0" port="6082" /> </mapping> <mapping connection="IRS right DC Fail"> <iocp serial="0" port="6096" /> </mapping> <mapping connection="IRS right Fault"> <iocp serial="0" port="6092" /> </mapping> <mapping connection="IRS right On DC"> <iocp serial="0" port="6094" /> </mapping> <mapping connection="IRS right align"> <iocp serial="0"...
- Page 38 <mapping connection="IRS Disp Sel Wind"> <iocp serial="0" port="6162" /> </mapping> <mapping connection="IRS Disp Sel HDG/STS"> <iocp serial="0" port="6164" /> </mapping> <mapping connection="IRS Keypad 0 Pushed"> <iocp serial="0" port="6188" /> </mapping> <mapping connection="IRS Keypad 1 Pushed"> <iocp serial="0" port="6168" /> </mapping> <mapping connection="IRS Keypad 2 Pushed">...
- Page 39 <iocp serial="0" port="6178" /> </mapping> <mapping connection="IRS Keypad 7 Pushed"> <iocp serial="0" port="6180" /> </mapping> <mapping connection="IRS Keypad 8 Pushed"> <iocp serial="0" port="6182" /> </mapping> <mapping connection="IRS Keypad 9 Pushed"> <iocp serial="0" port="6184" /> </mapping> <mapping connection="IRS Keypad CLR Pushed"> <iocp serial="0"...
- Page 40 </mapping> <mapping connection="IRS left Align"> <iocp serial="0" port="6194" /> </mapping> <mapping connection="IRS left Att"> <iocp serial="0" port="6198" type="SWITCH" /> </mapping> <mapping connection="IRS right Nav"> <iocp serial="0" port="6204" /> </mapping> <mapping connection="IRS right Off"> <iocp serial="0" port="6200" /> </mapping> <mapping connection="IRS right Align"> <iocp serial="0"...
- Page 41 <mapping connection="ASP OBS VHF 2 vol Pushed"> <iocp serial="0" port="6220" /> </mapping> <mapping connection="ASP OBS VHF 2 vol send Pushed"> <iocp serial="0" port="6216" /> </mapping> <mapping connection="ASP OBS NAV 1 vol Pushed"> <iocp serial="0" port="6222" /> </mapping> <mapping connection="ASP OBS NAV 2 vol Pushed"> <iocp serial="0"...
- Page 42 <iocp serial="0" port="6238" /> </mapping> <mapping connection="ASP OBS IC Selected On"> <iocp serial="0" port="6234" /> </mapping> <mapping connection="ASP OBS Normal Selected On"> <iocp serial="0" port="6240" /> </mapping> <mapping connection="ASP OBS RT Selected On"> <iocp serial="0" port="6232" /> </mapping> <mapping connection="Flight recorder Test"> <iocp serial="0"...
- Page 43 <iocp serial="0" port="6256" /> </mapping> <mapping connection="ASP OBS ADF 1 vol"> <iocp serial="0" port="6110" /> </mapping> <mapping connection="ASP OBS ADF 2 vol"> <iocp serial="0" port="6112" /> </mapping> <mapping connection="ASP OBS Marker vol"> <iocp serial="0" port="6114" /> </mapping> <mapping connection="ASP OBS NAV 1 vol"> <iocp serial="0"...
- Page 44 </mapping> <mapping connection="ASP OBS VHF 2 vol send bar"> <iocp serial="0" port="6100" /> </mapping> <mapping connection="MAINT"> <iocp serial="0" port="6118" /> </mapping> <mapping connection="Engine control left"> <iocp serial="0" port="6124" /> </mapping> <mapping connection="Engine control right"> <iocp serial="0" port="6126" /> </mapping> <mapping connection="Reverser AIR/GRD"> <iocp serial="0"...
- Page 45 <mapping connection="EEC Altn left"> <iocp serial="0" port="6128" /> </mapping> <mapping connection="EEC Altn right"> <iocp serial="0" port="6132" /> </mapping> <mapping connection="EEC On left"> <iocp serial="0" port="6130" /> </mapping> <mapping connection="EEC On right"> <iocp serial="0" port="6134" /> </mapping> <mapping connection="EEC left Pushed"> <iocp serial="0"...
- Page 46 <iocp serial="0" port="6142" /> </mapping> <mapping connection="Gear nose aft ovh"> <iocp serial="0" port="6146" /> </mapping> <mapping connection="Gear right aft ovh"> <iocp serial="0" port="6144" /> </mapping> <mapping connection="Oxygen pressure"> <iocp serial="0" port="6258"> <calibrator> <calibration input="0" output="160" margin="0" rawInput="0" /> <calibration input="5" output="330"...
- Page 47 <mapping connection="GPS"> <iocp serial="0" port="6080" /> </mapping> <mapping connection="IRS Display left char state"> <iocp serial="0" port="6272" /> </mapping> <mapping connection="IRS Display right char state"> <iocp serial="0" port="6274" /> </mapping> </mappings> </container> </config> 1. Siempre y cuando no hayamos realizado el paso 0, en el menú de configuración de ProSim (Config>Import Configuration) As long as we have not done step 0, in the ProSim configuration menu (Config>...
- Page 48 2.Seleccionar el archivo.XML que puede descargar desde la Web de Opencockpit y Abrir Select the XML that you can download of the Opencockpits Web and Open...
- Page 49 3.Marcar la casilla y hacel clic en OK Check the box and OK 4. En el menú de configuración de ProSim ( Config>Configuration) en la pestaña de Driver, añadir en IOCP Server la dirección IP y e Puerto. In the ProSim configuration menu (Config> Configuration) in the Driver tab, add the IP address and the Port to the IOCP Server.
- Page 50 Precaución / Caution IMPORTANTE: PARA PREVENIR CUALQUIER MAL FUNCIONAMIENTO Y EVITAR DAÑOS, DETALLADAMENTE ESTE MANUAL INSTRUCCIONES ANTES DE CONECTAR Y OPERAR EL MÓDULO. CONSERVE EL MANUAL PARA FUTURAS REFERENCIAS. IMPORTANT: TO PREVENT ANY MALFUNCTION AND AVOID DAMAGE, READ THIS INSTRUCTION MANUAL CAREFULLY BEFORE CONNECTING AND OPERATING THE MODULE.
- Page 51 Centro de servicio al cliente de Opencockpits. If the product generates a burning or smoke smell, immediately unplug the power cord and contact the Opencockpits Customer Service Center. 6. No coloque o vierta productos inflamables sobre el artículo. No instale el artículo cerca de fuentes de calor.
- Page 52 Keep the packaging out of the reach of children. Do not allow children to handle the product without adult supervision. 8. No instale el producto en un lugar expuesto al polvo, la humedad o humo. Do not install the product in a place exposed to dust, moisture or smoke.
-
Page 53: Mantenimiento
1. Limpiar mensualmente el panel con un paño suave y humedecido. Clean the bearing rails monthly with a soft and wet cloth. 2. Si algún elemento presenta algún desperfecto, póngase en contacto dirección soporte Opencockpits support@opencockpits.com If any item is defective, please contact the Opencockpits support address support@opencockpits.com... - Page 54 Do not use cleaners that contain alcohol, thinners or surfactants on the product. Póngase en contacto con la dirección de soporte de Opencockpits support@opencockpits.com si se detecta algún mal funcionamiento. Contact Opencockpits support address support@opencockpits.com if any...
- Page 55 • Ventas / Sales: +34 629 826 213 (Lunes a Viernes. 10 a 14 horas / Monday to Friday Spanish time 10 – 14 hours) sales@opencockpits.com www.opencockpits.com • Soporte Técnico / Technical Support: support@opencockpits.com • Ventas / Sales:...
Need help?
Do you have a question about the B737 MAX AFT Overhead and is the answer not in the manual?
Questions and answers