Table of Contents
Advertisement
Quick Links
Advertisement
Table of Contents

Subscribe to Our Youtube Channel
Related Manuals for Nova I-MAC

Summary of Contents for Nova I-MAC
- Page 1 User’s Manual...
-
Page 3: Table Of Contents
Content 1. Reference.................. 2 1.1 General Features ............2 2.Product Overview ............... 3 2.1 Front Panel ..............3 2.2 Rear Panel..............4 2.3 Remote Control Unit (RCU) ..........5 3.Installation ................7 3.1 Antenna Setting ............. 7 3.2 USALS Setup ..............7 3.3 Factory Default .............. -
Page 4: Reference
1. Reference 1.1 General Features DVB-S/DVB-S2 Satellite Compliant (MPEG-II/ MPEG-IV/ H.264) SCPC & MCPC receivable from Ku and C band satellites Universal, Single, Single S Band Wideband LNB DiSEqC1.0/1.1/1.2/1.3 (USALS) Blind search supported Auto DiSEqC Search PAL/NTSC Conversion True full Color (32 bits) on screen display (OSD) 8 favorite group and parental lock supported Multi-language menu supported Multi-language audio supported... -
Page 5: Product Overview
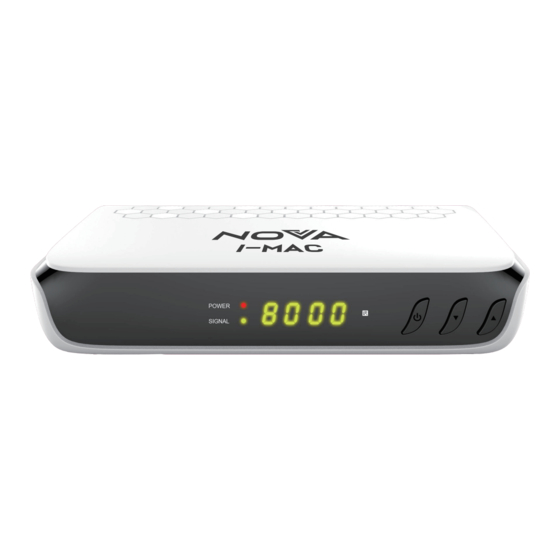
2.Product Overview 2.1 Front Panel 1. Power LED:Power indicator. 2. Signal LED:Signal indicator. 3. Display: It displays channel information. In standby mode it displays local time. 4. POWER: Switch between operation and standby modes. 5. ▲/▼: Change channels while watching programme or change option from up to down. -
Page 6: Rear Panel
2.2 Rear Panel 1. LNB IN:Connect the satellite antenna cable. 2. IR_EX: It displays channel information. In standby mode it displays local time. 3. USB2.0: USB 2.0 Host Port. 4. RS232: Connect to the computer using serial line. 5. DV-OUT: Connect to the TV using an HDMI cable. 6. -
Page 7: Remote Control Unit (Rcu)
2.3 Remote Control Unit (RCU) 1. POWER : Switch between operation and standby modes. 2. MUTE : Mute audio. 3. Mode: Change the display format. 4. Time: Setup the event timer. 5. TV/R: Switch between TV and RADIO. 6. Display: Set the display mode. 7. - Page 8 23. FIND: Quickly find channels. 24. SAT: Show the scanned satellite list. 25. PG+/PG-: Page up/down on menu or channel list. 26. FAV: Display favorite channel list you set before. 27. IP: Enter IP setting menu. 28. VOL+/VOL-: Change volume. 29.
-
Page 9: 3.Installation
3.Installation Tip: The default password is 0000. If you have forgotten your password, please contact your local product distributor. 3.1 Antenna Setting Menu-> Installation->Antenna Setting 3.2 USALS Setup Menu-> Installation->USALS Setting 3.3 Factory Default Menu-> Installation-> Factory Default Warning: Please note that once you perform Factory Default all, all data and settings will be deleted... -
Page 10: Channel Manager
4. Channel Manager 4.1 Edit Channel Menu-> Channel Manager->Edit Channels 4.2 Edit Favorite Menu->Channel Manager -> Edit Favorites Tip:Radio Channels operation similar to the TV Channels. 4.3 Sort Channels You can sort the channels list. Menu->Channel Manager ->Sort Channels 4.4 Delete Satellite Channels You can delete the satellite. -
Page 11: System Setting
5. System Setting 5.1 System Menu->System Setting->System ◄ /► Tip:You can set all the settings here by pressing button. 5.2 OSD Menu-> System Setting ->OSD 5.3 Parental control Menu->System Setting ->Parental Control Parental Control allows you to set limits for each program or change your previous password. -
Page 12: About Stb
5.4.2 Event Timer Menu-> System Setting ->Event Timer SLEEP Timer can set the automatic turn off time. 5.4.3 Sleep Timer Menu-> System Setting ->Sleep Timer SLEEP Timer can set the automatic turn off time. 5.5 About STB ABOUT STB can get the information about the STB, such as Model ID, software &... -
Page 13: App
6. APP Menu-> Network Application 7. USB USB Menu Menu->USB Menu or press the USB button directly to enter the USB menu. if hard-disk is to be used with the receiver, please make sure it is inserted before booting up. USB Manager Menu->... -
Page 14: Basic Operation
9. Basic Operation EPG: You can Press the EPG button view the EPG information of all channels in time and date order. In EPG menu, Press the RED button to switch EPG mode between Weekly EPG and Day EPG. Subtitle: You can press the SUB to select the language for the subtitle if the program provides subtitle information. -
Page 15: Trouble Shooting Problem Solving
10. Trouble Shooting Problem Solving Before contacting your local service centre, please read the tips below carefully. If the problem persists after completing the following procedure, please contact your local product distributor or service centre for further instructions. 1. No message displayed on the front display. (The product will not switch on.) •... - Page 16 towards the receiving part of the product. • Remove and reinsert the batteries in the remote control. • Replace the batteries in the remote control for a new set. 6. Cannot connect network . • Make sure the network of your family is good. •...
Need help?
Do you have a question about the I-MAC and is the answer not in the manual?
Questions and answers