Table of Contents
Advertisement
Quick Links
Advertisement
Table of Contents

Summary of Contents for AMS ALF19 Series
- Page 1 Automatic Label Feeder ALF19 Series Operating Instructions ALF19 Series...
- Page 2 Document number 80018-AA Version 0.1 ALF19 Series ALF19-21 Manufacturer AMS Software & Elektronik GmbH Lise-Meitner-Strasse 9 24941 Flensburg Germany Tel.: +49 461 90 39 80 Fax: +49 461 90 39 85 0 info@amsde.com ALF19 Series...
-
Page 3: Table Of Contents
Mounting the label feeder on the machine adapter ..........32 Threading the label carrier ..................35 Setting examples ....................41 5 The label feeder in operation ............45 Troubleshooting ...................... 47 6 Maintaining the label feeder ............. 50 7 Packing the label feeder ..............51 ALF19 Series... - Page 4 9 Annex ....................53 Declaration of conformity ..................54 Repeatability test by the Fraunhofer Institute ............56 Technical data ......................58 Spare parts list ......................60 Machine adapter table .................... 61 Confirmation form ....................63 10 Index ....................64 ALF19 Series...
-
Page 5: About These Operating Instructions
1.1 General information about these operating instructions These operating instructions contain important information about the Automatic Label Feeder of the ALF19 series (hereinafter referred to as the label feeder) and its handling. They are aimed at the operator and people who work on and with the label feeder. -
Page 6: Design Of The Operating Instructions
Caption Text Safety first! Link to another chapter or section of these operating instructions. Bold type Highlights individual terms in the text. Italics Highlight menu levels or entries in the text. → Menu navigation ALF19 Series... -
Page 7: List Of Abbreviations
About these operating instructions 7 1.3 List of abbreviations Abbreviation Term Automatic Label Feeder Serial input output ALF19 Series... -
Page 8: Glossary
Parameter in the main menu that describes the length of the label. Last line from the The version of the software on the TFT board is counter menu displayed in the last line. Pulse Parameter in the submenu that defines the pulse length of the sensor. ALF19 Series... - Page 9 Counter The number of labels conveyed, the operating hours, the conveying length and the revolutions of the winder are displayed here. The version of the motor board of the Alf19 is displayed in the last line. ALF19 Series...
-
Page 10: Safety First
Making sure that the personnel are adequately qualified. Making sure that the operating instructions are read and understood by the personnel before starting work We recommend having the confirmation form 60 signed by every employee who works with or on the label feeder . ALF19 Series... -
Page 11: Presentation Of Warning Notices And Other Information
In addition to the warning notices, notes are also used to warn of possible damage to property. ATTENTION Type and source of the hazard. Failure to observe this warning can lead to minor to moderate injury! Measure to avoid the damage. ALF19 Series... - Page 12 12 Safety first General notes General notes containing important information are also used. Note • This note contains important information. Tools or aids • Tool or aid ALF19 Series...
-
Page 13: Personnel Requirement
In principle, only people who can be expected to work reliably are allowed to work on and with the label feeder. The ability to react must not be impaired by drugs, alcohol or medication. The assigned personnel must have read the operating instructions. ALF19 Series... -
Page 14: General Safety Information
Only operate the label feeder when it is in perfect and fully functional condition. Do not make any technical changes to the label feeder (except for changes authorised by us). ALF19 Series... -
Page 15: The Label Feeder At A Glance
The label feeder at a glance 3.1 Scope of delivery Scope of delivery (standard) • 1 label feeder of the ALF19 series • 1 pair of tweezers • 1 original operating instructions (German) • 1 translation of the original operating instructions Accessories (optional) •... - Page 16 Menu structure and Settings 24 or The control panel The ALF19 series currently includes the model: ALF19-21. Firmware The firmware of the label feeder enables the setting of various parameters, which can be set via the control unit, the machine adapter.
-
Page 17: Views
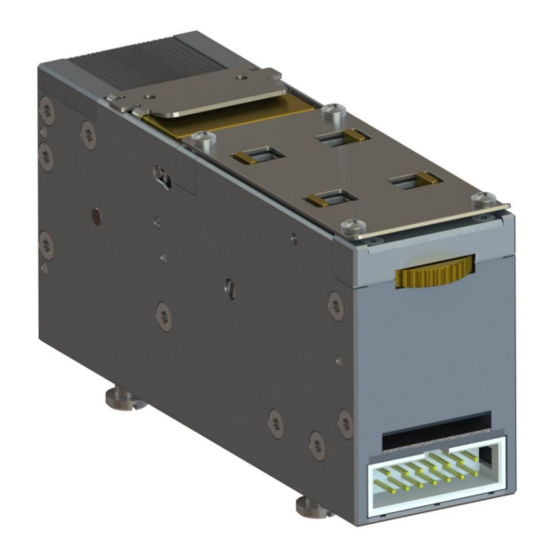
Labels The label feeders of the ALF19 series transport labels from 3 x 3 mm to 19 x 21 mm. The labels can be made of different materials such as paper or polyamide. They can be made of non-transparent, semi-transparent or fully transparent material. - Page 18 Fig. 1 Components of the label feeder Label rubber holder Adjusting wheel for width adjustment Bracket clamp Output opening Width adjustment Stepper motor board interface connection Feed opening Screw for manual label carrier transport Functions of the controls and components Control element Function Components ALF19 Series...
-
Page 19: Machine Adapter
Is the holder for the processed labels. Adjusting wheel for width Adjusting wheel to adjustment continuously adjust the width of the label carrier. Bracket clamp Device for implementing the label carrier. 3.3.2 Machine adapter Example: Siemens Siplace B30 ALF19 Series... - Page 20 20 The label feeder at a glance Fig. 2 Siemens Siplace B30 machine adapter Label feeder Machine adapter Dancer arm Winder Control element Machine adapter of the Siplace X/E series ALF19 Series...
-
Page 21: The Control Panel
The label feeder at a glance 21 Fig. 3 Machine adapter for Siplace X/E series Label feeder Machine adapter Dancer arm Winder Control element The control panel Control panel view ALF19 Series... - Page 22 The control panel has a colour LCD display, four status LEDs and three buttons. (R / Down button, M / Mode button and F / Up button). Use these buttons to navigate the menu structure. Representation of the operating states in label mode ALF19 Series...
-
Page 23: Menu Structure And Settings
The label is lights lights conveyed to the continuously continuously pick-up position on the shelf and liner material is wound up or conveyed away. Reserved for error flashes messages 3.5 Menu structure and settings ALF19 Series... - Page 24 24 The label feeder at a glance Note • The following description refers to firmware versions from V0.1.1. Menu structure Fig. 5 Menu structure Start screen Main menu Submenu Navigating the menu structure ALF19 Series...
- Page 25 D2→ C2→ W→ P→ SC→ Z→SB) The start screen is displayed for 1 minute and is then automatically switched to standby mode. You can read about the special cases of the settings in the section Setting examples 41 . Main menu ALF19 Series...
- Page 26 0.1 – 1 sec. Time Defines the delay time for label conveyance after a label has been picked up from the pick- and-place machine or the conveyance button Factory setting has been pressed. 0.1 sec. Submenu ALF19 Series...
- Page 27 Acc2 This parameter defines the acceleration of the winding motor. Factory setting 1.0 rps² Dec2 This parameter defines the deceleration of the 1–20 rps² winding motor. Factory setting 10 rps² Symbol Parameter Description of the parameter Value range ALF19 Series...
- Page 28 Counter The number of labels conveyed, the operating hours, the conveying length and the revolutions of the winder are displayed here. The software version of the ALF19's motor board is displayed in the last line Saving changed values ALF19 Series...
- Page 29 The current parameter is reset to the factory setting. Up button at the same time. Resetting all parameters to the factory setting is not possible. Note • When replacing the label feeder, all parameters must be set again. ALF19 Series...
-
Page 30: Preparing The Label Feeder For Operation
4.1 Requirements for the installation site • The label feeder is designed exclusively for indoor use. • For optimal operation, the maximum permissible ambient temperature is 30°C. • For optimal operation, the maximum permissible relative humidity is 60%. ALF19 Series... -
Page 31: Unpacking The Label Feeder
The label feeder is only fully functional with all components. Operating an incomplete label feeder can impair functionality! Check that the delivery is complete. If the delivery is incomplete, please contact us immediately. The label feeder is unpacked and ready for assembly. 4.3 Power supply ALF19 Series... -
Page 32: Mounting The Label Feeder On The Machine Adapter
The power supply units have connector plugs for EN, UK and US connections. There are machine adapters that only need to be connected with the help of a host feeder or relevant components from the pick-and-place machine. 4.4 Mounting the label feeder on the machine adapter ALF19 Series... - Page 33 Preparing the label feeder for operation 33 Note • No tools are required to attach the Alf19 label feeder. • The label feeders of the ALF19 series are compatible with several pick-and-place machines from different manufacturers. The section Machine adapter table 59 shows which machine adapter is compatible with which pick-and-place machine.
- Page 34 • The assembly of the label feeder including the machine adapter depends on the series. • Depending on the model of the pick-and-place machine used, the label feeder is connected to the power supply in different ways. Pick-and-place machine Power supply ALF19 Series...
-
Page 35: Threading The Label Carrier
The power supply is now established. The mounted label feeder is ready for threading the label carrier. 4.5 Threading the label carrier Tools or aids ALF19 Series... - Page 36 ATTENTION Paper jam due to incompletely threaded label carrier. If you thread the label carrier incompletely into the label feeder, this can lead to a paper jam! Always pull the label carrier completely through the label feeder. ALF19 Series...
- Page 37 Before threading the label carrier, remove the labels from the first 10 cm. Alternatively, you can stick a piece of label backing without labels of the same length to the label roll. ALF19 Series...
- Page 38 (3). Pull the label carrier approx. 10 cm further out of the label feeder. The width adjustment (2) is set to the width of the label carrier by turning the adjusting wheel (4). ALF19 Series...
- Page 39 Please close the clamp (3) and use the "F button" on the control panel to convey the empty label carrier tape approx. 10 cm further out of the label feeder. See Fig. 11 Fig. 11 Running the label carrier ALF19 Series...
- Page 40 The label carrier is fully inserted into the label feeder. Press the Mode button once to go to Label mode L. The label feeder is in Label mode L and ready for setting or programming. ALF19 Series...
-
Page 41: Setting Examples
To avoid this problem, we recommend, e.g. for a 15 mm long label a feed of a minimum of 12 mm / a maximum of approx. 14.5 mm. ALF19 Series... - Page 42 The parameter T was changed from 100 ms to 50 ms. The waiting time after picking up a label until the next label is transported has been halved. Press the Mode button once to return to the start screen to save the changed value. ALF19 Series...
- Page 43 You are in the submenu Parameter ST. The current setting for ST is displayed (factory setting 10.0 or customer setting). Press the Mode button once. You are in the submenu Parameter A1. The current setting for A1 is displayed (factory setting 1.0 or customer setting). ALF19 Series...
- Page 44 The parameter D1 was changed from 100 m/s² to 50 m/s². The deceleration of the label transport is reduced to 50 m/s². Press the Mode button eleven times to return to the start screen to save the changed value. ALF19 Series...
-
Page 45: The Label Feeder In Operation
The label feeder in operation 45 The label feeder in operation Fig. 12 The Label Feeder in operation Label feeder Machine adapter Pick-and-place machine ALF19 Series... - Page 46 Avoid paper jams by preventing labels from getting inside the label feeder. Make sure that the empty label carrier at the output opening cannot hit any obstacles when it emerges. Perform visual inspections at regular intervals during operation. ALF19 Series...
-
Page 47: Troubleshooting
Take the label feeder out of the pick-and-place machine. Slightly lift the locking flap. Use the screwdriver to turn the screw for manual label carrier transport clockwise while at the same time carefully pulling the label carrier back through the feed opening. ALF19 Series... - Page 48 Check that the label carrier is precisely centred. To do this, read the section Threading the label carrier 36 . Check the setting of the parameters. For more information, read the section Menu structure and settings 24 . ALF19 Series...
- Page 49 Deforming or peeling labels can indicate excessive ambient temperature or humidity. Make sure that the requirements for the installation site are complied with. Information on ambient temperature and humidity can be found in the section Requirements for the installation site 30 . ALF19 Series...
-
Page 50: Maintaining The Label Feeder
If you use tools with pointed or sharp edges when manually removing labels from the label carrier or from the label feeder, the label conveyor belts can be damaged! Always use stamp tweezers to manually remove labels. ALF19 Series... -
Page 51: Packing The Label Feeder
• We recommend using the original packaging. If this is no longer available, you can order suitable packaging material from us. Customer's own packaging material Make sure that the label feeder and the accessories cannot slip in the packaging. Provide adequate padding. ALF19 Series... -
Page 52: Proper Disposal
In doing so, comply with the applicable local regulations for environmental protection. Note • If you have any questions about proper disposal, please call us (+49 461 903 980) or send us an email: info@amsde.com. ALF19 Series... -
Page 53: Annex
Annex 53 Annex ALF19 Series... -
Page 54: Declaration Of Conformity
54 Annex 9.1 Declaration of conformity ALF19 Series... - Page 55 Annex 55 ALF19 Series...
-
Page 56: Repeatability Test By The Fraunhofer Institute
56 Annex 9.2 Repeatability test by the Fraunhofer Institute ALF19 Series... - Page 57 Annex 57 ALF19 Series...
-
Page 58: Technical Data
Label width (min./max.) 3 / 21 Label height (min./max.) 3 / 19 Label positioning accuracy Value In the direction of transport 0.5 mm Depending on the manual At right angles to the direction of transport setting of the guide blocks ALF19 Series... - Page 59 Annex 59 Mechanical dimensions Fig. 17 Mechanical dimensions ALF19-21 ALF19 Series...
-
Page 60: Spare Parts List
60 Annex 9.4 Spare parts list The spare parts list is available on request. If you need spare parts, please give us a call (+49 461 903 980) or send us an email :info@amsde.com. ALF19 Series... -
Page 61: Machine Adapter Table
49270-xx 19710351-xx FX-3 Juki 49270-xx 19710352-xx Speed Placer FX-3R / Juki 49270-xx 19710352-xx FX-3RA JM-10 Juki Multitask 49270-xx 19710352-xx Platform JM-20 Juki Multitask 49270-xx 19710352-xx Platform JX-100LED Juki Compact 49270-xx 19710352-xx Placer JX-300LED Juki Compact 49270-xx 19710352-xx Placer ALF19 Series... - Page 62 19710350-xx 47869 Siplace ASM HF 49270-xx 19710350-xx 47869 Siplace ASM S 49270-xx 19710350-xx 47869 Siplace ASM SX 49270-xx 19710356-xx 47869 Siplace ASM X 49270-xx 19710356-xx 47869 Siplace ASM D1i 49270-xx 19710356-xx 47869 45574 & Panasonic 49270-xx 19710353-xx 19710341 ALF19 Series...
-
Page 63: Confirmation Form
9.6 Confirmation form The operating instructions contain important information about the label feeders of the ALF19 series and their handling. I hereby confirm that I have read all the chapters of the operating instructions and have taken note of all safety and warning notices. -
Page 64: Index
Adapter board ..........34 Employees ............. 10 ALF19-21 ..........16, 59, 60 Empty roll ............40 ALF19 series ......5, 15, 16, 17, 33 EN 12198-2............ 10 Alcohol ............13 EN ISO 12100-1 ..........10 Ambient temperature ......30, 47, 50 EN ISO 13849-1 .......... - Page 65 Modes ............16 Repair ............14 Repeatability test ........... 57 Requirements ....... 14, 30, 47, 50 Resetting to factory settings......29 Responsibility ..........10 Revolutions ..........9, 28 Red status LED ..........29 Rewinding ............17 Observance ..........10, 50 ALF19 Series...
- Page 66 Winding/unwinding motor LED ....... 23 Suspension for label rolls ....... 17 Winding speed ..........9 Winding motor ..........8, 9 Winding motor LED ........22 Technical changes ......... 14 Technical data .......... 14, 59 TFT display ............ 22 ALF19 Series...
Need help?
Do you have a question about the ALF19 Series and is the answer not in the manual?
Questions and answers