
Related Manuals for Teamson VERSANORA VNF-00100


Summary of Contents for Teamson VERSANORA VNF-00100
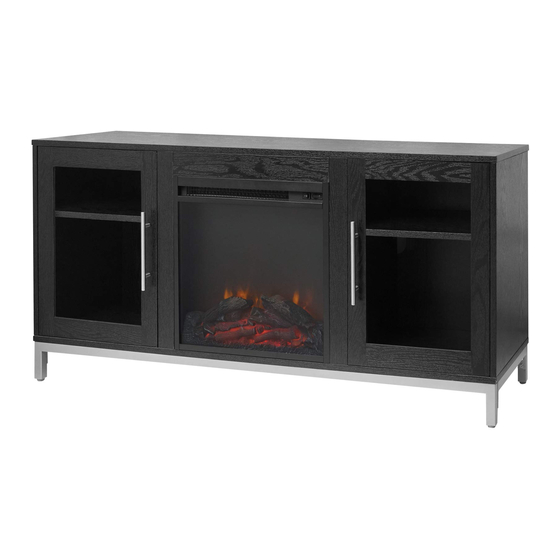
- Page 1 VERSANORA TIME SAVER! 3D Interactive Instruction 54in FIREPLACE TV STAND WITH 18IN INSERT VNF-00100 www.teamson.com...
- Page 2 MANUFACTURER: TEAMSON HOME/VERSANORA MODEL #: VNF00100 VERSANORA 54in FIREPLACE TV STAND WITH 18IN INSERT TOP PANEL FITS UP TO MOST 65in/165.1cm DIAGONAL FLAT PANEL TVS MAXIMUM LOAD 80lb/ 36.3kg. SHELF MAXIMUM LOAD 22.7 kg / 50 lb THIS UNIT IS NOT INTENDED FOR USE WITH CRT TVS. USE ONLY WITH FLAT PANEL TVS AND AUDIO/VIDEO EQUIPMENT MEETING RECOMMENDED SIZE AND WEIGHT LIMITS.
- Page 3 ** Got questions? Please have your product code (on the first page of this instruction, e.g. TD-12345A) and the order number ready, give us a call or email us through our customer care support! We are always ready to assist you!
- Page 4 Serving you well gives us great joy! +1(800)935-3959 Mon - Fri 10:00am ~ 2:00pm EST support@teamson.com +44(0)1952-916-050 Mon - Thu 9:00am ~ 5:00pm GMT Friday 9:00am ~ 4:00pm GMT support@teamson.co.uk 深圳办公室: +86(0755)8885-3558.分机号108 Mon - Sat 9:00am ~ 5:00pm GMT+8 sales_ec@teamson.com 台北辦公室:...
- Page 5 Exploded Drawing Questions? Scan Here...
- Page 6 Product Parts 1 PC 1 PC 1 PC 1 PC 1 PC 1 PC 1 PC 1 PC 1 PC 1 PC 2 PCS 2 PCS 2 PCS 1 PC 1 PC Care Instructions Dust surface with a dry soft cloth. Do not use window cleaners or cleaning abrasives as they will scratch the surface and could damage the protective coating Questions?
- Page 7 Product Parts 1 PC 2 PCS Care Instructions Dust surface with a dry soft cloth. Do not use window cleaners or cleaning abrasives as they will scratch the surface and could damage the protective coating Questions? WARNING WARNING Scan Here Small parts and sharp edges may be present prior to assembly.
- Page 8 Hardware Φ6*35mm Φ3*15mm Φ3*12mm Φ15*12 14+1 14+1 Φ3.5*12mm Φ5*35mm Φ6*50mm Φ8*30mm 21+2 24+2 20+2 Φ4mm Φ3*15mm 30*25mm 1/4”*15 1/4”*15 26+2 Φ8*16 M4*22 Questions? Scan Here...
- Page 9 Step 1 Φ6*35mm Φ3*15mm Step 2 Φ3*12mm Questions? Scan Here...
- Page 10 Step 3 Φ8*30mm Φ15*12 Step 4 Φ6*35mm Questions? Scan Here...
- Page 11 Step 5 Φ8*30mm Φ15*12 Step 6 Φ3.5*12mm Questions? Scan Here...
- Page 12 Step 7 Φ8*30mm Φ15*12 Step 8 Φ8*30mm Φ5*35mm Questions? Scan Here...
- Page 13 Step 9 Φ6*50mm Step 10 1/4”*15 Questions? Scan Here...
- Page 14 Step 11 Φ4mm 1/4”*15 Step 12 Φ5*35mm Questions? Scan Here...
- Page 15 Step 13 Φ3*15mm Step 14 Φ3*12mm Questions? Scan Here...
- Page 16 Step 15 Step 16 Φ6*50mm Questions? Scan Here...
- Page 17 Step 17 30*25 Φ3*12mm Step 18 Φ3.5*12mm Questions? Scan Here...
- Page 18 Step 19 Step 20 M4*22 Φ8*16 Questions? Scan Here...
- Page 19 Step 21 Step 22 Tools required: Phillips screwdriver, Power Drill, 3/8” Drill Bit and Rubber Mallet. Questions? Scan Here...
Need help?
Do you have a question about the VERSANORA VNF-00100 and is the answer not in the manual?
Questions and answers