Table of Contents
Advertisement
Quick Links
Bedienungsanleitung
Istruzioni per l'uso
Instructions for use
Οδηγίες χρήσης
Notice d'utilisation
Bruksanvisning
Gebruiksaanwijzing
Brukerveiledning
Instrucciones de uso
Brugsanvisninger
Instruções de utilização
Käyttöohje
Instrukcja obsługi
Használati útmutató
Kasutusjuhised
Инструкция по эксплуатации
Naudojimo instrukcija
Инструкции за употреба
Lietošanas instrukcija
Instrucţiuni privind siguranţa
Návod k obsluze
Інструкції з використання
Пайдалану нұсқаулығы
Návod na použitie
Advertisement
Table of Contents

Related Manuals for Whirlpool ACM 868/BA/IXL


Summary of Contents for Whirlpool ACM 868/BA/IXL
- Page 1 Bedienungsanleitung Istruzioni per l'uso Instructions for use Οδηγίες χρήσης Notice d'utilisation Bruksanvisning Gebruiksaanwijzing Brukerveiledning Instrucciones de uso Brugsanvisninger Instruções de utilização Käyttöohje Instrukcja obsługi Használati útmutató Kasutusjuhised Инструкция по эксплуатации Naudojimo instrukcija Инструкции за употреба Lietošanas instrukcija Instrucţiuni privind siguranţa Návod k obsluze Інструкції...
- Page 2 210 mm 145 mm 210 mm 280/180 mm 210 mm 180 mm 145 mm 145 mm 145 mm 210 mm 210 mm 210 mm 280/180 mm 145 mm 145 mm...
- Page 3 DEUTSCH Installation Seite 8 Bedienungsanleitung Seite ENGLISH Installation Page 17 Instructions for use Page FRANÇAIS Installation Page 27 Mode d’emploi Page NEDERLANDS Installatie Pagina 35 Gebruiksaanwijzing Pagina ESPAÑOL Instalación Página 44 Instrucciones de uso Página PORTUGUÊS Instalação Página 53 Instruções de utilização Página ITALIANO Installazione...
- Page 4 R = Min. 6,5 mm Max. 8 mm Min. 50 mm R = 11,5 mm 483 mm 490 mm 560 mm R = 11,5 mm 6 mm R = Min. 6,5 mm Max. 8 mm R = Min. 6,5 mm Max.
- Page 5 Min. 10 cm Min. 5 mm Min. 5 mm Min. 3 cm Max. 6 cm...
-
Page 6: Important Safety Instructions
Page Instructions for use Page These instructions shall also be available on website: www.whirlpool.eu IMPORTANT SAFETY INSTRUCTIONS YOUR SAFETY AND THAT OF OTHERS IS VERY IMPORTANT This manual and the appliance itself provide important safety messages, to be read and always observed. -
Page 7: Safeguarding The Environment
- Do not touch the appliance heating elements during and after use. Do not allow the appliance to come into contact with cloths or other flammable materials until all the components have cooled down completely. - Do not place flammable materials on or near the appliance. - Overheated oils and fats catch fire easily. -
Page 8: Existing Pots And Pans
EXISTING POTS AND PANS Use a magnet to check if the pot is suitable for the induction hob: pots and pans are unsuitable if not magnetically detectable. Make sure pots have a smooth bottom, otherwise they could scratch the hob. Check dishes. Never place hot pots or pans on the surface of the hob’s control panel. - Page 9 Connection to the terminal block For the electrical connection, use an H05RR-F or H05V2V2-F cable as specified in the table below. Wires Number x size 380-415 V 3N ~ 220-240 V ~ 220-240 V ~ (AU and UK) 220-240 V ~ + 3 x 4 mm 220-240 V 3 ~ + 4 x 1.5 mm...
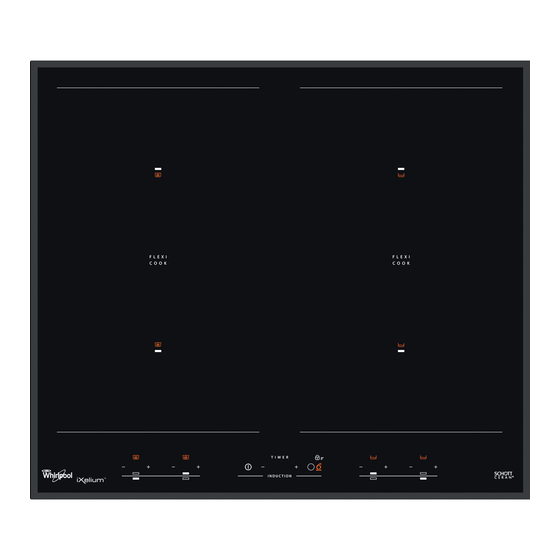
- Page 10 Power management step 1 On/Off Timer Control panel lock/Special function/ Power management step 1 Power management step 2 and 4 Cooking zone controls and corresponding display Switching the hob ON/OFF To switch the hob on, press the button for approx. 2 seconds until the cooking zone displays light up. To switch off, press the same button until the displays switch off.
- Page 11 Simmering (If available) After bringing to the boil, press the key and the hob will automatically set the correct power level to keep the pot simmering. “A” appears on the display: the indicator light lights up. To deactivate the function, simply press button.
- Page 12 Activation/deactivation of the acoustic signal After switching the hob on, press and hold the “-” of the first cooking zone and the external button on the right simultaneously for at least five seconds (“as shown below”). . 5 Sec Flexi cook Where present, this function allows the cooking zone to be used as two separate zones or as a single extra large zone.
-
Page 13: Troubleshooting Guide
Whirlpool finishing that guarantees a perfect clean and a long-lasting brilliance. Therefore, if you have a IXELIUM hob, we strongly suggest to observe the following cleaning recommendations: •... -
Page 14: Power Level Table
POWER LEVEL TABLE Power level Type of cooking Level use (indicating cooking experience and habits) Ideal for rapidly increasing the temperature of food to fast boiling in the case of water or rapidly Boost Fast heating heating cooking liquids Max. power Ideal for browning, starting to cook, frying deep frozen products, fast boiling Frying - boiling Ideal for sautéing, maintaining a lively boil, cooking and grilling (for a short period of time, ...
Need help?
Do you have a question about the ACM 868/BA/IXL and is the answer not in the manual?
Questions and answers