Advertisement
Quick Links
Advertisement

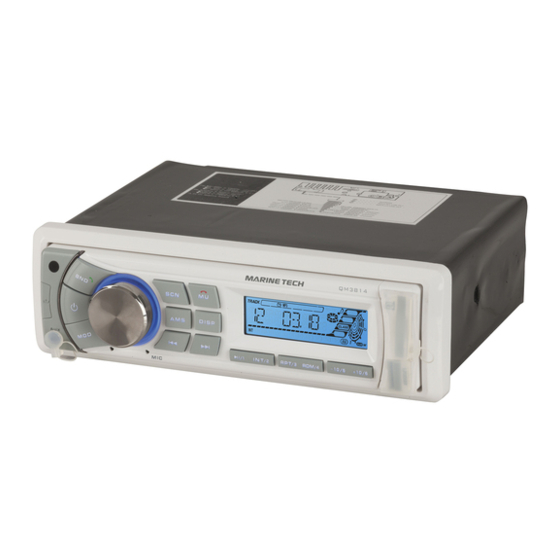
Summary of Contents for Marine Tech QM3814
- Page 1 MARINE AM/FM RADIO with MP3 Player and Bluetooth® QM3814 INSTRUCTION MANUAL...
-
Page 2: Table Of Contents
CONTENTS: Installation: Additional Information: General Operation: Radio Operation: USB/SD Operation: Remote Control Layout: Bluetooth®: Specifications: PRECAUTIONS: Choose a mounting location where the unit will not interfere with operation of the boat or vehicle. Before installing the unit, connect the wiring temporarily to ensure it is all wired correctly, and that the unit and system function as expected. -
Page 3: Installation
INSTALLATION: INSTALLATION/DISMOUNTING: HEAD UNIT INSTALLATION: Insert sleeve into installation holes of dashboard. Insert unit into sleeve. Install decoration frame on front panel. HEAD UNIT REMOVAL: Gently remove the decorative frame by inserting a finger into each of the locating grooves (Fig. 1). Insert the release key into the gap between unit and sleeve (Fig. -
Page 4: Additional Information
ADDITIONAL INFORMATION:... -
Page 5: General Operation
GENERAL OPERATION: Power Button 13. Repeat & Preset Button 3 14. Random & Preset Button 4 Volume/Sel Button 15. Preset Button 5 Mode switch 4. Display Button 16. Preset Button 6 LCD Display 17. Release Button Reset Button 18. Mute/ Button Band/ switch/1D3 select... - Page 6 GENERAL OPERATION: ON/OFF: Press the POWER button (1) to turn on the unit. When the unit is turned on, press and hold the button to turn the unit off. SOUND ADJUSTMENT: The volume knob (2) can be used to adjust multiple settings. Press the SEL button (2) to change the type to be adjusted in the following order.
- Page 7 GENERAL OPERATION: DISPLAY: Press the “DISP” button (4) to enter each display mode as listed below. Time is displayed for 5 seconds when the “DISP” key is pressed, and it will return to its previous display unless the key is pressed again. To adjust the clock, press and hold the “DISP”...
- Page 8 GENERAL OPERATION: RESET: RESET button (6) is placed on the housing and must be activated with either a ball point pen or thin metal object. (Do not use sharp object to avoid damaging the unit.) The RESET button (6) is to be activated for the following reasons: •...
-
Page 9: Radio Operation
RADIO OPERATION: BAND SELECTION: In tuner mode, press the “BAND” button (7) to select the desired band. The radio band will change in the following order: STATION SELECTION: In radio mode, Press “SEEK ” or “SEEK ”buttons to automatically search a station, Press and hold the “SEEK “or “SEEK ”... -
Page 10: Usb/Sd Operation
USB/SD OPERATIONS: USB/SD FLASH MP3 PLAYING: PLAY/ PAUSE Press the “Play/Pause” button (11) to pause the current playing track. The music track play time indicator will flash. Press the “Play/Pause” button again to resume playing. Pressing & holding the button will stop the music. -
Page 11: Remote Control Layout
REMOTE CONTROL LAYOUT: Power Button 14. Display Button 15. APS/ AMS Button Pause/Play/Preset Button 1 16. LOC/DX Button Intro/Preset Button 2 4. Repeat Playing/Preset Button 3 17. Band/ Switch Random/Preset Button 4 18. Tuning/Selecting Tracks/F.F/F.R Preset Button 5 19. Select Button Preset Button 6 Mute/ Button... - Page 12 REMOTE CONTROL LAYOUT: REPLACING THE BATTERY: After 12 months of use, or if the remote control ceases to function as expected, replace the battery in the remote control. The battery required is a CR2025. Pull out the battery holder while pressing the stopper. Place the battery positive (+) side up into the battery holder.
-
Page 13: Bluetooth
BLUETOOTH®: 1. PAIRING CONNECT: Turn the head unit on and enable Bluetooth® on your phone & search for the Bluetooth® device called “CAR AUDIO”. Input the pairing password “8888” and press OK. When the pairing connection is successful, the display will show “BT ON” & the on the LCD, it will display BT ON, and the Bluetooth®... -
Page 14: Specifications
SPECIFICATIONS: GENERAL Power Supply Requirements: DC 14.4V, Negative Ground Load Impedance: 4 ohms Maximum Output Power: 20W x 4 Chassis Dimensions: 178 x 87x50mm (W x D x H) Current Drain: TONE CONTROLS Bass (at 100Hz): +10dB / -10dB Treble (at 10K): +10dB / -10dB USB/SD MUSIC PLAYER Signal to Noise Ratio:... - Page 16 Distributed by: Electus Distribution Pty. Ltd. 320 Victoria Rd, Rydalmere NSW 2116 Australia www.electusdistribution.com.au Made in China...
Need help?
Do you have a question about the QM3814 and is the answer not in the manual?
Questions and answers