
Subscribe to Our Youtube Channel
Related Manuals for Bissell POWERSWIFT 2598 Series


Summary of Contents for Bissell POWERSWIFT 2598 Series
- Page 1 POWERSWIFT ® Vacuum ___________ USER GUIDE 2598 SERIES More of a video person? Look for this icon and go online for an instructional how-to video at www.BISSELL.com...
- Page 2 If the plug does not fit fully in the outlet, reverse the plug. If it still does not fit, contact a qualified electrician to install a proper outlet. Do not change the plug in any way. SAVE THESE INSTRUCTIONS FOR FUTURE USE This model is for household use only. www.BISSELL.com...
-
Page 3: Table Of Contents
Thanks for buying a BISSELL® vacuum! We love to clean and we’re excited to share one of our innovative products with you. We want your vacuum to work like new for the years to come, so this guide has tips on how to use, maintain and, if there’s a problem, troubleshoot. -
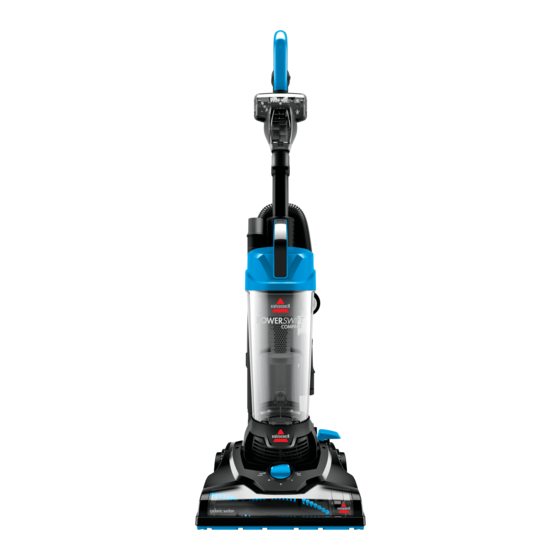
Page 4: Product View
13 Hose Wand Base 6 Bottom Empty Dirt Bin 14 Power Foot Pedal 7 Combination Dusting/ 15 Handle Release Lever Upholstery Tool (select models) 8 Height Adjustment Knob Cord Release and Storage Twist Cord Release down to quickly remove cord www.BISSELL.com... -
Page 5: Assembly
Assembly WARNING Do not plug in your vacuum until you are familiar with all instructions and operating procedures. Install the Upper Cord Push Lower Cord Wrap Install the Wand Release Wrap by aligning tabs and in, aligning two tabs, then Clip by aligning tabs and pushing down until you turn clockwise (down) to... - Page 6 Press the release button at Dirt Tank. Close lid and return the top of the Dirt Tank to tank to vacuum base. Empty once tank is full. remove it from the vacuum. www.BISSELL.com...
- Page 7 Dirt Tank by aligning Cyclone assembly and press firmly until you the tab, then twist with tank to replace. hear a “click”. clockwise to lock. NOTE: Let parts dry completely before returning them to vacuum for use. www.BISSELL.com...
- Page 8 WARNING Do not operate vacuum with damp or wet filters, as well as without filters or the Dirt Tank in place. Allow components to dry before reassembling the Dirt Tank. www.BISSELL.com...
- Page 9 5 screws. Spin the end opposite of the belt to line up with tab. The Brush Roll by hand one end closest to the belt will slide in the tab without revolution to self-center needing any rotation. the belt. www.BISSELL.com...
-
Page 10: Troubleshooting
There is a crack or hole in the main If there is a crack or hole, order a new won’t pick hose. main hose from BISSELL.com/parts. up dirt Brush Roll is not turning. Replace the Brush Roll. There is a clog in the vacuum. -
Page 11: Warranty
Care by E-mail or telephone as described it was sold. below. BISSELL is not liable for incidental or It may be necessary to obtain some of your consequential damages of any nature personal information, such as a mailing associated with the use of this product. - Page 12 NOTE: Please keep your original sales receipt. It provides proof of purchase date in the event of a warranty claim. See Warranty page for details. Parts & Supplies For Parts and Supplies, go to www.BISSELL.com and enter your model number in the search field. Love your product? BISSELL®...
- Page 13 POWERSWIFT ® Aspiradora ___________ GUÍA DEL USUARIO SERIE 2598 ¿Prefiere ver videos? Busque este ícono y conéctese para ver un video instructivo en www.BISSELL.com...
- Page 14 Si el enchufe no encaja por completo en el tomacorriente, inviértalo. Si aún no encaja, póngase en contacto con un electricista calificado para instalar el tomacorriente apropiado. No cambie el enchufe de ninguna manera. GUARDE ESTAS INSTRUCCIONES PARA UN PRÓXIMO USO Este modelo es solo para uso doméstico. www.BISSELL.com...
- Page 15 ¡Gracias por comprar una aspiradora BISSELL®! Amamos la limpieza y estamos ansiosos por compartir uno de nuestros innovadores productos con usted. Queremos que la aspiradora funcione como nueva por años, por eso esta guía presenta sugerencias sobre el uso, el mantenimiento y, si hay algún problema, la solución de problemas.
-
Page 16: Vista Del Producto
7 Accesorio combinado para 14 Pedal de alimentación limpieza de polvo y accesorio para 15 Palanca de manija de liberación tapicería (en modelos seleccionados) Liberación del cable y almacenamiento Gire hacia abajo la liberación del cordón para retirarlo rápidamente www.BISSELL.com... -
Page 17: Ensamblaje
Ensamblaje ADVERTENCIA No enchufe la aspiradora hasta que no comprenda todas las instrucciones y los procedimientos de funcionamiento. Presione hacia adentro el soporte inferior para Instale la abrazadera para envolver el cordón, alinee Instale el sujetador de las dos lengüetas, luego gire cable superior alineando las liberación del tubo alineando en sentido horario (abajo) - Page 18 Cierre la tapa y Vacíe el tanque cuando de suciedad para quitarlo de la devuelva el depósito a la base de esté lleno. aspiradora. la aspiradora. www.BISSELL.com...
- Page 19 “clic”. dirección de las manecillas del reloj para bloquearlo. NOTA: permita que las piezas se sequen por completo antes de volver a colocarlas en la aspiradora para su uso. www.BISSELL.com...
- Page 20 ADVERTENCIA No use la aspiradora con filtros húmedos o mojados, tampoco la use sin filtros o sin que el tanque de suciedad esté en su lugar. Deje secar los componentes antes de volver a ensamblar el tanque de suciedad. www.BISSELL.com...
- Page 21 5 tornillos. Gire con la para alinear con la lengüeta. El extremo del cepillo más mano el cepillo giratorio una cercano a la correa se deslizará en la lengüeta sin necesidad vez para centrar la correa de ningún giro. automáticamente. www.BISSELL.com...
-
Page 22: Solución De Problemas
Si hay una fisura o un orificio, pida La aspiradora manguera principal. una nueva manguera principal desde no aspira la BISSELL.com/parts. suciedad El cepillo giratorio no está girando. Reemplace el cepillo giratorio. Hay una obstrucción en la aspiradora. Revise si hay acumulación de desechos... -
Page 23: Garantía
La responsabilidad de BISSELL no superará el precio de términos de esta garantía. Cualquier dato personal se tratará compra del producto. conforme a la Política de privacidad de BISSELL, que se encuentra Algunos estados no permiten la exclusión o limitación en línea en www.BISSELL.com/privacy-policy. - Page 24 Visite www.BISSELL.com/registration. Visite el sitio web de BISSELL: www.BISSELL.com Cuando se ponga en contacto con BISSELL, tenga a mano el número de modelo de la limpiadora. Registre su número de modelo: ___________________ Registre su fecha de compra: ___________________ NOTA: conserve el recibo de venta original.
Need help?
Do you have a question about the POWERSWIFT 2598 Series and is the answer not in the manual?
Questions and answers