Table of Contents
Advertisement
Quick Links
Advertisement
Table of Contents

Summary of Contents for BTEK T401S
- Page 1 T401S Weight Indicator User Instructions AWT35-501629 Issue AA...
- Page 2 © 2016 B-TEK. All rights reserved BTEK_T401S_u_en_501629.book...
-
Page 3: Table Of Contents
FCC and EMC declarations of compliance ................ 7 Chapter 2 Introduction ..........................8 Front panel ......................... 9 Annunciators ......................10 Powering up the T401S ....................10 Numeric entry procedure ....................11 Chapter 3 Indicator applications ......................12 General weighing application ................... 12 SELECT key default function .................. - Page 4 Chapter 4 Menus ............................25 Accessing the menus ...................... 25 Menu annunciators ......................25 Exiting the menus ......................26 USER level menus ......................26 User menu ........................27 Time .......................... 27 Date ........................... 28 Site ID ........................29 Seal ........................... 29 About menu ........................
-
Page 5: Chapter 1 General Information And Warnings
Cautions give information about procedures that, if not observed, could result in damage to equipment or corruption to and loss of data. NOTE: This is a Note symbol. Notes give additional and important information, hints and tips that help you to use your product. T401S Indicator User Instructions... -
Page 6: Installation
Installations within the USA should use a cover that meets NEMA 3R specifications as required by the National Electrical Code under section 410-57. This allows the unit to be plugged in with a rain tight cover fitted over the plug. T401S Indicator User Instructions... -
Page 7: Routine Maintenance
Operation of this equipment in a residential area is likely to cause harmful interference in which case the user will be required to correct the interference at his own expense. T401S Indicator User Instructions... -
Page 8: Chapter 2 Introduction
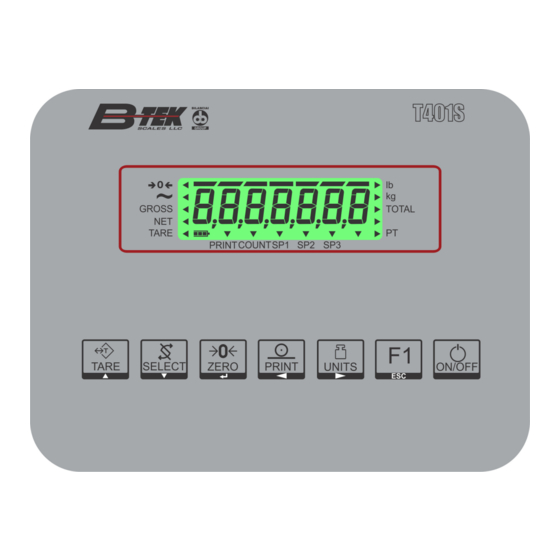
Introduction The T401S indicator, shown in Figure 2.1, is easy to use for weighing. The T401S has two serial COM ports and an Ethernet port. The indicator also has three logic level inputs with configurable functions and three setpoint outputs. See the Specification literature for a full list of specifications. -
Page 9: Front Panel
Press and hold to view the password entry screen for menu access. If DC powered, press to turn the indicator on. Press and hold for two seconds to turn the indicator off. If AC powered, when power is applied to the indicator it will be on. ON/OFF T401S Indicator User Instructions... -
Page 10: Annunciators
ON as long as power is received. If DC powered, the ON/OFF key functions as described in the section Front panel on page T401S power can be supplied by: AC power cord connected to a properly grounded outlet (100 VAC - 240 VAC, 50 or 60 Hz) -
Page 11: Numeric Entry Procedure
Press the ZERO key to enter or accept the value. Press the PRINT() key to move the entry function one digit to the left. This effectively deletes the current value in that position and allows you to enter a new value in that position. T401S Indicator User Instructions... -
Page 12: Chapter 3 Indicator Applications
Empty the scale and press ZERO to zero the display … 0 is displayed and the center-of-zero annunciator ( ) lights. Place item to be weighed on the scale … Weight is displayed. Repeat steps and 2. T401S Indicator User Instructions... -
Page 13: Net Weighing
Use one of these methods to clear a tare: Press and hold the TARE key. The display will change to gross mode. If gross weight is not at 0, press the ZERO key; then press the TARE key to clear the tare value. T401S Indicator User Instructions... -
Page 14: Using Setpoints
The indicator can be configured to only allow one print for each weighing sequence. If PRINT is pressed when so configured, the message cAnt will appear. Refer to Default print formats on page T401S Indicator User Instructions... -
Page 15: General Weighing With Accumulation Application
If enabled, press and hold PRINT for three seconds to print and/or clear the active accumulator values. These functions are enabled or disabled in a password protected menu. T401S Indicator User Instructions... -
Page 16: Counting Application
If the sample met the minimum sample requirements and the weight is stable, the display will show the correct number of parts on the scale and COUNT is lit. T401S Indicator User Instructions... - Page 17 PRINT while in count mode. If enabled, press and hold PRINT for three seconds to print and/or clear the active count total. These functions are enabled or disabled in a password protected menu. T401S Indicator User Instructions...
-
Page 18: Checkweighing Application
The checkweighing annunciators are based off of net weight so if a tare is active only the net weight is considered for checkweighing. If there is no tare, gross weight is used as the basis for the annunciators. T401S Indicator User Instructions... -
Page 19: Weighing A Target Object
Hi is briefly displayed and then the current value for the upper accept weight. Press ZERO to accept this or key in a new upper accept weight and press ZERO … The display returns to normal weighing mode. T401S Indicator User Instructions... -
Page 20: Setpoint Operation In The Checkweighing Application
Under Target or Below Low Accept Weight = SP1 annunciator and Output 1 are on. Inside Target = SP2 annunciator and Output 2 are on. Over Target or Above Upper Accept Weight = SP3 annunciator and Output 3 are on. Outputs have to be enabled (see Service manual). T401S Indicator User Instructions... -
Page 21: Batching Application
There is one type of batching operation, ingredient filling (up to three ingredients). Other parameters, that are set in a password protected menu, affect the batching operation. The bargraph will sequentially light up to show from 0 to 100% of the batch weight. T401S Indicator User Instructions... -
Page 22: Ingredient Filling
To start the batching process, press F1. See more details on Gross or Net weight batching in Notes on batching on page To stop the batching process, press F1. When you press F1 again, the batching process starts over from the beginning. T401S Indicator User Instructions... -
Page 23: Peak Hold Application
The display will show the peak weight recorded during the weighment. To reset the peak, press F1 … The peak weight is reset to the current gross weight. Repeat the steps to perform another peak weighment. T401S Indicator User Instructions... -
Page 24: Remote Display Application
(Tare, Select, Zero, Print, and Units) on the remote will function as if they were pressed on the primary indicator. Contact your local representative for information on setting up the indicator as a Remote or Primary indicator. T401S Indicator User Instructions... -
Page 25: Chapter 4 Menus
Password protected menus are available to configure the indicator and/or view information. 4.1 Accessing the menus Follow these steps to access the menus in the T401S. With the indicator powered up and in normal operating mode, press and hold F1 …... -
Page 26: Exiting The Menus
Weighing Mode TARE = PRINT = Press and hold F1 key UNITS = ZERO = Enter 111 F1 = Escape or & press ZERO User About Audit page page page Figure 4.1 USER level (password 111) menus T401S Indicator User Instructions... -
Page 27: User Menu
Use this to set the time and clock style. Press SELECT … SEt is displayed. Press SELECT … h- x is displayed, with the x flashing. This is a numeric entry screen for the hour value. T401S Indicator User Instructions... -
Page 28: Date
Key in the month value and press ZERO to accept … d- x is displayed, with the x flashing. This is a numeric entry screen for the day value. Key in the day value and press ZERO to accept … SEt is displayed. T401S Indicator User Instructions... -
Page 29: Site Id
If the unit is sealed, no changes can be made to the configuration of the indicator. Press F1 to return to the SEAL display. To exit the menu, see Exiting the menus on page T401S Indicator User Instructions... -
Page 30: About Menu
PArtno is displayed Press SELECT … The 1st half of the bootloader PN is displayed. Press UNITS to view the 2nd half. Press ZERO to return to the PArtno display. Press UNITS … VErSion is displayed. T401S Indicator User Instructions... -
Page 31: Firm And App
Addr is displayed. Use this item to view the four part IP address. Press SELECT … 1 XXX is displayed. This is first octet of the IP address Press ZERO … 2 XXX is displayed. This is second octet of the IP address. T401S Indicator User Instructions... -
Page 32: Dload
Press SELECT … The 1st half of the serial number of the downloading application of the configuration file was downloaded to, is displayed. Press ZERO to show the 2nd half. Press F1 … dSEriAL is displayed. T401S Indicator User Instructions... -
Page 33: Audit Menu
A number appears showing how many times the indicator has been configured. Press ZERO … conFig is displayed. Press UNITS … cALib is displayed. Press SELECT … A number appears showing how many times the indicator has been calibrated. T401S Indicator User Instructions... - Page 34 Menus Press ZERO … cALib is displayed. Press TARE … countEr is displayed. This completes the Audit menu. To exit the menu, see Exiting the menus on page T401S Indicator User Instructions...
-
Page 35: Chapter 5 Communications
Default print formats Communications The T401S can communicate through these ports: Serial Ethernet 5.1 Default print formats Below are examples of the ten default formats that are available. The default unit of measure may change based on your geography. Gross 272.04 lb... - Page 36 95.88 lb Net Total 176.16 lb Print Totals (Format #9) Transaction Count: Default for Counting App. Count Total Create your own (Format #10) The indicator can be configured for many other outputs to match the application. T401S Indicator User Instructions...
-
Page 37: Chapter 6 Error Messages
Can’t fit on display Underload Can’t Entry not in valid range Password entry failed Remote display not receiving data from the master indicator Indicator did not reach a stable zero weight within time window set for automated weighing process. T401S Indicator User Instructions... -
Page 38: Chapter 7 String Index/Character Data Entry
Single Key Press flashing digit by the flashing Enter Add Digit ESC/Abort digit digit by 1 Move flashing Move flashing Delete the Long Key Press Does nothing Does nothing Does nothing digit left digit right entire entry T401S Indicator User Instructions... -
Page 39: Chapter 8 Supervisor Menu
Batching application supervisor menu on page 54 Peak Hold application supervisor menu on page 57 Remote Display application supervisor menu on page 59 Use the Numeric entry procedure on page 11 when you need to enter values. T401S Indicator User Instructions... -
Page 40: General Weighing Application Supervisor Menu
Figure 8.1 Supervisor menu for the General Weighing application The Setpoint menu is the same for all the applications so will only be explained once here. Exceptions are noted in the text. Follow these steps to set the items in the Supervisor menu. T401S Indicator User Instructions... -
Page 41: Setpoint
OFF when below, ON when above. Press SELECT … The current setting is displayed (oFF or on). Press UNITS to toggle between the choices and when your choice is displayed, press ZERO to accept … Annun is displayed. T401S Indicator User Instructions... - Page 42 Press UNITS to scroll through the choices and when your choice is displayed, press ZERO to accept … in1 is displayed. Press UNITS … in2 is displayed. Repeat steps through for in2 and in3. Press TARE when finished … Edit is displayed. T401S Indicator User Instructions...
-
Page 43: Battery
Press UNITS … bAttErY is displayed. Use this to enable the battery and to set a timeout length (in minutes). If this time expires with no scale or keypad activity the indicator will automatically shut off. T401S Indicator User Instructions... - Page 44 Supervisor menu Enable Battery Enable Only enable the battery and set the tMout value if using the internal T401S battery option. The shut off timer will not work with other external battery sources. Press SELECT … EnAbLE is displayed. Choices are oFF and on. Choose oFF to disable battery usage.
-
Page 45: Accumulator Application Supervisor Menu
The Setpnt and bAttErY submenus in Figure 8.2 are the same as described in General Weighing application supervisor menu on page 40. Go there for information on those submenus. The unique submenus to this application are described below. T401S Indicator User Instructions... -
Page 46: Accumulator
The current print format number is displayed with a flashing right-most digit. (Default is format 8) Press ZERO to accept the existing setting or key in a new format number and press ZERO … tot FMt is displayed. T401S Indicator User Instructions... - Page 47 Refer to step on page for information on setting up the battery. This completes the Supervisor menu for the Accumulation application. Repeatedly press TARE until the indicator returns to normal weighing mode. The current weight value is displayed. T401S Indicator User Instructions...
-
Page 48: Counting Application Supervisor Menu
8.3.1 Count Super Setpoint Count With the Count application active, access the Supervisor menu using password 1793. Refer to Accessing the menus on page 25 for instructions. From SuPEr, press SELECT … SEtPnt is displayed. T401S Indicator User Instructions... - Page 49 The current print format number is displayed with a flashing right-most digit. (Default is format 8) Press ZERO to accept the existing setting or key in a new format number and press ZERO … tot FMt is displayed. T401S Indicator User Instructions...
- Page 50 Refer to step on page for information on setting up the battery. This completes the Supervisor menu for the Accumulation application. Repeatedly press TARE until the indicator returns to normal weighing mode. The current weight value is displayed. T401S Indicator User Instructions...
-
Page 51: Checkweighing Application Supervisor Menu
From SuPEr, press SELECT … SEtPnt is displayed. Press UNITS … chEcK is displayed. This stands for checkweigher. Use this to set the items relating to checkweighing: Set under divisions for acceptable target weight (undrdiv) T401S Indicator User Instructions... - Page 52 Press SELECT … The current value is shown with a flashing right-most digit. Press ZERO to accept the current value or key in a new value and press ZERO to accept … oVErdiV is displayed. T401S Indicator User Instructions...
- Page 53 Refer to step on page for information on setting up the battery. This completes the Supervisor menu for the Checkweighing application. Repeatedly press TARE until the indicator returns to normal weighing mode. The current weight value is displayed. T401S Indicator User Instructions...
-
Page 54: Batching Application Supervisor Menu
8.5.1 Batch Super Setpoint Batch With the Batching application active, access the Supervisor menu using password 1793. Refer to Accessing the menus on page 25 for instructions. From SuPEr, press SELECT … SEtPnt is displayed. T401S Indicator User Instructions... - Page 55 Choose Gross to base batching on gross weights. Press SELECT … The current setting is displayed. Press UNITS to toggle between the choices and when your choice is displayed, press ZERO to accept … diSP is displayed. T401S Indicator User Instructions...
-
Page 56: Notes On Batching
Out 1 = 10, Out 2 = 30 (10 + 20) and Out 3 = 60 (10 + 20 + 30). Output setpoints are based on the actual displayed Gross weight so if inaccurate amounts of ingredient are experienced during the batch then it may affect the amount of each subsequent ingredient that is added. T401S Indicator User Instructions... -
Page 57: Peak Hold Application Supervisor Menu
P-hoLd is displayed. Use this to reset the max peak value. If the F1 key is disabled, which is the normal key to reset peak value, the supervisor needs an alternate method to reset these values. T401S Indicator User Instructions... - Page 58 Press UNITS to toggle between the no and YES choices. Press ZERO to accept … If you chose YES, the max peak value is reset to the current gross weight and rESEt is displayed. Press TARE repeatedly to exit and save changes. T401S Indicator User Instructions...
-
Page 59: Remote Display Application Supervisor Menu
Choices are OFF (disable) or on (enable). Press SELECT … The current setting is displayed. Press UNITS to toggle between the choices and press ZERO to accept the displayed choice … EnAbLE is displayed. Press TARE … r-diSP is displayed. T401S Indicator User Instructions... - Page 60 Supervisor menu Settings in two password protected menus must be made to configure the indicator for remote display operation. Contact your local representative for information on setting up the indicator as a Primary or Secondary indicator. T401S Indicator User Instructions...
- Page 62 B-TEK Scale LLC 1510 Metric Ave. SW Canton, OH 44706-3088...
Need help?
Do you have a question about the T401S and is the answer not in the manual?
Questions and answers