Table of Contents

Summary of Contents for Seedburo Count-A-Pak 801
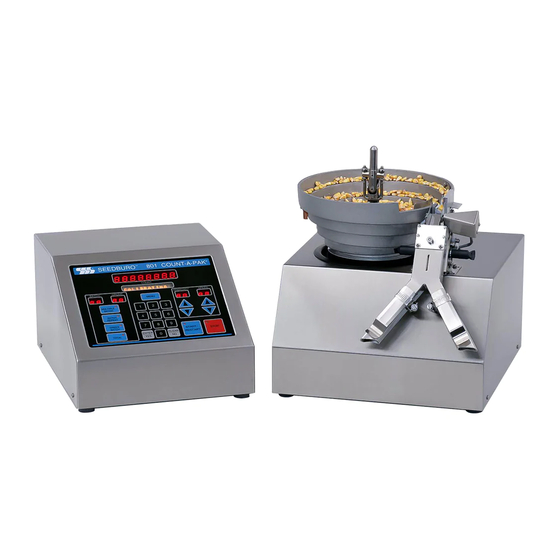
- Page 1 Seedburo Model 801 COUNT-A-PAK Seed Counter Operating and service Manual 10” Shallow Bowl 7” Bowl 10” Standard Bowl SEEDBURO EQUIPMENT CO. MANUAL REVISION 6.0 2293 South Mount Prospect Rd. MAN0016 Des Plaines, IL 60018 07/12/2012 (312) 738-3700...
-
Page 2: Table Of Contents
TABLE OF CONTENTS 1. INTRODUCTION..................Page 4 2. FUNCTIONAL DESCRIPTION............... Page 4 3. INSTALLATION AND SETUP..............Page 5 3.1 Unpacking..................Page 5 3.2 Connection..................Page 7 4. OPERATING PROCEDURE..............Page 9 4.1 Power-up..................Page 9 4.2 Establishing Operating Parameters..........Page 9 4.3 Selecting An Operating Mode............ - Page 3 APPENDIX A. SERIAL COMMUNICATIONS.............. Page 32 A.1 801 Initiated output................Page 32 A.1.1 Function................... Page 32 A.1.2 End of Run Data Transmission..........Page 32 A.1.2.1 TOTAL mode............. Page 32 A.1.2.2 SINGLE BATCH mode..........Page 32 A.1.2.3 BATCH REPEAT mode..........Page 32 A.1.2.4 MULTIPLE BATCH mode..........
- Page 4 TABLE OF FIGURES Figure 3-1 Major Components........... Page 5 Figure 3-2 Bowl Quick Release Assembly........ Page 6 Figure 3-3 Connections.............. Page 7 Figure 5-1 Displays and Controls..........Page 16 Figure 7-1 Power Input Connector..........Page 22 Figure 7-2 Voltage Selector Card Orientation......Page 22 Figure 7-3 Parts and alignment to Diverter Chute Assembly...
-
Page 5: Introduction
1. INTRODUCTION Congratulations! You have chosen the most technologically advanced seed counter available today. The Seedburo Model 801 Count-A-Pak incorporates state-of-the-art CMOS microprocessor technology and full front panel programmability to provide you, the user, with the ultimate in flexibility and reliability. -
Page 6: Installation And Setup
3. INSTALLATION AND SETUP 3.1 Unpacking Carefully remove the OPERATOR CONTROL CONSOLE (OCC), SEED HANDLING BASE (SHB), and BOWL of the COUNT-A-PAK from packaging containers (see Figure 3-1). Place OCC and SHB units on a solid, level surface. Make sure the locking handle of the BOWL is pointing forward to the unlocked position (see Figure 3-2). Lower bowl over slotted shaft on SHB. -
Page 7: Figure 3-2 Bowl Quick Release Assembly
INSTALLATION HINTS: *Keep original packaging containers for storage or future shipping purposes. Diverter chute assembly must be protected during storage or shipment with careful packaging. *The feeder bowl is packaged separately. It is made of cast aluminum and may crack or break if dropped. A cracked or damaged bowl must be replaced. -
Page 8: Connection
Connection Connect the cables from OCC (P17 Figure 3-3 #1, SHB CONTROL and P18 Figure 3-3 #2, SHB POWER) to the mating connectors on the rear of the SHB. The SHB CONTROL cable connects to the 28 pin connector on the SHB (left side of rear panel, looking from rear of unit). - Page 9 Although the OCC can be configured for a wide range of voltages and frequencies, the SHB cannot. The voltage and frequency required for the SHB may be determined from the serial number tag on the rear panel of the SHB. It will work only on the voltage and frequency marked.
-
Page 10: Operating Procedure
4. OPERATING PROCEDURE Power-Up Turn on the power switch on the rear panel of the OCC. The diverter gate will switch positions several times to check the solenoids. All LEDs and LED display segments will light for several seconds allowing a visual check for bad LEDs. -
Page 11: Selecting An Operating Mode
The final message, "9600=Y1200=N", refers to the serial data transmission rate, or baud rate, detailed in Appendix A. This option is only important if some type of equipment, such as a printer or computer/data logger is connected to the serial port on the back of the 801. Choose ENTER/YES to select 9600 baud, or CLEAR/NO to select 1200 baud. -
Page 12: Total Mode
As an example, assume it is desired to count 20 Batches of 38 seeds each and then 10 Batches of 15 seeds each. Group 01 will be set for a Count of 38 and Batches at 20. Group 02 will be set for a Count of 15 and Batches at 10. -
Page 13: Single Batch Mode
Upon pressing ENTER/YES to confirm the sensitivity value, the message display will indicate "COUNT OK?" and the COUNT display will flash the current terminal count. It should be set to the number of seeds desired in the batch, and will proceed to count down to zero (0) from that value. Entering a new terminal count is accomplished by pressing CLEAR/NO and entering the value on the numeric keypad followed by ENTER/YES. -
Page 14: Multiple Batch Mode
The bag should be changed and the counting will continue upon pressing the START switch. This feature prevents double filling a bag. If the bags are changed after each batch, the feeder stays on until the bowl is empty, at which point the feeder stops and the message "BOWL EMPTY"... -
Page 15: Starting The Counting Process
If, however, the bag detector is turned on, a filled bag on either chute must be changed before seeds will again be delivered into that chute. The feeder may also be manually stopped by pressing the STOP switch or optional foot-switch. Starting the Counting Process Place the seeds to be counted into the bowl. - Page 16 7. Service and repairs are most easily done by a qualified repairman. If help is needed, time and trouble can be saved by calling the manufacturer for service assistance. Contact Information SALES: Seedburo Equipment Co. SERVICE: AgPoint Precision LLC 2293 South Mount Prospect Rd.
-
Page 17: Displays And Controls
5. DISPLAYS AND CONTROLS There are five numeric displays, one message display, six indicator LEDs (Light Emitting Diodes), and twenty-three key-switches on the OCC. There is also a power on/off switch located on the rear of the OCC on the power entry module. The function of each display and control follows. (1) Count Display ........ - Page 18 (2) Message Display ......Displays various messages and operator prompts. (3) BATCH Display ......... Displays the number of Batches in a Group in MULTIPLE BATCH mode. This is active only in the BATCH REPEAT mode. (4) GROUP Display ........ Displays the number of the current Group in MULTIPLE BATCH operation.
-
Page 19: Prompts And Messages
6. PROMPTS AND MESSAGES Scrolling Messages There are several messages that scroll continuously across the message display until the operator intervenes. These are: "PRESS ENTER TO RECORD..." Pressing the ENTER/YES key stores the currently displayed parameter value in retained memory. "USE LAST PROGRAM? (YES OR NO)..."... - Page 20 "SENS. OK?" Verify current Sensitivity setting with ENTER/YES, or change setting utilizing one of several methods. The setting can be changed using the up/down arrows. It can also be changed entering a new value via the numeric keypad followed by ENTER/YES. Also, if CLEAR/NO is pressed, the message "MODIFY NOW!!" will appear and a new value can be entered via the numeric keypad followed by ENTER/YES.
- Page 21 "AC = 60Hz" During power up the 801 automaticly detects the power line frequency of 60 Hz or 50 Hz. "AC = 50Hz" Display will indicate which power line setting is being used. "CALIBRATING" This means the 801 is calibrating the sensitivity of the opto-electronic sensor to compensate for changes due to component aging and light output from the lamp.
-
Page 22: Adjustments And Maintenance
7. ADJUSTMENTS AND MAINTENANCE Setting the Gate Time The Gate Time is adjusted by selecting MENU, setting the Bag Detect Function off, selecting the power line frequency, and then entering a number for the Gate Delay Time. 50 milliseconds is a good starting point. -
Page 23: Changing The Required Operating Voltage Of Occ
Changing the Required Operating Voltage of OCC The power line voltage required to operate the OCC can be changed as follows : ****** Note ****** The voltage required by the SHB CANNOT be changed, this section refers only to the OCC Disconnect power line cord from power outlet and from P5. -
Page 24: Feeder Bowl Alignment
Feeder Bowl Alignment The feeder bowl should be aligned such that the gap between the discharge area of the bowl and the diverter chute is approximately 1/16 inch (1.6 mm). See Figure 7-3 Item 9. If a sharp knocking occurs, STOP feeder immediately. -
Page 25: Checking And Changing Vibratory Feeder Springs
(3) Baffle - Prevents seeds that fall from track width slide from falling to bottom of bowl (ten inch bowl only) (4) Track Wiper - Proper adjustment returns seeds to feeder bowl when they tend to ride "piggyback" or travel on edge of track (5) Track Width Slide is slightly lower than adjacent portion of seed track (6) Track Width Slide is slightly higher than adjacent portion of seed track (If Track Width Slide position needs... -
Page 26: Figure 7-5 Side View Of Feeder Spring Stacks
(1) Spacers (2) Clamp Bolts (3) Pressure Pad (4) 1/32" Leaf Spring (5) 1/16" Leaf Spring (6) Feeder Base (7) Bowl Mounting Plate Figure 7-5 Side view of feeder spring stacks 1. Bowl mounting plate 2. Rubber feet 3. Disk spring 4. -
Page 27: Figure 7-7 Adjusting Feeder Air Gap
Place a .020 inch (0.5 mm) air gap spacer gauge (may be obtained from our service department) between magnet assembly (see Figure 7-6, Item 8) and bowl mounting plate (see Fig. 7-6, item 10) to keep magnet assembly and mounting plate parallel. Tighten all 3 bottom clamp bolts first. While applying pressure to the bowl mounting plate, tighten all 3 top clamp bolts, starting with the 2 at the wider part of the magnet assembly and ending with the one at the narrow part of the magnet assembly. -
Page 28: Spare Parts And Accessories List
Spare Parts and Accessories List - Recommended spare parts include: Springs for 7 inch SHB vibratory feeder requires 3 each, 99-MHDW0067, 1/16 inch leaf spring Springs for 10 inch SHB vibratory feeder requires 3 each, 99-MHDW0067, 1/16 inch leaf spring and 3 each, 99- MHDW0049, 1/32 inch leaf spring Cover glass lenses, requires 2 each, 99-MLEN0001, clear cover glass 801 LED assembly, requires 1 each, 99-MSUB0092... -
Page 29: Troubleshooting Guide
8. TROUBLESHOOTING GUIDE Vibratory Feeder A broken leaf spring causes either slow or uncontrollable feeding If no loose bolts, broken springs or isolation mounts are found, the cause may be electrical. Diverter Assembly If chutes are sharply bumped or used as handles to move the Count-A-Pak, the diverter assembly may be damaged. -
Page 30: Operator Control Console
Operator Control Console Figure 8-1 Diverter Assembly If the LED displays fail to light, check the power connection and the fuse. If the operation of the unit ceases and it no longer responds to key-switch inputs, turn the power switch off for at least 5 seconds and then turn it on again. -
Page 31: Warranty
9. WARRANTY Count-A-Pak instruments are warranted to be free from defects in workmanship and material for a period of one year from date of shipment. Liability of seller under this warranty is limited to replacing or repairing any such instrument returned by the buyer during this period, provided: 1) Buyer promptly notifies seller in writing requesting authorization to return instrument. -
Page 32: Specifications
10. SPECIFICATIONS POWER CONSUMPTION 120 volt-amps, maximum VOLTAGE RANGE 100-130 and 200-260 volts, 50 or 60 hertz as specified UNIT SIZE OCC - 11" W x 8" H x 14"D SHB - 13" W x 8" H x 14" D (Add approx. 8" to Height with Feeder Bowl mounted.) SHIPPING WEIGHT OCC - 21 Lbs. - Page 33 APPENDIX A. SERIAL COMMUNICATIONS 801 Initiated output A.1.1 Function This type of communication includes end-of-run data transmissions (Autoprint), and configuration data transmissions. Autoprint, which can be selected or inhibited from the setup menu, transmits data at the end of a "run" or when the STOP switch (or foot-switch) is pressed. This would be used with a printer or data logger.
- Page 34 A.3 Character Legends - The following abbreviations are utilized in this specification. = Space Character (20H) is REQUIRED here. CR+LF = Carriage Return (13H) and Linefeed (10H) xxxxxxxx = Numeric Characters (0-9) - The number of characters present or required is indicated by the number of x or y characters shown. Yyyyyyyy | = Option.
- Page 35 Index 50Hz........... 9, 20, 32, 34 60Hz........... 9, 20, 32, 34 Accessories........ 27 ACCURACY....... 4, 14, 15 air filter........15 air gap spacer......26 AUTO PRT ON......9, 20, 32, 34 Baffle.......... 24 BAG DET. ON......9, 19 BAG DETECT ON...... 10, 32 BATCH REPEAT......
- Page 36 SHIPPING WEIGHT....31 SINGLE BATCH......4, 9-11, 17, 19, 32 SPEED OK......... 11-13, 18 SPEED........4, 9, 11-14, 17, 18, 21, 26, 33, 34 START........10, 11, 13, 14, 17-21, 26 STOP.......... 9-14, 17, 19, 20, 23, 27, 32 Threshold........4 TOTAL........
- Page 37 Quick Troubleshooting Guide This is a quick troubleshooting reference guide. Keep this by your seed counter as a reference for the most common and simple problems that may come up. This guide should solve most common problems without contacting the service department. If not, contact the service department at the number listed at the end of this guide.
- Page 38 Seeds fall between 1. Too much space 1. Unlock handle of the quick release on the bowl. Turn the bowl a chute and bowl between chute and bowl little bit closer to the chute. Feeder all of a 1. Probably 1 or 2 broken 1.
- Page 39 Important: Be sure to save ALL original packing material that your unit came with! Because of the weight of your counter and the fact that mailing and freight services do not always handle things with care, it is best if you ever need to send the counter in for service, to send it back in the original packaging.
Need help?
Do you have a question about the Count-A-Pak 801 and is the answer not in the manual?
Questions and answers