Advertisement
X-TRAC
TACTICAL REMOTE ACCESS CONTROL
M A N U A L
X-TRAC REV. 1 – JAN., 2017
Important Export Restrictions! Commodities, products, technolo-
gies and services contained in this manual are subject to one or more
of the export control laws and regulations of the US BIS-Department of
Commerce, Export Administration Regulations. It is unlawful and strictly
prohibited to export, or attempt to export or otherwise transfer or sell any
hardware or technical data or furnish any service to any foreign person,
whether abroad or in the United States, for which a license or written
approval of the U.S. Government is required, without first obtaining the
required license or written approval from the Department of the U.S. Gov-
ernment having jurisdiction. Diversion contrary to U.S. law is prohibited.
Advertisement
Table of Contents

Related Manuals for ATN X-TRAC

Summary of Contents for ATN X-TRAC
- Page 1 X-TRAC TACTICAL REMOTE ACCESS CONTROL M A N U A L X-TRAC REV. 1 – JAN., 2017 Important Export Restrictions! Commodities, products, technolo- gies and services contained in this manual are subject to one or more of the export control laws and regulations of the US BIS-Department of Commerce, Export Administration Regulations.
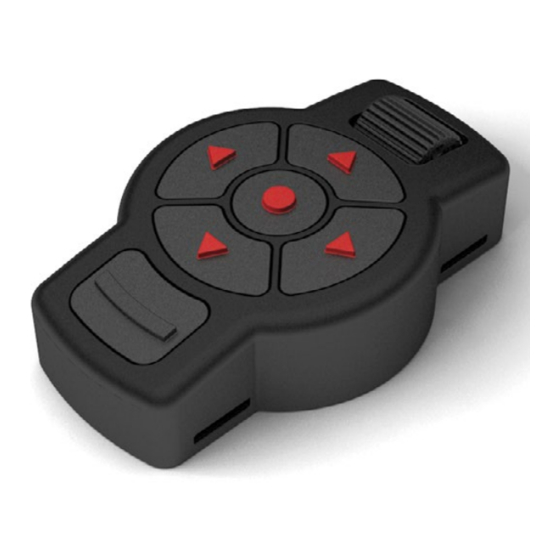
- Page 2 6 buttons and a Roller 3.2” x 2” x 0.8” Dimensions 80 x 50 x 21 mm Weight 1.76 oz / 50 g Warranty 2 years * ATN reserves the right to change the above specifications at any time without notice.
- Page 3 2 . D E S C R I P T I O N The X-TRAC was designed to aid the shooter in a dynamic shooting environment. Connect via Bluetooth to your ATN Smart Device and control all the functions and fea- tures without touching the scope.
- Page 4 4 . C O N N E C T I N G T H E X-T R A C 4.1 Activate the Bluetooth function in your ATN Smart HD Scope. 4.2 Enter the system setting from the menu. 4.3 Select the Settings Category.
- Page 5 6. B AT T E R Y R E P L A C E M E N T 6.1 Unscrew the Battery using a coin or an- other object turn counter clock wise. 6.2 Remove the CR2450 Battery 6.3 Replace with New CR2450 Battery 6.4 Replace the battery cover and turn clock wise.
- Page 6 Site: www.atncorp.com The information in this manual furnished for informational use only, is subject to change without notice, is not to be construed as a commitment by ATN Corp. ATN Corp. assumes no responsibility or liability for any errors or inaccuracies that may appear in this book.
Need help?
Do you have a question about the X-TRAC and is the answer not in the manual?
Questions and answers