Advertisement
Quick Links
Advertisement

Subscribe to Our Youtube Channel
Related Manuals for ViewLight Inami L-0955-SD

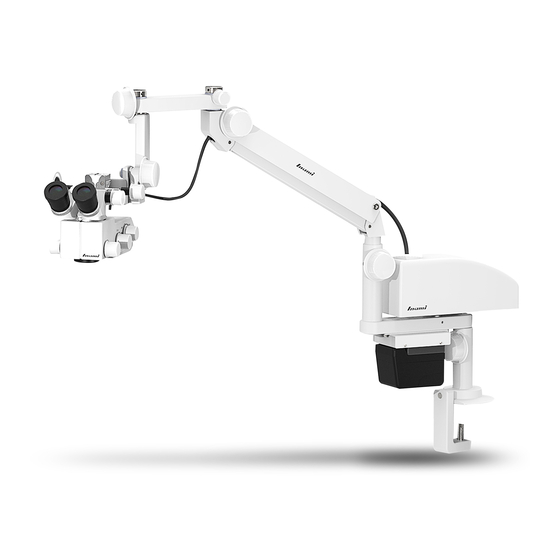
Summary of Contents for ViewLight Inami L-0955-SD
-
Page 2: Table Of Contents
This time, Zoom LED portable operation microscope , Thank you for purchasing. Please use properly on before using this manual well read, and you know how to use, etc.. And stop use if you can't follow the preparation and operation, please contact the dealer or our company. -
Page 3: 1. Safety Warnings And Cautions
1. Safety warnings and cautions Before using this safety warnings and precautions well read on the right please. Keep important this instruction manual so that you can view at any time. Because the precautions listed in this section are provided to serious safety always keep. The symbols and their meanings in the following. - Page 4 1) Product overview ・ Zoom LED portable operation microscope Is lightweight, compact, and handling ease has been designed for the purpose. ・ You can set the position to facilitate adoption of the spring arm. ・ By 45 degrees tilting mirror to get rid of ENT , Can be used, such as orthopaedic surgery. ・...
- Page 5 2) 各部の名称 9 Second arm rotation control knob 17 second arm 1 12.5 Eyepiece lens 10 Power supply unit 18 Zoom microscope head 2 PD adjustment knob 11 Illumination control knob 19 Focusing knob 3 Microscope removal screw 12 First arm rotation control knob 20 Delivery Ali 4 Zoom magnification control knob 13 Microscope head adjustment knob...
-
Page 6: 3. Assembly Instructions
3. Assembly instructions 1)installation (1) Installation conditions · Please place it in a place not subject to water. · Please place it in places where there is no fear of adverse effect due to air including atmospheric pressure, temperature, humidity, ventilation, sunlight, dust, salt, ion content etc. - Page 7 (4)eyepiece with Prism box installation (5)installation of the power unit Supply unit eyepiece Clamp screws Teflon washer Scale conbersion No.1 arm Mounting Power supply unit to the Teflon washer the chapter 1 Scale conversion box installed eyepiece Prism box, Perpendicular to the arm slowly insert. clamp screws.
-
Page 8: 4. Instructions
4. Instructions (How do) (1)power switch If you turn on the unit, press the power switch |. Power switch (2)coaxial lighting brightness adjustment knob Darkens the light mirror tunnel side coaxial lighting brightness adjustment knob turns to the right and turn left. coaxial lighting brightness adjustment knob (3)フィルター... - Page 9 (5)turn locking knob Tightening the lock knob rotation on postgraduate offered by the rotation, fixed. (6)diopter adjustment Rotate the eyepiece and adjust the scale to a diopter measured by. Tightening the lock knob (7)adjustment PDcontrol knob to rotate, and adjust the scale to a measured by eyes wide.
- Page 10 (9)Battery charging Insert the charger's power plug into the indoor outlet (100 to 240 VAC) and install the battery. The red lamp lights up while charging. The green lamp will light up when it is fully charged. * Lamp lighting status indicates the following meaning. Yellow Lit:Energized Red Lit:Charging Green Blinking:Practical charging completed...
- Page 11 5. Replacement consumables, cleaning, and storage 1) Cleaning (1) Body ・ And use a neutral detergent if the body is dirty, wipe it with a soft cloth. (2) Operation knob Cap ・ Operation knob Cap (disinfection CAP) for the disinfection of all removable has become. ・...
-
Page 12: 6. Maintenance
・ Tilt, shake, please note that shock and steady state. ・ Please do not store flammable gas and chemicals storage place. (3) Environmental conditions During storage please adhere to the following conditions. Storage conditions Temperature -10℃~+55℃ Relative humidity 10%~95% 6. Maintenance Depending on operating conditions, May require parts replacement and repair. - Page 13 How to adjust the 3) (1)the second arm balance shaft Remove the locking knob and shaft, please open the strong arm. weak Adjust the balance arm, arm locking nut tightened with a clasp (bar, etc.). Locking nut ( 3 ) mirror heads rotating clamping force (2)microscope angle tightening force adjustment adjustment Power tool...
-
Page 14: 7. Troubleshooting
7. Troubleshooting If faulty, and refer to the items listed below, please check. If, if still not resolved, please contact dealer or us. Symptoms Cause How to deal with Light does not Does not contain a main power Put the main power switch from the power cables are light switch properly connected. - Page 15 Notes on the use of medical electrical equipment 1) Does not use equipment other than skilled. 2) To note the following when installing the equipment. (1) To install water-free place. (2) Of adverse effects caused by air pressure, temperature, humidity, ventilation, sunlight, dust, salinity, Ion, including placing in unlikely places.
-
Page 16: 9. After-Sale Service
8. Specification L-0955SD L-0955SD+K-1422 Use power AC100 - 240 V 50 / 60 Hz Power 70 VA consumption Electrical Use LED 13.5 V 16 W Departme Blue filter Filter Retinal protection filter Color temperature change filter Objective lens Focal length f = 175 Eyepiece 12.5 Total...
Need help?
Do you have a question about the Inami L-0955-SD and is the answer not in the manual?
Questions and answers