Table of Contents
Advertisement
Quick Links
EN ISO
9001
Quality
international
level
RC
Duo 2
1
General information
1.1
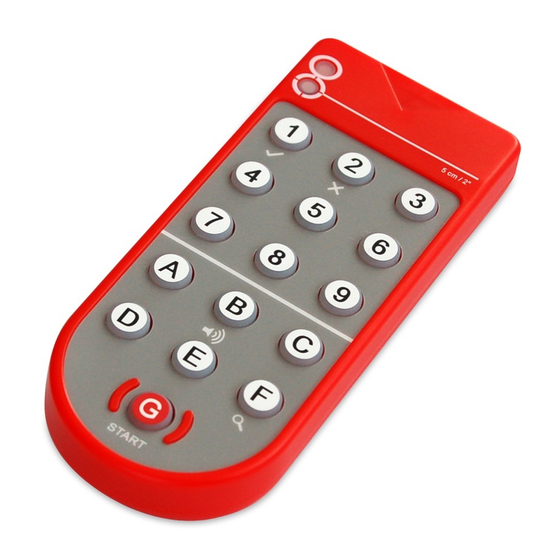
Parts of the remote
2'' (5 cm)
F
G
1.2
Shortcut buttons
1
On/Yes (only for certain parameters)
B Turns beeper function on/off (hold for 2 sec)
2
Turning on the remote
The RC Duo 2 must be powered on before it can communicate with the sensor.
POWER ON: Press and hold G for 2 seconds
POWER OFF*: Press and hold G for 2 seconds
*The remote will automatically turn off after 2 minutes if no button is pressed.
3
Communication with the sensor
3.1
Establishing connection with the sensor
Once the remote has been powered on, G will illuminate in red and begin to blink. To establish a connection with a particular sensor, aim
at the sensor and press G . The sensor's address (1 - 7) will illuminate on the keypad. The sensor's LED will briefly illuminate to confirm
communication. The RC Duo 2 is now ready to program the sensor. For help in selecting a particular sensor out of several, see section 4.3,
The connection between the RC Duo 2 remote control and the sensor can only be established while the sensor is in configuration mode.
Configuration mode is activated when the sensor is switched on. For safety reasons, this mode is exited automatically 30 minutes after the
last setting has been made, and the connection between the remote control and the sensor is interrupted.
The connection can be re-established in one the following ways:
- Pressing a button on the sensor OR
- Interrupting the electrical power supply to the sensor OR
- Using the "access code" function on the remote control (only available on some sensor models)
Please refer to the sensor user manual for more information.
3.2
Setting sensor parameters
The RC Duo 2 functions bidirectionally with the sensor. This means that changes to the settings on the sensor are immediately signalled back
by the sensor to the remote control.
EXAMPLE: the steps for setting the Hercules sensor mounting height (parameter F4) are shown below:
Ensure remote is
The sensor's ad-
powered on (section 2)
dress illuminates on
and sensor is in confi-
the keypad.
guration mode (section
3.1)
EXAMPLE: address
1 (factory default)
Once G blinks, press
G again to establish
connection.
J
H
I
1
To address the desired
parameter
EXAMPLE: mounting
height - F4
Press F immediately
followed by 4
Note: If any keys are blinking, programming failed. In this case, repeat programming.
Page 1
Transmitter/receiver (infrared)
Status indicator LED
Safety curtain infrared spot detector
Numerical keys (1 to 9)
2" (5 cm) spacing for safety curtain infrared spot finder
F
Function keys (A to F)
G
Start button - power on (2 sec) & establish connection
H
Battery compartment
I
Battery compartment cover
J
Quick reference guides
(stored in slot on battery compartment cover)
2
Off/No (only for certain parameters)
F
Scans for available addresses/sensors (hold for 2 sec)
The sensor ack-
Now press desired
nowledges it's current
new value.
set value by illumina-
ting it on the keypad.
EXAMPLE: 10-13 ft
(3.0-3.9 m) -3)
EXAMPLE:
4 = 13-16 ft (4- 4.9 m),
Press 3
factory default
Bidirectional remote control
Power ON: Press G for 2 sec
The new setting is im-
mediately saved and
displayed on the key-
pad.
Programming of this
parameter is now
complete. Repeat for
other parameters.
Advertisement
Table of Contents

Summary of Contents for Bircher Reglomat RC Duo 2
- Page 1 G . The sensor’s address (1 - 7) will illuminate on the keypad. The sensor’s LED will briefly illuminate to confirm communication. The RC Duo 2 is now ready to program the sensor. For help in selecting a particular sensor out of several, see section 4.3, sensor scan mode.
- Page 2 Safety curtain spot detector Use the 2” width mark on the RC Duo 2 to determine e.g. when the infrared safety curtain is 2” from the face of a sliding door. Beeper function...

Need help?
Do you have a question about the RC Duo 2 and is the answer not in the manual?
Questions and answers