
Summary of Contents for Indemnis Nexus M200 PRS
- Page 1 EQUIPMENT OPERATIONS GUIDE MANUAL FOR THE NEXUS M200 PARACHUTE RECOVERY SYSTEM ( Nexus M200 PRS ) N E X U S M 2 0 0 E Q U I P M E N T O P E R AT I O N S G U I D E - V 1 . 2...
- Page 2 IN-DEM-NIS; Noun from Latin: Indemnitasm Indemni(s) uninjured; suffering no damage or loss; suffering no loss of wealth or property N E X U S M 2 0 0 E Q U I P M E N T O P E R AT I O N S G U I D E - V 1 . 2...
- Page 3 OPERATOR MUST FULLY READ MANUAL TO ENSURE PROPER OPERATION Failure to do so could result in equipment failure or malfunction, serious injury, or death. N E X U S M 2 0 0 E Q U I P M E N T O P E R AT I O N S G U I D E - V 1 . 2...
- Page 4 N E X U S M 2 0 0 E Q U I P M E N T O P E R AT I O N S G U I D E - V 1 . 2...
- Page 5 DISCLAIMER This document and the information contained herein are proprietary and commercially confidential to Indemnis, Inc. Any use, disclosure, reproduction, distribution or other use of this manual by an individual or entity other than the intended recipient is prohibited. This is a living document and is available electronically at indemnis.com/manuals...
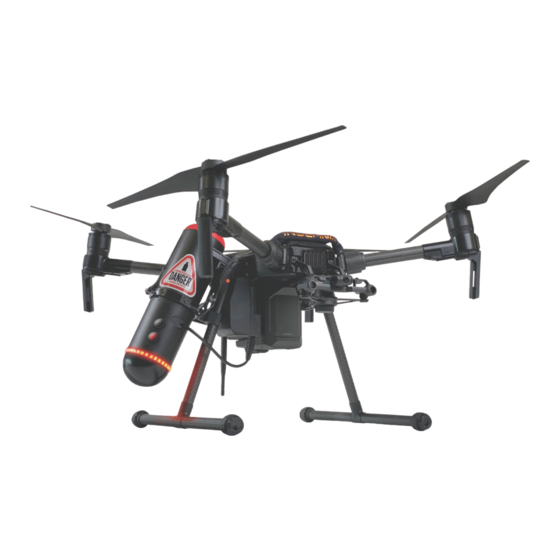
- Page 6 The Indemnis Nexus M200 Parachute Recovery System (Nexus M200 PRS) for the DJI Matrice 200 Series is an advanced ballistic safety system designed to protect life and property on the ground and enable advanced flight operations by reducing the drones level of kinetic energy in the event of a failure. This manual explains installation instructions and how the Nexus M200 PRS works and how to properly operate the system both on the ground and in the air.
-
Page 7: Table Of Contents
..........Nexus M200 PRS Remote (MTD) 34-35 . -
Page 8: Safety Precautions
Nexus M200 PRS deploys from the top of the aircraft where the RED CAP is located. It is recommended that the operator maintains a clear area of 8 meters from the Nexus PRS when the system is powered on. -
Page 9: Operational And Environmental Limitations
OPERATIONAL AND ENVIRONMENTAL Operational Considerations a) At maximum takeoff weight with the Nexus M200 PRS installed, the average measured parachuting descent rate of the Matrice 200 Series is 3.23 meters per second (7.25 MPH). b) Minimum Operating Altitude with zero wind – 36 meters (118 FT) Environmental Considerations a) Temperature -4°to 104°F (-20°to 40°C) -
Page 10: Nexus M200 Prs Components
M4 x 6 M4 x 6 M3 x 3 The antenna on the Nexus M200 PRS housing is glued in place and user will adjust up and down for storage and operation. N E X U S M 2 0 0... -
Page 11: Charging The Nexus
Charging your Nexus M200 PRS The Nexus M200 PRS must be charged before use. It uses a USB-C cable to charge the unit and can be charged with any standard USB charger. The battery charge status can be indicated by pressing the power button once. A fully charged battery is indicated by a fully lit green LED ring. -
Page 12: Installation Instructions
INSTALLATION HARNESS AND ARM BRACKETS Attaching the Nexus M200 Parachute Harness and Arm Brackets (ONE-TIME INSTALL): There are two parachute harness and arm bracket assemblies. The arm brackets are designed to strengthen the M200 articulating arm joints during a deployment and to attach the parachute to the M200 for a level landing orien- tation. - Page 13 7) Using the provided mounting tape, place it along the M200 body just under the area where the INDEMNIS logo cable wrap sits securing it first to the surface, then peeling the backer off and pressing the cable wrap firmly onto the tape.
- Page 14 INSTALLATION HARNESS AND ARM BRACKETS To install the BACK PARACHUTE HARNESS assembly: 1) Place the DJI M200 in front of you so that you are looking at the back of the aircraft, with the front end furthest away from you. 2) Unlock and loosen the DJI M200 twist arm lock on the back two arms so that the arms remain in the ready-to-fly position but are not secure.
- Page 15 WATCH THE INSTALL VIDEOS: indemnis.com/how-to N E X U S M 2 0 0 E Q U I P M E N T O P E R AT I O N S G U I D E - V 1 . 2...
- Page 16 INSTALLATION FLIGHT TERMINATION SYSTEM Attaching the Nexus M200 Flight Termination System (ONE-TIME INSTALL): The Nexus FTS is designed to attach to the back arm parachute harness arm brackets at the remaining two bolt holes. The Nexus FTS will extend into the cavity above the battery release mechanism on the aircraft.
- Page 17 Automatic Termination System (ONE-TIME INSTALL): The Indemnis M200 Nexus PRS ATS is attached to a leg bracket that will re- main rigid on the aircraft in the event of a deployment. The leg bracket will be placed onto the right side of the aircraft. This will be a one-time install. The FTS is attached to the ATS via a wiring harness.
- Page 18 PLEASE NOTE : The Nexus V1 RTK Mount is only for M200 Series aircraft using the M200 V1 GPS system or M210 V1 RTK system. N E X U S M 2 0 0 E Q U I P M E N T O P E R AT I O N S G U I D E - V 1 . 2...
- Page 19 Nexus PRS Tube. WATCH THE INSTALL VIDEOS: indemnis.com/how-to N E X U S M 2 0 0 E Q U I P M E N T O P E R AT I O N S G U I D E - V 1 . 2...
- Page 20 N E X U S M 2 0 0 E Q U I P M E N T O P E R AT I O N S G U I D E - V 1 . 2...
- Page 21 Nexus PRS Tube WATCH THE INSTALL VIDEOS: indemnis.com/how-to N E X U S M 2 0 0 E Q U I P M E N T O P E R AT I O N S G U I D E - V 1 . 2...
- Page 22 This device is easily attached and detached from the aircraft such that it can be stored safely in the Indemnis M200 Nexus Case and so that the DJI M200 with the ATS, FTS, and parachute harnesses can still fit into the DJI provided M200 travel case.
- Page 23 ATS and plug it into the USB port of the Nexus tube near the buttons. WATCH THE INSTALL VIDEOS: indemnis.com/how-to N E X U S M 2 0 0 E Q U I P M E N T O P E R AT I O N S G U I D E - V 1 . 2...
-
Page 24: Battery Operation
BATTERY OPERATION INSTALLING THE BATTERY 1) The aircraft should be upright with the rear facing towards you. Have both batteries available and fully charged. 2) Press down on the silver lever to allow the battery release to swing freely. 3) Slide the left battery in as normal, then the right battery. 4) Using your thumbs, push both batteries in firmly until they click. - Page 25 BATTERY OPERATION REMOVING THE BATTERY Place your forefinger under the black release tab and your thumb on the silver battery release tab. 2) Pull the black battery release up while pressing the silver battery mechanism down at the same time to unlock the batteries. 3) When the batteries pop partially out you can slide them out to remove with ease.
- Page 26 SECURE THE PARACHUTE HARNESSES WHEN OPERATING THE AIRCRAFT WITHOUT THE NEXUS PRS TUBE IN PLACE Failure to do so could result in equipment failure or malfunction, serious injury, or death. N E X U S M 2 0 0 E Q U I P M E N T O P E R AT I O N S G U I D E - V 1 . 2...
-
Page 27: Securing The Parachute Harnesses
SECURE PARACHUTE HARNESSES WHEN OPERATING YOUR DJI M200 WITHOUT THE NEXUS PRS TUBE IN PLACE. 1) Close the carabiner. 2) Run the Indemnis velcro strap through the carabiner. 3) Pul the cable and carabiner across to the opposite arm and wrap the... -
Page 28: Understanding The Led Light Ring
LED Light Ring Colors and System Status State: The Nexus M200 PRS uses a LED light ring at the front of the system to indicate the system status to the user. The included Nexus MTD GREEN BUTTERFLY = SAFE AND CANNOT DEPLOY also provides users with Nexus M200 PRS systems status via both System battery is charging. - Page 29 IT IS HIGHLY RECOMMENDED TO USE THE NEXUS MTD In absence of the Nexus MTD the LED light ring and audible tones indicate system Mode. N E X U S M 2 0 0 E Q U I P M E N T O P E R AT I O N S G U I D E - V 1 . 2...
-
Page 30: Checklists
Pre-flight Checklist: CHECKLIST T/O | LZ clear and safe from other individuals Power on Aircraft Power on Nexus MTD Power on Nexus PRS Aircraft Inspection Checklist: Wait for boot up tones and LED indication Propellers installed and checked for cracks MTD reads “Ready for Pre-Arm”/LED indicates rotating blue Batteries are charged and firmly in place Pre-Arm Nexus (Rotating yellow/MTD indicates “Pre-Arm”) -
Page 31: Ground Operation Procedures
M200 PRS, Press the power button once and then press again and from rotating blue to rotating yellow. The Nexus M200 PRS is now in a hold. Pre-Armed Mode. The Nexus M200 PRS will remain in this state until the N E X U S M 2 0 0 E Q U I P M E N T O P E R AT I O N S G U I D E - V 1 . -
Page 32: Flight Operation Procedures
If the Nexus M200 PRS has not automatically disarmed then it should be kept level until it 1) Takeoff - Make sure the Nexus M200 PRS LED light ring is rotat- is manually disarmed with the Nexus MTD or by the Arm/Disarm ing yellow prior to takeoff. - Page 33 1) The Nexus M200 PRS can be used in any of the aircraft’ s flight modes such as GPS or Sport Mode. 2) The aircraft with Nexus M200 PRS needs to be at a minimum altitude of 35.97 m (118 Ft) to have a successful deployment and recovery in any failure scenario.
-
Page 34: Nexus M200 Prs Remote (Mtd)
The Nexus manual triggering device (MTD) is included in your 1) The Nexus MTD is designed to be hung around the pilot’ s neck Nexus M200 PRS purchase – The Nexus MTD is the same for all using the included neck lanyard, mounted to a tripod using a standard... - Page 35 The LCD screen will read “Disarmed”, indicating that the Nexus is disarmed and you can visually observe that the rotating red LED ring on the Nexus M200 PRS has changed to rotating green, indicating it is Disarmed. The Nexus MTD will also make a series of audible tones indicating a change in mode.
-
Page 36: Post-Flight Inspection Procedures
Any damage noted shall be reason for grounding the system and contacting support. 2) The Nexus M200 PRS is a ballistic parachute launcher and the system should always be STORED IN ITS APPROVED CASE WHEN NOT IN USE. -
Page 37: Maintenance And Servicing Instructions
MAINTENANCE AND SERVICING INSTRUCTIONS POST DEPLOYMENT PROCEDURE: Like an airbag in your car, the Nexus M200 PRS is a certified safety system. It is not user re-packable or user serviceable after the Nexus M200 PRS has been deployed. SERVICING: The Nexus M200 PRS can only be serviced by Indemnis and service providers that have been authorized by Indemnis. -
Page 38: Troubleshooting & Icon Guide
MID FLIGHT WARNING CAUSE This error indicates the Nexus M200 PRS has lost contact with the ATS. If this happens mid-flight, this represents a serious error that requires landing. *If the unit has ascended above the altitude lockout, manual deployment is enabled until the Nexus unit is disarmed. - Page 39 READY FOR PRE-ARM NEXUS REBOOTING The Nexus M200 PRS is calibrated / Reboot is in progress. Please wait charged and ready to be Pre-Armed. a moment to allow completion. Do not touch the UAV or Nexus system during reboot. SYSTEM PRE-ARMED Nexus M200 PRS and UAV are ready LAND &...
- Page 40 I N D E M N I S . C O M...
Need help?
Do you have a question about the Nexus M200 PRS and is the answer not in the manual?
Questions and answers