Table of Contents
Advertisement
Advertisement
Table of Contents

Subscribe to Our Youtube Channel
Summary of Contents for 7E Wellness MYOLIFT MINI
- Page 1 MYOLIFT MINI...
- Page 3 MYOLIFT MINI TRAINING MANUAL ©2020 7E Wellness Corporation l All Rights Reserved MyoLift Mini Training Manual is for Educational and Training purpose only No portion of this manual may be reproduced or transmitted in any form or by any means, electronic or mechanical, including photocopying and recording,...
- Page 4 The MyoLift Mini is NOT a medical device and are not to be represented as such, in any manner, that may be misconstrued by the public. 7E Wellness does not endorse the use of the MyoLift Mini for conditions outside the professionals scope of practice.
- Page 5 Important Information for the User of MyoLift Mini Device: Contraindication: The MyoLift Mini microcurrent devices are contraindicated for the following health conditions: Electrical implanted devices, such as a pacemaker Epilepsy; History of Seizures Active Cancer Pregnancy Heart Conditions: Consult with physician...
- Page 6 Precautions: The MyoLift Mini should only be used on normal intact skin and stimulation should not be applied over open wounds, over swollen, infected or inflamed areas or skin eruptions, or over areas of skin that lack normal sensation. Potential adverse reactions may include electrode burns, skin irritation/or redness.
-
Page 7: Table Of Contents
TABLE OF CONTENTS Overview Introduction to Microcurrent How does it work? Indications for use and intended use Indicators and Controls Charging MyoLift Mini Device Applicator Overview MyoLift Mini Operations MyoLift Mini Treatment 7e Signature Movements MyoLift Mini Device Maintenance Troubleshooting... -
Page 9: Overview
The MyoLift Mini device allows you to adjust the current output from 0 to 400 microamps, as per the client comfort level. -
Page 10: Introduction To Microcurrent
Introduction to Microcurrent: Non-invasive facial treatments have grown in popularity over the last 20 years because of their results and ease-of-use in the day & medical spas. Microcurrent, for the face, is another example of a procedure which began as a medical treatment but, has now been adapted for use in the cosmetic marketplace. -
Page 11: How Does It Work
MyoLift Mini for facial lifting, tightening and toning is a great alternative to a facelift since it is non-invasive, does not require any recovery time, gives instant results and does not have the same potential for harmful complications as surgery does. -
Page 12: Indications For Use And Intended Use
Indications for use and intended use: The MyoLift Mini device is intended for facial stimulation and is indicated for over- the-counter cosmetic use. The MyoLift Mini Device Includes The Following: MyoLift Mini Device Lead Wire Probe Applicators 4oz. Conductive Gel... -
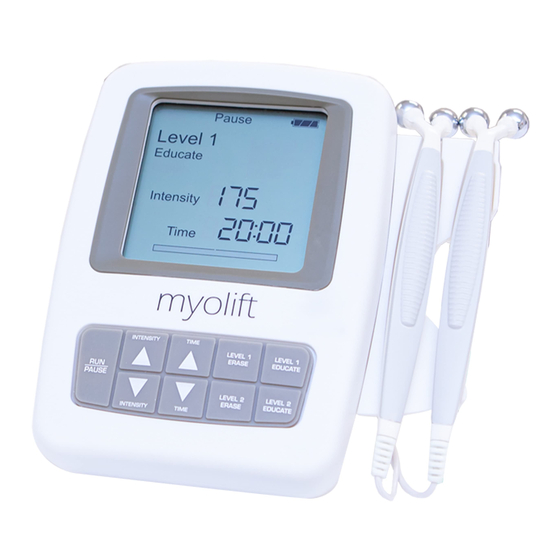
Page 13: Indicators And Controls
Indicators and Controls: Turn it On/Off Status Indicator Battery Icon Level 1 Level 2 Mode Mode Intensity Treatment Time Value Conductivity Indicator Intensity Increase/ Level 1 Erase Key Decrease Level 1 Educate Key Run/Pause Level 2 Educate Key Level 2 Erase Key Time Increase/Decrease Key... -
Page 14: Charging Myolift Mini Device
Charging MyoLift Mini Device: To charge the device, insert the charger connector pin into the charger socket on the top of the device. Note: Charging is indicated by the battery indicator on the top right corner of the device. The battery icon becomes steady when the battery is fully charged. -
Page 15: Applicator Overview
Applicator Overview: The device comes with a set of applicators often referred to as probes. The double-tipped probes must make direct and constant contact with the skin, as both the probes together complete the circuit required for the treatment. The two specially designed probes are manipulated over the surface of the skin in a precise way to stimulate the different muscles requiring treatment. -
Page 16: Myolift Mini Operations
MyoLift Mini Operations: Insert probes or lead wire Press to start Charging socket Level 1 Status Indicator Battery Icon Level 2 Mode Intensity Treatment Time Value Conductivity Bar Indicator Mode... - Page 17 MyoLift Mini Operation: Run-Pause Run Button: Indicates the device is on and ready for use. Pause Button: Indicates the device is on and may be paused at any time. The timing will also pause and resume when “Run” is pressed once again.
- Page 18 MyoLift Mini Operation: Intensity Button MyoLift Mini Intensity Range is 0 - 400uA. Level 1 Intensity Range is 0 - 175uA. Level 2 Intensity Range is 350 - 400uA. Upward Arrow: Increases the INTENSITY. Downward Arrow: Decreases the INTENSITY. Intensity Increase/Decrease...
- Page 19 MyoLift Mini Operation: Time Button Pre-Caliberated Timing 10 - 20 minutes. Upward Arrow: Increases the TIME. Downward Arrow: Decreases the TIME. Intensity Increase/Decrease Erase Level 1 Educate Level 1 Educate Level 2 Erase Level 2 Time Increase/Decrease Run/ Pause...
- Page 20 MyoLift Mini Operation: Erase Level 1 Setting Pre-Calibrated to 175 * uA. For treating: Eye area, Forehead, Lips and Thin Skin. Preset waveform to help lengthen the muscles. Erase Level 1 focuses on skin texture and supercial lines. It relaxes the muscles and helps to work on fascia release for minimizing tension in the muscles.
- Page 21 MyoLift Mini Operation: Educate Level 1 Setting Pre-Calibrated to *175 uA. This program shortens the muscles. Educate Level 1 focuses on toning muscles that are supercial. Lifts, tightens, and tones the skin and muscles. For Treating: Neck, Nasolabial Folds, Jowls, Cheeks, Eyebrows.
- Page 22 MyoLift Mini Operation: Erase Level 2 Setting Pre-Calibrated to *350 uA. Decrease the intensity if it feels stinging, too strong or brings visible twitching of the muscles. This program lengthens the muscles. Erase Level 2 focuses on skin texture and reduction in the appearance of wrinkles at various depths.
- Page 23 MyoLift Mini Operation: Educate Level 2 Setting Pre-Calibrated to *350 uA. Decrease the intensity if it feels stinging, too strong or brings visible twitching of the muscles. This program shortens the muscles. Educate Level 2 focuses on toning muscles at various depths.
-
Page 24: Myolift Mini Treatment
Facial muscles need exercise to keep healthy and lifted as much as the muscles of the body. Note: MyoLift Mini utilizes double-tipped probe applicators with a flexible handle designed. True microcurrent is delivered with the pinch-and-hold technique on the different size muscles by grasping the muscle in-between the probe applicators. -
Page 25: Signature Movements
7E Signature Movements During the aging process (35 years and up) the muscles go through noticeable changes. Re-educating the muscle to its original location is achieved by understanding the origin and insertion of the muscles and applying the MyoLift Mini signature movement techniques. -
Page 26: Myolift Mini Device Maintenance
MyoLift Mini Device Maintenance: Disinfecting Protocol: Make sure the device is disconnected from the wall socket and the probe applicators are disconnected from the device Remove all foreign matter from device and probes with wet paper towel. With gloves on, spray state approved disinfectant onto wet paper towel and wipe down the device and probes thoroughly. -
Page 27: Troubleshooting
Troubleshooting: Remedy Observation Possible Causes Device not turning on Device is plugged into Unplug the device a power socket from the power socket and then turn it on Battery is not charged Charge the battery for 4-5 hours The Round start button Start the device using the push down round is not pressed... -
Page 28: Standard Instructions
Hold for three to five seconds to get the best results. Prepare the skin prior to MyoLift Mini treatment with the 7E RePlenish Spritzer and the 7E Conductive Tx Gel. Use all cleansing and exfoliation techniques prior to using MyoLift Mini. -
Page 29: Professional Series
Professional Series: 7E MyoLift treatment may be repeated weekly until the desired results are achieved. Maintenance 1x every 6-8 weeks is suggested, if 3 months have passed since last treatment, series will need to be restarted. The following are general and approximate guidelines for frequency of treatment 20-35 years old: Preventative, can be done once every month 35-40 years old: Initial series of 3-6, once... -
Page 30: Treatment Steps
Treatment Steps: Preparation of Skin Cleanse the face and pat dry. Before beginning the treatment, spray the skin with 7E RePlenish Conductive Spritzer. Apply a water-based serum on cleansed face. Apply 7E Conductive Tx Gel on the skin of the face and neck. Reapply to the selected facial area(s)being treated. -
Page 31: Conductive Skin Care Products
ATP and muscles tightening. The 7E Wellness Conductive Tx Gels and 7E RePlenish Spritzer are a water-based formula formulated as an active mineral-based to maintain a wide-range of conductivity. - Page 32 ReStore Conductive Tx Gel For symptoms associated with sun-damaged and anti-aging and the onset of the chronological aging process. The skin is nourished, hydrated, muscles are tightened, and self-healing of the skin's tissue takes place for a healthy glow. ReSolve Conductive Tx Gel For oily/acneic skin conditions and focuses on eliminating the impurities of the skin.
-
Page 33: Erase Mode
Erase Mode: Top of the Face The frontalis works with assistance from the occipitalis to raise the eyebrows or draw scalp forward. Better known as expression lines, the movement leading to an expression stimulates the forehead muscles but results increase that hampers the smooth blood vessels flow. - Page 34 Program Intensity Repetition Level 175 microamps Erase Note: Dots = Stationary Probe...
- Page 35 Glabella Area (11 Lines): Place the two probe applicators together between the eyebrows (do not touch probe applicators together). Draw the two probe applicators up and out towards each eyebrow using light pressure and stretching apart any lines. Hold for 3–5 seconds and repeat. Program Intensity Repetition...
- Page 36 Crow's Feet Eraser: Place the two probe applicators together on the outside of the eye. Draw the top probe applicator up towards the eyebrow (leaving the bottom probe applicator stationary) using light pressure and stretch apart any lines. Hold for 3–5 seconds, and repeat. Perform the move on the other side of the face and repeat so each side is treated twice 3x.
- Page 37 Upper Lip: Place the two probe applicators together on the center of the upper lip. Simultaneously, slide the probe applicators outward toward the corners of the mouth using light pressure and stretch probes apart. Hold for 3–5 seconds. Program Intensity Repetition Level 175 microamps...
- Page 38 Depressor (Chin): Place the stationary probe applicator in the middle of the chin, place the moving probe applicator next to the stationary and drawing it away moving to the edge of the mouth. When you reach the edge of the mouth, hold movement for 3–5 seconds. Move to a lower position on the chin and repeat the move.
- Page 39 Mentalis: Place both probe applicators in the middle of the chin and pull the probes away from each other – one towards the lip and the other towards the jawline. Hold movement for 3–5 seconds. Move the probe applicators to a position closer to the end of the mouth and repeat the move.
- Page 40 Stretch: Place both probe applicators together on the jaw line just at the edge of the mouth. Hold the lower probe applicator stationary while pulling the top probe applicator up firmly to where it is level with the middle of the mouth. Hold for 3–5 seconds and repeat.
-
Page 41: Educate Mode
Educate Mode: Muscles of the Lower Face The Muscles such as the orbicularis oris, depressor anguli oris, depressor labi inferiois and mentalis will be addressed in the lower areas of the face. Neck: Cleanse the face and pat dry. Before beginning the treatment, spray the skin with 7E RePlenish Conductive Spritzer. - Page 42 Jawline: Apply the 7e Conductive Tx Gel on the area being treated before using the 7E MyoLift Mini device. Place the stationary probe just under the ear lobe where the jawline and ear meet (one end of the Sternocleidomastoid muscle)
- Page 43 Work up the neck until you get to the center of neck making sure to avoid working over the trachea area. When you reach the jawline hold the movement for 3–5 seconds. Program Level Intensity should be Educate1 at 175 microamps 3x. Repeat each movement at least 3x on each side of the face.
- Page 44 Middle of the face: The muscles in the middle portion of the face lead to expressions more voluntary than the upper portion. When it comes to middle of the face, muscles like the masseter, buccinator, temporalis are at work, including the zygomatic major and minor.
- Page 45 Program Intensity Repetition Level 350-400 microamps Educate Note: Dots = Stationary Probe...
- Page 46 Snarl 1: Place the first probe applicator on the center portion of the top lip (using no pressure). Place the second probe applicator just off the corner of the mouth. Push the second probe applicator up towards the first, getting under the muscle at the corner of the mouth and lifting to produce a “snarl.”...
- Page 47 Snarl 2: Place the first probe applicator next to the nostril (using no pressure). Place the second probe applicator just off the corner of the mouth. Push the second probe applicator up towards the first getting under the muscle at the corner of the mouth and lifting to produce a “snarl.” Hold for 3–5 seconds and repeat.
- Page 48 Masseter Area (Hollow of Cheeks): Place the stationary probe applicator just below the cheek bone and place the moving probe applicator at the jawline sliding it towards the stationary probe applicators. When the moving probe applicator reaches the stationary probe applicator, hold movement for 3–5 seconds (do not let probe applicators touch).
- Page 49 Cheek Sculptor: Place the stationary probe applicator next to the nostrils (using no pressure). Push the moving probe applicator up from the jawline with firm pressure. Stop when you have the cheek muscle “pinched” between the two probe applicators and hold for 3–5 seconds. Repeat. Continue out towards the ear performing each move twice.
- Page 50 Apple of Cheeks: Place the stationary probe applicator under the eye making sure you are on the bone and not in the eye socket. Push the moving probe applicator up from the middle of the cheek with firm pressure. Stop when you have the cheek “pinched” between the two probe applicator and hold for 3–5 seconds then repeat.
- Page 51 Hairline: Place the stationary probe applicator just inside the hairline above the ear. Place the moving probe just outside the hairline above the ear. Gently pinch the two probe applicator together, hold for 3–5 seconds, and repeat. Continue up towards the arch of the eyebrow performing each move twice. Perform the move on the other side of the face and repeat so each side is treated twice.
- Page 52 Eyebrow Lift: Place the stationary probe applicator on the forehead above the eyebrow. Place the second probe applicator under the eyebrow and lift up firmly so the brow is arched. Continue the move down the eyebrow, holding for 3–5 seconds & repeating. Perform the move on the other side of the face and repeat so each side is treated thrice.
- Page 53 Eyes Upper: Place the stationary probe applicator at the end of the eyebrow closest to the nose. Start the moving probe applicator at the outside of the eye and gently sweep over the eyebrow (straddling the eyebrow) towards the first probe. Stop when the probe applicators are close, but not touching.
- Page 54 The area around the eyes is surrounded by numerous fine, narrow muscles that support the skin which is particularly fragile. The lines can be caused by sunglasses, eyeglasses, migraines and sleeping on stomach. The MyoLift Mini Microcurrent device stimulates the muscles around the eye to improve the circulation in the peripheral blood vessels.
- Page 55 Under Eye: Place the stationary probe applicator under the eye and next to the nose. Start the moving probe applicator at the outside of the eye and gently sweep the probe applicator in towards the first probe applicator. Stop when the probe applicators are close but not touching.
-
Page 56: Warranty
This product warranty extends to the original consumer/purchaser of the product. Warranty Coverage Each new MyoLift Mini device (exclusive of batteries) is warranted to be free from defects in materials and workmanship for a period of one year. Note: When you register your device online, you will get an additional one year free warranty. - Page 57 Customer Service For in-warranty service for a product covered under the warranty period, no charge is made for service. Please contact 7E Wellness customer service to request an RMA return form. No returns will be accepted without an RMA. Have the product insured, packed with sufficient protection, postage and prepaid to the address provided on the RMA.
Need help?
Do you have a question about the MYOLIFT MINI and is the answer not in the manual?
Questions and answers
how often to use myolift mini