Advertisement
Quick Links
Thank you for purchasing a Sealey product. Manufactured to a high standard this product will, if used according to these instructions and
properly maintained, give you years of trouble free performance.
IMPORTANT: PLEASE READ THESE INSTRUCTIONS CAREFULLY. NOTE THE SAFE OPERATIONAL REQUIREMENTS, WARNINGS & CAUTIONS.
USE THE PRODUCT CORRECTLY AND WITH CARE FOR THE PURPOSE FOR WHICH IT IS INTENDED. FAILURE TO DO SO MAY CAUSE
DAMAGE AND/OR PERSONAL INJURY AND WILL INVALIDATE THE WARRANTY. PLEASE KEEP INSTRUCTIONS SAFE FOR FUTURE USE.
1. SAFETY INSTRUCTIONS
1.1.
GENERAL SAFETY INSTRUCTIONS
Familiarise yourself with the application, limitations and potential hazards of the tester. Also refer to the vehicle manufacturer's hand book.
Ensure that the tester is in good condition before use.
Only use recommended attachments and parts. To use unapproved items may be dangerous and will invalidate your warranty.
If the tester receives a sharp knock or blow the unit must be checked by a qualified service agent before using.
Keep children and unauthorised persons away from the work area.
DO NOT disassemble the tester for any reason. The tester must only be checked by qualified service personnel.
WARNING! To avoid damaging hearing, DO NOT set headphones volume too high.
DO NOT drop the detector or transmitter.
DO NOT tamper with the electronic circuit boards within the dectector or transmitter.
DO NOT use the tester outdoors, or in damp, or wet locations and DO NOT use in the vicinity of flammable liquids or gases.
DO NOT use the dectector or transmitter near any electrical appliances which emit electromagnetic waves, as this will give a false reading.
DO NOT use the tester for a task for which it is not designed.
When not in use, store the tester carefully in a safe, dry, childproof location.
If the dectector and transmitter are not to be used for long periods, remove the batteries before storing.
2. INTRODUCTION & SPECIFICATION
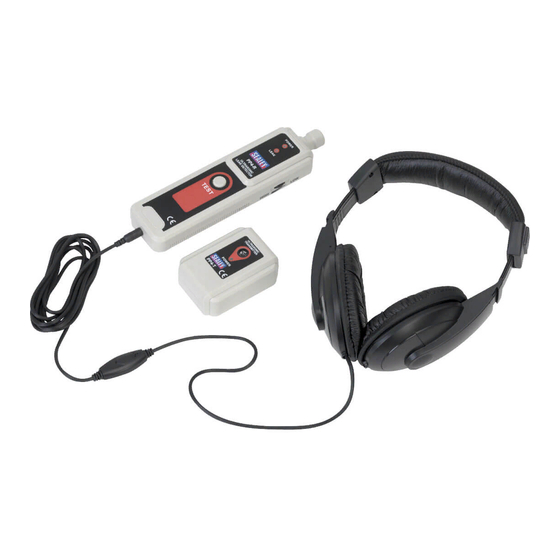
Quick and simple location of air, water or dust leaks. Place the transmitter
in the vehicle and close the doors and windows. Trace the detector around
outside of the screen, windows and door seals to locate the leak. Includes
adjustable headphones for detector. Transmitter and detector powered by
9V Lithium batteries. Supplied in carry-case.
Operating Conditions:
0°C ~ 40°C <80% RH
Frequency Response:
Output Frequency:
Battery:
Size:
Weight:
3. OPERATION
WARNING! Ensure the headphone volume setting is set to low before operating the unit.
3.1.
Operating in Passive Mode.
3.1.1. Insert the headphones plug into the jack (fig.1.7) and put on the headphones.
3.1.2. Press and hold down the TEST button (fig.1.6), the POWER LED will light (fig.1.4). A ticking tone will be heard through the
headphones, adjust the volume of the headphones to a suitable level (fig.4). Adjust the sensitivity control to eliminate external noise
(fig.2).
3.1.3. Holding down the TEST button, move the detector probe around the joint or seal of the suspected area. If a leak is detected the
ticking tone frequency will increase and the "LEAK" LED will also illuminate (fig.1.5). The closer to the leak the higher the frequency of
the ticking tone.
Note: When the PP4 detects a possible leak, move the probe around the suspected leak to determine whether the ultrasonic sound is from
the leak or from other areas. Keep the probe as close as possible to the test area and move the probe slowly.
3.1.4. Repair the leak and recheck with the detector.
3.1.5. Once testing is complete release the TEST button.
Note: There are many factors involved in the ultrasonic leak detection, such as the pressure within the vessel, the size and shape of the
hole, temperature etc. In some cases the ultrasonic sound caused by the leak may be very weak, so the sensitivity will need to be set
at the highest level. If the ultrasonic sound is too intense, the ticking tone frequency will be high, the sensitivity should be adjusted
down to an acceptable level. Noisy environments may also increase the ticking tone frequency, adjust the sensitivity down to an
acceptable level.
3.2.
Operating in Active Mode
3.2.1. Switch on the transmitter (see fig.1.1 & fig.3), the "POWER" LED will illuminate (fig.1.3).
3.2.2. Place the transmitter inside the compartment to be checked and close the compartment. The ultrasonic sound generated by the
transmitter (fig.1.2) will leak though any orifice or faulty seal.
3.2.3. Scan the the outside of the compartment with the detector. Any leaks from the compartment can be easily detected and pinpointed.
3.2.4. When the check is completed remove and turn off the transmitter.
© Jack Sealey Limited
Detector
Transmitter
0°C ~ 40°C <80% RH
40kHz +/- 2kHz
-
9V
192 x 50 x 30mm
80 x 56 x 27.5mm
115g (incl battery)
75g (incl battery)
INSTRUCTIONS FOR:
ULTRASONIC LEAK DETECTOR
PP4.V2
MODEL No:
-
40kHz
9V
Original Language Version
PP4.V2 Issue No: 2(L) - 08/01/14
Advertisement

Related Manuals for Sealey PP4.V2


Summary of Contents for Sealey PP4.V2
- Page 1 PP4.V2 MODEL No: Thank you for purchasing a Sealey product. Manufactured to a high standard this product will, if used according to these instructions and properly maintained, give you years of trouble free performance. IMPORTANT: PLEASE READ THESE INSTRUCTIONS CAREFULLY. NOTE THE SAFE OPERATIONAL REQUIREMENTS, WARNINGS & CAUTIONS.
- Page 2 4.4. Store the kit in its case and keep it in a dry safe childproof location. Under the Waste Batteries and Accumulators Regulations 2009, Jack Sealey Ltd are required to inform potential purchasers of products containing batteries (as defined within these regulations), that they are registered with Valpak’s registered compliance scheme. Jack Sealey Ltd’s Batteries Producer Registration Number (BPRN) is BPRN00705 Environmental Protection.