Advertisement
Quick Links
Advertisement

Summary of Contents for DLC DL-RLF90
- Page 1 DL-RLF90 LED Ring Light / Flash...
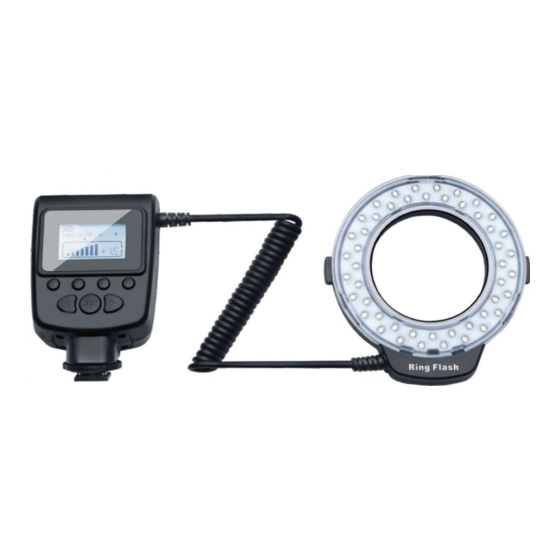
- Page 2 Part Descriptions: Ring Flash LED Light Test button (PILOT) Control Module Mode switch button (MODE) Connecting cable Constant LED light button (LIGHT) Translucent diffuser ( or Warming filter) Power switch (ON/OFF) Squeeze Lock buttons Output power adjustment button(Left/Decrease) Battery cover Set button Hot Shoe Locking Ring Output power adjustment button (Right/Increase)
-
Page 3: Main Features
Warnings 1. Review manual before using product 2. Do not disassemble any part of the ring flash. If service is needed, return unit to DLC 3. Do not use if unit or cord shows sign of wear or damage 4. Do not flash near eyes 5. -
Page 4: Installing The Batteries
Installing and Removing the Flash Diffuser. 1. Rotate the diffuser according to the direction indicated by the arrow to open it. 2. Connect the diffuser to the main body according to the indication on the diffuser. 3. Rotate the diffuser according to the direction indicated by the arrow to tighten it. Note: There are two types of diffusers: warming and diffusion. - Page 5 Installing and Removing the Control Unit from Camera. 1. Push the Power Control's hot shoe base fully into the camera hot shoe. 2. Rotate the Hot Shoe Locking Ring to tighten it according to the direction indicated by the arrow. Do not over-tighten. 3.
- Page 6 Compatible Devices With the new hot shoe base technology, the DL-RLF90 Ring Flash will fit a variety of camera models: including most Nikon Canon / Panasonic/ Olympus brand DSLR and Mirrorless models. Installing the Ring Flash on Camera lens Included are adapter rings to fit lens diameters of...
- Page 7 Basic Functions Buttons operation Button Name Operation Power switch (ON/OFF) Long press the button 5 seconds to turn on or turn the ring flash power. Mode switch button (MODE) Press button to switch between the FLASH, Land R modes. Output Power adjustment button Press button to...
- Page 8 LCD suspend mode and Startup Status backlight will automatically turned off if there is no operation (button pressing or flashing) after 20 seconds but will be automatically turned on when an operation is performed. The ring flash is automatically powered off and enters power-conservation mode if no operation (button pressing or flashing) is...
- Page 9 Mode Display Output power control display...
-
Page 10: Technical Specifications
Q&A 1. Q: What underexposure or overexposure occurs? A: Check the related settings flashing such as the shutter, aperture, ISO, exposure compensation and exposure bracketing. What the four corners the photo are dark or have shadows? 2. Q: A: Adjust the camera focal distance to 50mm or higher.
Need help?
Do you have a question about the DL-RLF90 and is the answer not in the manual?
Questions and answers