Table of Contents
Advertisement
Quick Links
Advertisement
Table of Contents

Subscribe to Our Youtube Channel
Summary of Contents for Depaepe SecurAccess SIP
- Page 1 SecurAccess SIP USER MANUAL Ref: 27112017 This product is designed and manufactured in France. It can be connected to VoIP and ToIP servers. This product is Hearing Aid Compatible. Depaepe Tel : +33 (0)1 30 25 81 60 Fax: +33 (0)1 39 98 61 24 Site Web: www.depaepe.com...
-
Page 2: Table Of Contents
SecurAccess SIP PMR – User Guide EN Summary 1. DESCRIPTION .................... 4 2. INSTALLATION .................... 8 2.1. L .............. 8 ... - Page 3 SecurAccess SIP PMR – User Guide EN 5.2. C .................... 31 ALENDAR 5.3. E- .................... 32 MAILING 5.4. R .............. ...
-
Page 4: Description
SecurAccess SIP PMR – User Guide EN 1. Description SecurAccess SIP PMR audio and video IP/SIP doorphones can be connected to VoIP and ToIP servers. This doorphone can be installed on most private installations thanks to various setting options. The SecurAccess SIP PMR complies with disabled help recommendations: - a wide angle colour video camera allowing visitors monitoring, - a user friendly guidance with enlightened icons and digital voice announcements, - an hearing aid induction coil, - a keypad with Braille dots. It complies with IP65 rating (weatherproof) and IK09 rated (mechanical), and can be installed: - flush or surface mount, - inside or outside a building, to provide reliable telephony in adverse operating environments (unmonitored or public locations, with damage risk and/or exposed to the weather). The SecurAccess SIP PMR : - can activate two relays remotely or locally when entering a stored code for opening doors or airlock-like doors, and only one relay for driving an alarm, a camera, a light or any other electrical appliance, - can make a video call or a remote monitoring thanks to its built-in camera, with an IP videophone or with the dedicated PC software, - can adjust video and lightning settings for the camera, and audio settings. Those features do not require an external power supply. In all cases, the product can be powered by an external power (included) or thanks to PoE technology (Power over Ethernet). - Page 5 SecurAccess SIP PMR – User Guide EN When a limited timed conversation has been programmed When the conversation is over (by end of conversation detection or by end of call DTMF code detection) 4. 2 door latches activation / 1 contact / 2 exit buttons For opening doors or airlock-like doors, two relays can be activated when entering a stored code, locally thanks to the doorphone keypad, or remotely in DTMF during a call or thanks to the dedicated PC software. Only the second relay can be used as a dry contact for driving an alarm, an external camera, a light, or an auxiliary ringer. 2 exit buttons can be connected to activate the door latch relays. Door codes can be managed by programmable calendar control. 5. Video monitoring The doorphone video streaming can be permanently watched or only during call activity. It is possible to record videos and images with the dedicated PC software and to e-mail them. 6. Doorphone settings via Web interface 7. Miscellaneous Parameters reset (back to factory settings) Hacking and hostile use protection...
- Page 6 SecurAccess SIP PMR – User Guide EN COMPACT models without keypad Fixing screw Camera Loudspeaker Enlightened icons Dialling button Microphone Fixing screw...
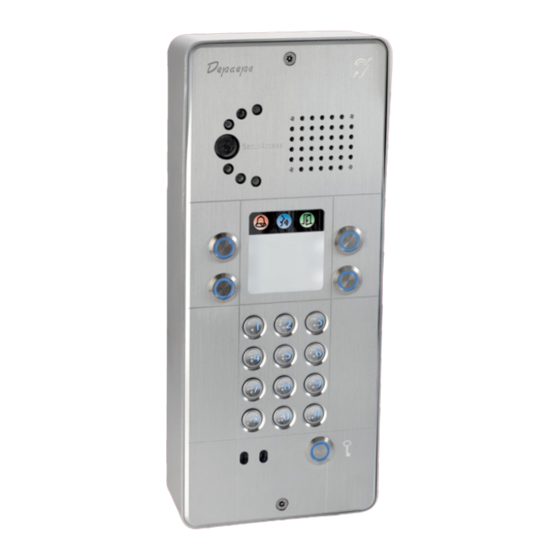
- Page 7 SecurAccess SIP PMR – User Guide EN With or without keypad models Fixing screw Camera Loudspeaker Enlightened icons Dialling buttons Keypad Microphone Door button keypad model Fixing screw...
-
Page 8: Installation
SecurAccess SIP PMR – User Guide EN 2. Installation 2.1. Line connection and installation COMPACT models without keypad Installation, line connection and configuration should be done by qualified personnel. All operations requiring an opening of the unit should be done carefully to prevent from electric shocks. Programming switch Micro SD card Power supply 12V IN RJ45 Ethernet Dialling buttons 2x door latch relays 3 contacts NC/Com./NO 2x exit button sensors Power supply 12V OUT... - Page 9 SecurAccess SIP PMR – User Guide EN With or without keypad models Installation, line connection and configuration should be done by qualified personnel. All operations requiring an opening of the unit should be done carefully to prevent from electric shocks. Programming switch Micro SD card Power supply 12V IN RJ45 Ethernet Dialling buttons Door button keypad model 2x exit button sensors 2x door latch relays 3 contacts NC/Com./NO Power supply 12V OUT...
-
Page 10: Ethernet Network And Poe (Power Over Ethernet)
SecurAccess SIP PMR – User Guide EN Ethernet network and PoE (Power over Ethernet) A RJ45 plug provides a connection from SecurAccess SIP PMR to the Ethernet network with a possibility of PoE powered thanks to Ethernet cable. TRT3 (TNV-3) access: RJ45 plug for Ethernet connection Ethernet Camera as well as lightning do not require any additional power supply. If the doorphone is not PoE powered, an external power (optional), whose specifications and connection are here after, is required. Power connection 12V DC 1000mA IN TRT3 (TNV-3) access : Power connection 12V/DC 1000mA Those ports are designed to be connected on a TRT3 (TNV-3) network in accordance with EN 60950 amendments 1 to 11 specifications. These two ways of power must not be simultaneously connected on the SecurAccess ... -
Page 11: Doors Latches Relays
SecurAccess SIP PMR – User Guide EN Doors latches relays The SecurAccess SIP PMR is fitted with two NC/Com/NO driving relays (see p 8 and next) for a remote activation of a door latch electrical relay. - NC: normally close - connected contact - Com: common (middle) - NO: normally open - disconnected contact Up to 60VA and 2A maximum (TRT3 TNV-3 access) Exit buttons sensors The SecurAccess SIP PMR is equipped with 2 relays sensors (see pages 8 and next) for connecting 2 exit buttons and for a door latch electrical relay activation, etc... - C: common - T: normally close Micro SD card The micro SD card is used to record digital voice announcements for disabled help recommendations (see pages 8 and next). Never disconnect the micro SD card when the doorphone is ON. -
Page 12: Drilling Plan
SecurAccess SIP PMR – User Guide EN 2.2. Drilling plan COMPACT models without keypad In mm Compact wall drilling plan... -
Page 13: Compact Flush Mount Layout
SecurAccess SIP PMR – User Guide EN COMPACT models without keypad In mm Compact flush mount layout... -
Page 14: Wall Drilling Plan
SecurAccess SIP PMR – User Guide EN With or without keypad models In mm Wall drilling plan... -
Page 15: Flush Mount Layout
SecurAccess SIP PMR – User Guide EN With or without keypad models In mm Flush mount layout... -
Page 16: Cable Routing And Connection
SecurAccess SIP PMR – User Guide EN 2.3. Cable routing and connection In order to improve the protection against humidity and bad weather: Drill the cable(s) holes with a slightly thinner dimension than the diameter of the cable itself, bend the cable downwards to let the water and humidity run outside of the case. Inside Inside Outside Outside Rubber cap Cable Housing surface Good The case has been drill at many places in order to permit a natural ventilation. Please do not obstruct these holes. 3. How to use it 3.1. Identification of the dialling buttons The dialling buttons are always numbered from right to left and top to bottom from Bt1 to Bt8 regardless of the number of buttons available. Only models with keypad have an additional lower button named Door button and allowing opening the door by entering keypad code. -
Page 17: Answering Acall
SecurAccess SIP PMR – User Guide EN The ‘calling’ icon lights up and the ‘call in process’ voice message is played. If the other party does not answer and if several numbers have been stored into this memory, the unit will automatically dial the following number stored. If chain dialling is activated, the sequence of number will be repeated several times. It is also possible to make group callings, according to the dialling button setting. The dialling, the chain dialling and the group calling can be managed by programmable calendar control, to activate them according to time and day. When the other party answers, the ‘talk’ icon lights up, the conversation will be held in the ‘speakerphone’ mode. When the call is over, the SecurAccess SIP PMR will automatically hang up, or you can hang up the unit by pressing again the off-hook/memory button. 2) By using the keypad (manual dialling, only with keypad model) The SecurAccess SIP PMR keypad can operate according to 2 selectable modes: (see §4.5 Keypad mode p 29) -
Page 18: Remote Door Latch Activation
- door latch activation times can be configured (see §5.4 p 34). Important: - activation of this code requires a Tone compatible telephone and PABX. - the door latch n°1 is for opening doors use only, because disabled help signallings are associated with it. The called party, using a PC with the dedicated Depaepe software, can activate door latches by clicking on ‘key’ buttons in the bottom right corner of the screen. To install and to set the dedicated Depaepe software for PC, please see §8 Video pop-up for PC p 44. Note: a SecurAccess SIP PMR allows to activate/deactivate door latch codes according to time and day by programmable calendar control. 3.6. Local door latch activation Only models with keypad have an additional lower button named Door button and allowing opening the door by entering keypad code (see p 7). Press the door button, you can hear a beep tone, then enter with the keypad one of the stored codes (once the codes have been configured, see §5.4 Relays and door latches codes p 34) corresponding to the relay. -
Page 19: Video Monitoring
SecurAccess SIP PMR – User Guide EN 3.7. Video monitoring The SecurAccess SIP PMR is fitted with a wide angle colour video camera allowing visitors monitoring, by which it can make a video call or a remote monitoring, with an IP videophone or with the dedicated Depaepe PC software. The doorphone video streaming can be permanently watched or only during call activity. It is possible to record videos and images with the dedicated PC software and to e-mail them. You can adjust video and lightning settings for the camera, and audio settings. Please see §6.2 Audio settings p 37 and §6.4 Video settings p 38. To install and to set the dedicated Depaepe software for PC, please see §8 Video pop-up for PC p 44. 3.8. Hearing aid induction coil The SecurAccess SIP PMR is equipped with an induction coil so that a person wearing a hearing device can hear the conversation (loudspeaker out). This feature is permanently enabled, no adjustment is required. 4. General programming 4.1. Standard settings The SecurAccess SIP PMR doorphone comes with default settings: Ip address: 192.168.1.250 Subnet mask: 255.255.0.0 SIP mode: P2P (static IP address) User name: admin password : 1234 All models are fitted with a programming switch (see pictures p 8 and next), that lets you restore these default IP settings of the doorphone. -
Page 20: Standard Factory Settings Overview
SecurAccess SIP PMR – User Guide EN 4.2. Standard factory settings overview Parameters Default values Web interface Access login : admin password : 1234 Network QoS Set - Layer x Layer 3 : 48 advanced Layer 2 : blank Web Server - HTTP Port SIP parameter SIP Mode Mode peer to peer Host name IP DoorPhone SIP User Agent IP BOLD Authentification Auth id none Password none Registration server none SIP Transport TCP & UDP Provisional code 180 ringing Enable symetric RTP none Network ... -
Page 21: Settings Via Web Interface
SecurAccess SIP PMR – User Guide EN 4.3. Settings via Web interface The SecurAccess SIP PMR Web interface comes by default in french. You can modify the language by clicking on the ‘Flag’ button in the top right corner of the screen. Click on ‘Save’ button to save the modification. The SecurAccess SIP PMR comes out of factory in Static IP Address mode, the IP address is 192.168.1.250. Your computer has to be on the same network segment that your phone in order to access to the setting page. Contact your network administrator if you have any doubt. 4.3.1. Web interface access, doorphone status Enter the ‘192.168.1.250’ IP address into the address bar of your internet browser. You access the home page, the video image of the doorphone displays : Click on ‘Setup’ button, and enter the login and the password. By default, the login is ‘admin’ and the password is ‘1234’. You access the ‘Status’ page which informs you on :... -
Page 22: Password, Web Port And Video On Home Page
SecurAccess SIP PMR – User Guide EN - the doorphone display name, - the firmware version, - the buttons number, - options (keypad, camera), - the micro SD card, - the MAC address, - the IP address, - the SIP mode or P2P, - the registration status… 4.3.2. Password, web port and video on home page Via the ‘Network’ page, select ‘Web server’. -
Page 23: Network Settings
Network mask: enter the IP address of the subnet mask. Network gateway: enter its IP address. DNS: enter the server IP address - the doorphone will try to contact a DNS server in your network, to translate a name into an IP address. NAT policy: activate or deactivate the network address translation service (in order to match IP addresses to other IP addresses). NAT address: enter the server IP address. STUN address: Click on ‘Save’ button to save modifications. Note : in DHCP mode, the doorphone IP address can change after reboot. We therefore recommend that the Static IP Address mode is selected for the SecurAccess SIP PMR. Please pay attention, wrong network settings may prevent the access to your doorphone, and the inefficiency of your network. Contact your network administrator if you have any doubt. -
Page 24: Sip Account Settings
SecurAccess SIP PMR – User Guide EN 4.3.4. SIP account settings The SecurAccess SIP PMR has one SIP account. Via the ‘Network setting’ page, select ‘SIP parameters’. The following settings will appear and can be modified: Mode Sip: select SIP server (IP pbx) or Peer-to-Peer (by default). Display name: enter a name for the doorphone. SIP User Agent: Account: enter extension number, for authentication purpose, provided by IAP. Auth.ID: enter extension name, for SIP server registration, provided by IAP. Password: password for SIP server registration, provided by IAP. Send register: mark to activate, if necessary for ‘Registration server’ and ‘SIP server’ fields. If you do not mark, do not fill in the two fields. Registration server: enter the registration server IP address or name. Port: SIP port, 5060 or 5061. Expiration [sec]: enter the time frequency the doorphone refreshes its registration to the SIP server. Registrate after restart: mark to unregister on reboot the doorphone. SIP server: enter SIP server IP address or name (IP pbx, SIP provider). If this is not filled in the doorphone is registrered on the Registration server (you must mark ‘Send register’). -
Page 25: Snmp
SecurAccess SIP PMR – User Guide EN Port: 5060 SIP port. Outbound proxy: enter Proxy server IP address or name. Complete only if the outbound proxy is different from the SIP server. Port: SIP transport: UDP/TCP mode for transmission packets. Provisional code: defines the SIP code during ringing, ‘180 ringing’ or ‘183 Session progress’. Enable Symmetric RTP: used by Cisco in particular. Click on ‘Save’ button to save modifications. 4.3.5. SNMP SNMP = Simple Network Management Protocol Via the ‘Basic settings’ page, select ‘Setting SNMP’. The following settings will appear and can be modified: Enable SNMP: mark to activate this protocol. Community: enter the SNMP user. Admin address: enter client IP address or domain name. Variables in MIB tree: set of organized informations about a network device (OID). Startup: contact your network administrator. Open sensor: Sensor open timeout: Open sensor for too long: Entered invalid keycode: Open relay: Click on ‘Save’ button to save modifications. Note: OID is the digital identification allowing to definitively identify any value in SNMP communication. -
Page 26: Memory Keys Storing
SecurAccess SIP PMR – User Guide EN Time zone : select your time zone. NTP server: enter NTP server IP address or domain name. By entering *, the SecurAccess SIP PMR will automatically find a NTP server. Summer time: select enable/disable. Click on ‘Save’ button to save modifications. The doorphone must be synchronized to a NTP server for a proper functioning of the calendar control management for dialling buttons and door codes (please see §5.2 Calendar p 31). 4.4. Memory keys storing Buttons web pages access The SecurAccess SIP PMR comes with 1 up to 8 programmable off-hook and dialling buttons. For each of the buttons, numbers to be dialled when depressing one of them are stored in numbered forms (from 1 to 8) called ‘Phonebook’. E.g : button n°1 - phonebook n°1, button n°2 - phonebook n°2, …up to n°8. Via the ‘Basic settings’ page, select ‘Phonebook’. The phonebook page of the dialling button n°1 will appear, and the following settings can be modified:... -
Page 27: To Simply Dial One Phone Number
SecurAccess SIP PMR – User Guide EN Please fill out the fields to save and to enable the phonebook: Title: enter a name. Email: to this email will be sent information about missed calls with picture or video (see §5.3 p 32), enter an email address. Enabled: mark to activate this phonebook. Click on ‘Save’ button to save modifications. You can access the phonebook page of the dialling button n°2 by clicking on tab ‘2’ or by entering ‘2’ in ‘Goto:’ field in the upper blue banner. You can proceed in the same way for phonebooks of the other dialling buttons, up to the tab ‘8’. 4.4.1. To simply dial one phone number To access dialling buttons phonebooks, to enable them or to switch from one to another, please see § Buttons web pages access (here above). On the dialling button phonebook web page (screenshot here above) you want to program: 1) Fill out the ‘1. call number’ field: entry the phone number to be dialled when depressing the dialling button. Note 1: in SIP server mode (doorphone connected to a PABX), if needed, insert a ‘0’ or a ‘9’... -
Page 28: To Dial In Chain Up To 5 Numbers
SecurAccess SIP PMR – User Guide EN Note 2: in ‘P2P ’ (peer to peer) mode, the IP address of a phone can be stored with the ‘xxx.xxx.xxx.xxx’ format. Do not fill out other fields of the phonebook form, if you want to simply dial one number when depressing a dialling button, without chain dialling, group calling, or calendar control management features. Click on ‘Save’ button to save modifications. 2) You can proceed in the same way for every dialling buttons of your SecurAccess SIP PMR, up to the tab ‘8’. 4.4.2. To dial in chain up to 5 numbers This feature, when activated, will automatically keep on dialing a sequence of numbers stored into the same dialling button if the other party does not answer or if busy line tone is detected, it will only stop when another party answers. Up to 5 different numbers can be stored in each key (phonebook page), and the dialing sequence can be repeated up to 9 times (see §6.1 DoorPhone - Ringing cycle count p 36). -
Page 29: To Manage By Programmable Calendar Control
SecurAccess SIP PMR – User Guide EN On the dialling button phonebook web page (screenshot here above) you want to program: 1) Fill out the ‘1. call number’ field: entry the 1 phone number of the group to be dialed when depressing the dialling button. Note 1: in SIP server mode (doorphone connected to a PABX), if needed, insert a ‘0’ or a ‘9’ before, to dial the phone number on the public network. Note 2: in ‘P2P ’ (peer to peer) mode, the IP address of a phone can be stored with the ‘xxx.xxx.xxx.xxx’... -
Page 30: Basic Configuration
SecurAccess SIP PMR – User Guide EN for installations with a called party large number, which can be called from the doorphone. To access phonebooks, to enable them or to switch from one to another, please see here after. Note : the first 8 speed-dial numbers (from 1 to 8) are directly linked to dialling buttons phonebooks. In other words, when depressing the dialling button n°1 or the ‘1’ key of the keypad (in speed dialling mode), the same action is performed, and so on…... -
Page 31: Calendar
SecurAccess SIP PMR – User Guide EN Please fill out the fields to save and to enable the phonebook: Title: enter a name (character only). Email: to this email will be sent information about missed calls with picture or video (see §5.3 p 32), enter an email address. Enabled: mark to activate this phonebook. Click on ‘Save’ button to save modifications. The next fields of the phonebook allow to set the dialling of one number, the chain dialling or the groups calling features, managed or not by programmable calendars control to activate them according to time and day. Please see §4.4.1 and next p27. To access another phonebook page, click on the desired tab number or enter its number in the ‘Goto:’ field in the upper blue banner. Note: the first 8 phonebook forms (from 1 to 8) allow to program the dialed numbers of the programmable dialling buttons (according to models, from 1 to 8 keys): see §4.4 p 26 . -
Page 32: E-Mailing
SecurAccess SIP PMR – User Guide EN These calendars are weekly. Every day of the week is configurable according to 3 active intervals. We can create and name up to 10 different timetables. The doorphone must be synchronized to a NTP server for a proper functioning of the calendar control management. To access timetable forms, via the ‘Basic settings’ page, select ‘Timetable’: Name: entry name for each timetable. Active: enable the timetable for each day. Interval: for every day, up to 3 active intervals. The time format is hh:mm. Active: timetable status (Yes/No). Switch : click on to modify the timetable status. Click on ‘Save’ button to save modifications. To create or access another timetable page, click on the desired tab number in the upper blue banner. The used timetables are to be specified in fields of dialling buttons, phonebooks and relays forms. Users should be free to decide the timetables use, by filling out or not the forms ‘Timetable’ field. 5.3. E-mailing When you want to inform subscriber about missed calls from door entry you can setup the SecurAccess SIP PMR to send out e-mails (with subject and text) after every missed calls. You can automatically add to e-mails one or more pictures from doorphone camera (pictures are taken during the ringing tone). The doorphone will send an e-mail to the recipients specified in the phonebook forms. To access e-mail page, via the ‘Basic settings’ page, select ‘E-mail’:... - Page 33 SecurAccess SIP PMR – User Guide EN Enable: mark to activate e-mails sending. SMTP server: enter SMTP server IP address or domain name. SMTP Port: only adjust in case of non-regular SMTP server setting. Usual value is 25. SMTP account: if SMTP server authentication is required, enter the name for registration to this server. Otherwise, leave this field empty. SMTP password: password for registration to SMTP server. Message from: e-mail sender to be mentioned in sent e-mails. Default message to: e-mail address of the main recipient or a notified, for control message sending too. Send timeout (min): period for which the doorphone will try to send an e-mail. Attach pictures: mark to enable the attachment of one or more pictures taken during the ringing tone or the conversation. Pictures count: enter the pictures number to be attached to an e-mail. Pictures interval (sec): period between two pictures. Message subject and body: enter the contents for sending message. Click on ‘Send test message’ button to test settings. Click on ‘Save’ button to save modifications.
-
Page 34: Relays And Door Latches Codes
SecurAccess SIP PMR – User Guide EN 5.4. Relays and door latches codes The SecurAccess SIP PMR is fitted with two NC/Com/NO driving relays (see connection p 11), and can activate them when entering a stored code for opening doors or airlock-like doors, locally thanks to the doorphone keypad, or remotely in DTMF during a call or thanks to the dedicated PC software. The door latch n°1 is for opening doors use only, because disabled help signallings are associated with it. Only the second relay can also be used as a dry contact for driving an alarm, an external camera, a light, or an auxiliary ringer… Via the ‘Basic settings’ page, select ‘Relay’. The web page of the relay n°1 will appear, and the following settings can be modified: 1) Fill out fields: Enable: mark to activate the relay. Timetable: activate/deactivate the relay by timetable control. In the drop-down menu, select the timetable name you want to assign to the relay, or ‘None’ for no timetable control. Relay mode: Monostable, the relay is closed by a code and after a preprogrammed timeout it is open. Used for an electrical lock switching, a sliding doors control, a signalling button etc… or bistable, the relay is closed by a code and is still closed until a Off code is dialled. Delay time (sec): duration between closing code evaluation and relay closing. It has no influence on open code which is immediately performed. Run time (sec): in monostable relay mode, relay closing duration, which is calculated from relay effective closing. Source: by default Relay 1. Synchronize delay (sec): duration between the start and the end of relays opening. Used for the delayed airlock-like doors application. Activation on call: None, call has no influence on relay status Incoming call, relay is closed during an incoming call ... -
Page 35: Sensors
SecurAccess SIP PMR – User Guide EN Outgoing call, relay is closed during an outgoing call Both, relay is closed during every call. Acoustic tone: by default ‘User defined’, it allows to play the digital voice announcements (for disabled help recommendations). ‘Short’ disables the announcements playing and replaces them with beep. Active by HTTP: by default marked, it allows to activate the relays thanks to the dedicated PC software. Security output code: Direct ON button: RC command at relay ON: RC command at relay OFF: Door codes We can create up to 6 different codes for each relays (numbered lines from 1 to 6). Code: enter the desired code for door latch activation, from 1 to 10 digits. Source: select the activation mode, remotely from a tone (DTMF) telephone keypad or locally by the door button of the doorphone (see p 7). If you want the 2 sources, enter twice the same code in ‘Code’ fields, one for each of the sources. On/Off: activation/deactivation of the code with its source. Timetable: activate/deactivate the code by timetable control. In the drop-down menu, select the timetable name you want to assign to the code, or ‘None’ for no timetable control. You can proceed in the same way to program other door codes for this relay. Click on ‘Save’ button to save modifications. 2) Repeat this process to program the relay n°2, after clicking on the tab ‘2’ in the upper blue banner. Note : only tabs 1 and 2 are enabled. 5.5. Sensors The SecurAccess SIP PMR is equipped with 2 relays sensors (C/NC) (see connection p 11) for connecting 2 delayed exit buttons, and for door latch electrical relays activation,... Via the ‘Basic settings’ page, select ‘Door sensors’: Input door sensor 1 & 2 : in the drop-down menu, select ‘Door sensor’, the censor is enable or ‘Exit button - Relay x’ (1 by default) to add an exit button in order to activate the door latch relay 1 or 2 (for opening door). -
Page 36: Advanced Configuration
SecurAccess SIP PMR – User Guide EN 6. Advanced configuration 6.1. DoorPhone Via the ‘Extended settings’ page, select ‘DoorPhone’: Ringing timeout (sec): on outgoing calls, time elapsed in case of no answer, including for chain dialling numbers (before dialling the following number stored). This time can be adjusted. Maximum call duration (sec): talking time can be limited. When this field is empty there is no talk time limit. When you enter a duration, 10 seconds before end of call the doorphone emits a ‘beep’ tone. Prolongation key: select * or #. During a call, when you hear the ‘beep’ tone, press the * or # selected key to cancel the talk time limitation and to prolong the call of the maximum duration here above. Reject all incoming calls: mark to deactivate incoming calls on the doorphone. Ringing cycles count : enter number from 1 to 9, setting for chain dialling. It defines the repetition number (up to 9 times) of the dialling sequence of phone numbers stored into the same phonebook page (dialling buttons or speed-dial numbers). Same key pressed again : in the drop-down menu, select ‘Cancel call’ or ‘Redial’ or ‘Ignore’ (nothing will happen). It defines the action when you press again the same dialling button. Active button by HTTP : mark to enable calls the doorphone from the dedicated PC software. Dialling timeout (sec): time elapsed before digits are dialled, in regular (direct) dialling mode. DTMF dialling timeout (sec): Keyboard Mode: ‘Direct dialling’ or ‘Choice number from memory’, see §4.5 p 29. Camera light: in the drop-down menu, select lighting options of camera LEDs. ‘OFF’: will never light - ‘During a call’: are always lighted during a call, independently on surrounding light... -
Page 37: Audio Settings
SecurAccess SIP PMR – User Guide EN conditions - ‘In the night’: are lighted according to surrounding light conditions independently on call conditions - ‘During night call’: are only lighted during a call and in the dark. Light intensity (%): enter the LEDs light intensity. Labels light: in the drop-down menu, select the label display-keypad-buttons backlighting options. ‘Never’ - ‘At night’ - ‘Always’ Light intensity (%): enter the LEDs light intensity. Daylight lower threshold: adjusted by default. Daylight upper threshold: adjusted by default. IP VarioBell: Number of buttons on basic module: Expansion buttons count: Keyboard connected: Click on ‘Save’ button to save modifications. 6.2. Audio settings Via the ‘Extended settings’ page, select ‘Audio’: Note: audio presets are optimized in factory, we do not recommend any modification. Speaker volume: the loudspeaker volume can be adjusted, in dB. Microphone gain: the microphone sensitivity can be adjusted, in dB. Echo limiter threshold: Echo limiter attenuation: Echo limiter samples: Note: echo, default settings are usually sufficient for most situations. A wrong adjustment may... -
Page 38: Audio Codecs
SecurAccess SIP PMR – User Guide EN Acoustic tone on button pressed: Acoustic tone on call start: Acoustic tone on remote ringing: Acoustic tone before call end: Acoustic tone on call end: Acoustic tone on error: Acoustic tone on remote busy: Acoustic tone on unknown number: Acoustic tone on valid code entry: Acoustic tones volume: Relay running tone volume: the loudspeaker volume can be increased during the relay 1 is activated, in dB. Click on ‘Save’ button to save modifications. 6.3. Audio codecs Via the ‘Extended settings’ page, select ‘Audio codecs’: Priority from 1 to 5: for SIP calls, select the audio codecs priority. Available codecs are: G.711u, G.711a, G.722, G.726-32bit, GSM. Jitter compensation (msec): 100ms by default. Click on ‘Save’ button to save modifications. 6.4. Video settings Via the ‘Extended settings’ page, select ‘Video’:... -
Page 39: Video Codecs
SecurAccess SIP PMR – User Guide EN Note: video presets are optimized in factory, we do not recommend any modification. Image size: select the image resolution of the doorphone camera, default maximum 640x480px. Quality: select the image quality. Brightness - Contrast - Colour - Hue - Gamma: can be adjusted. Power line frequency: select the scan rate of the doorphone camera Sharpness - Backlight compensation: can be adjusted. Note: camera, default settings are usually sufficient for most situations. A wrong adjustment may affect the video quality. Click on ‘Save’ button to save modifications. 6.5. Video codecs Via the ‘Extended settings’ page, select ‘Video codecs’:... -
Page 40: Video Streaming
SecurAccess SIP PMR – User Guide EN Priority from 1 to 2: select the video codecs priority. Available codecs are: H264, H263. For video compatibility with Yealink or Snom Voip videophones, mark the concerned box. Click on ‘Save’ button to save modifications. 6.6. Video streaming The SecurAccess SIP PMR video streaming can be permanently watched. You can enable the video (in H264) from the doorphone with the RTSP protocol on port 554. To receive this video you need some regular stream video players: IP TVs, videophones (eg. Grandstream, MPlayer, VLC,…), or the dedicated Depaepe PC software… This video is permanently running. It does not depend on call activity. Via the ‘Extended settings’ page, select ‘Streaming’: Enable Streaming: mark to provide the video. -
Page 41: Services
SecurAccess SIP PMR – User Guide EN Permitted client: enter authorized IP address for remote monitoring of the video. When this field is empty, anybody can watch the video. Stream media: select what will be emitted by the RTSP server, video or audio or video+audio. Multicast address: enter IP address that allows RTP packets sending to selected multicast address. JPEG image quality: enter video coding quality, in %. Click on ‘Save’ button to save modifications. 7. Services 7.1. Reboot Via the ‘Service’ page, select ‘Restart’: Click on ‘Restart’ button to reboot the SecurAccess SIP PMR. 7.2. Save or restore configuration Via the ‘Service’ page, select ‘Configuration’:... -
Page 42: Reset To Factory Settings
SecurAccess SIP PMR – User Guide EN Save configuration: click on “Make” button to save the doorphone configuration in a file, named ‘config.cfg’ and located in ‘Downloads’ directory of your browser. Load configuration: click on, a new page will open to select your configuration file, to restore a saved doorphone configuration. Load phonebook: mark to include phonebook informations. Load network and SIP: mark to include network and SIP settings. Load others: mark to include other parameters. Click on ‘Make’ button to restore the desired configuration. 7.3. Reset to factory settings This operation will erase the SecurAccess SIP PMR doorphone’s parameters. Hardware reset (Network settings) : You can reset the doorphone IP settings, and restore those by default, by switching from ‘OFF’ to ‘ON’ the switch 2 located on the PCB (see §4.1 p 19) and then reboot the doorphone (disconnect and reconnect the Ethernet cable PoE or the power supply). The doorphone will be reachable with the IP address 192.168.1.250. After reboot, switch from ‘ON’ to ‘OFF’ the switch 2. Parameters reset via Web interface : Via the ‘Service’ page, select ‘Configuration’, you can separately reset phonebooks, restore default network settings and other settings by marking the option you want to modify. Clear phonebook: erase complete phonebook (all 999 possible forms). Default network and SIP: default IP address 192.168.1.250 and erase SIP settings. Default others: all remaining settings will return to factory settings. -
Page 43: Firmware Update
SecurAccess SIP PMR – User Guide EN Click on ‘Make’ button to reset the unit. 7.4. Firmware update Via the ‘Service’ page, select ‘Firmware upgrade’: Update Firmware: choose the firmware file , then click on ‘Save’ button to perform the update. Click on ‘Save’ button to start the upgrade. 7.5. Logfile Via the ‘Service’ page, select ‘Logfile’: Start enhanced log: click on ‘Start’ button to start logs, and click on it again to stop them. Download log file: click on ‘Make’ button to download debug logs. Show call log: displays in real-time all call logs. -
Page 44: G729 License
SecurAccess SIP PMR – User Guide EN Show VoIP log: displays in real time all VoIP logs. Syslog server: enter server IP address. Click on ‘Save’ button. 7.6. G729 license Via the ‘Service’ page, select ‘License’: CODEC G729 : enter your license key for G729 codec. Click on ‘Save’ button. 8. Video pop-up for PC The ‘Depaepe Manager’ software is a freeware and allows to reach from a PC the SecurAccess SIP PMR video doorphone features to: - make an audio and video call with the doorphone directly from a PC, - remotely activate the 2 door latches in and out call, - permanently watch, or only during call activity, the doorphone video. 8.1. Installation Network : the SecurAccess SIP PMR doorphone and the host computer shall be connected to the same network. - In P2P mode, the doorphone can be connected in standalone to your computer network. - In SIP mode, your SIP telecom and computer networks have to be interconnected. Software : download the ‘Depaepe_Manager_3-6_setup.exe’ installer from www.depaepe.com Web site. This software is compatible with OS up to Windows 10. Run this program to start the installation of: - program files in the Depaepe Telecom directory, - a shortcut on the desktop, - a shortcut in the quick launch toolbar, - an auto-run feature when the PC boots up. Once the installation is complete, the software automatically runs. -
Page 45: Description
SecurAccess SIP PMR – User Guide EN 8.2. Description When the program is not configured, the video mask will display a black screen. When the program and the doorphone are configured, the doorphone name and the video will be displayed. Web interface: : click on, the setting menu will appear : to reduce the application window in the taskbar : to close the application : to call the doorphone : it shows the audio call status with the doorphone : click on to activate the image capture (see configuration here after) : to activate the door latch relay n°1 : to activate the door latch relay n°2 : application icon in the taskbar 8.3. Configuration Web interface description : DoorPhone IP 1 up to 4 : fill out fields to be connected to a doorphone. Up to 4 doorphones can be connected by marking the desired box and filling out settings. Phone connection : select the doorphone connection mode, in P2P or SIP. For the SIP mode, enter additional connection settings. -
Page 46: Templates For Front Plate Customization
SecurAccess SIP PMR – User Guide EN Send LOG file : click on to send an e-mail with events logs (.txt format) of the software. Save / Cancel : click on ‘Save’ button to save settings. Setting procedure : In P2P mode, the doorphone must be registered in P2P. In software settings menu, you had - enter the doorphone IP address, the user name (login) and the password. These are the same as to access the doorphone Web interface. By default, login : admin and password : 1234, - mark the ‘P2P’ box in the Phone connection part, - activate, if need be, by marking Pop-up upon call mode or Pop-up always, - confirm settings by clicking on ‘Save’ button. The window is automatically reduced, double- clicking on its icon will display the video. In SIP server mode, the doorphone must be registered in SIP. In software settings menu, you had to: - enter the doorphone IP address, the user name (login) and the password. These are the same as to access the doorphone Web interface. By default, login : admin and password : 1234, - mark the ‘SIP server’ box in the Phone connection part, - fill out the software SIP account : SIP server address: eg : 192.168.1.200 SIP proxy address: eg : 192.168.1.200 Call prefix: eg : My identity (user): eg : 410 My password: eg : ****** Auth. ID: ... -
Page 47: Specifications
SecurAccess SIP PMR – User Guide EN Without keypad models 58mm (Keypad models) 58mm (Visible part, dotted) (Visible part, dotted) Specifications Audio codec : G.711, G.722, G.723, G.726, G.729, iLBC Protection : IP65 and IK09 Working temperature range : -20°C up to +50°C (Celsius) Door latch relay contact : 60VA / 2A max External voltage supply : 12V DC 1000 mA PoE : IEEE 802.3af Current consumption : 520mA with +12V external voltage supply... -
Page 48: Declaration Of Conformity
SecurAccess SIP PMR – User Guide EN Declaration of conformity Name : Depaepe Phone : +33 (0) 1 30 25 81 60 Address : 75-77 rue du Pré Brochet Fax: +33 (0) 1 39 98 61 24 Locality : SANNOIS Postal code : 95110 Product identification : Family : Telecommunications Terminal Equipment Type : Telephone set Model : SecurAccess SIP PMR Other informations : Handsfree doorphone We, Henri DEPAEPE S.A.S, hereby declares that this product is in conformity with the essential requirements and other relevant provisions of the R&TTE directive 1999/5/EC of the European Parliament and of the Council of 9 March 1999 on radio equipment and telecommunications terminal equipment and the mutual recognition of their conformity, as well as the harmonised standards : 3.1 a articles: (for health and safety of user) …………………………………EN 60950 3.1 b articles : (for electro-magnetic compatibility) …………………………………. EN 55022 et EN 55024. Designed and manufactured in France This product complies with: European Directive 2011/65/EU on the restriction of the use of certain hazardous substances in electrical and electronic equipment. (RoHS). -
Page 49: Warranty And After Sales Service
SecurAccess SIP PMR – User Guide EN Warranty and after sales service Make sure to use this product in accordance with all operations described in this user manual. Any misuse may be hazardous for this product or for your health. For your security and to avoid damaging the product, we recommend that you read this user manual carefully. In addition, never use this product during thunderstorms. Note: Depaepe may void the warranty if no attention has been paid to these points.. Depaepe Telecom warrants that this product will be free from defects in workmanship and materials for a period of one year from the date of purchase. The obligations of Depaepe Telecom, under this warranty shall be limited to the repair or replacement (at our option) during the warranty period, of any part that proves defective ...
Need help?
Do you have a question about the SecurAccess SIP and is the answer not in the manual?
Questions and answers