
Related Manuals for Black Mountain PINTO SKOG

Summary of Contents for Black Mountain PINTO SKOG
- Page 1 USER MANUAL USER MANUAL PHONE: 01291 639890 10AM-5PM MONDAY-FRIDAY EMAIL: HELP@BLACKMOUNTAIN.BIKE www.blackmountain.bike...
-
Page 2: Table Of Contents
CONTENTS HELLO AND WELCOME WARNINGS 6 - 7 ON RECEIVING YOUR BIKE 8 - 10 SAFETY CHECKS GETTING TO KNOW THE PINTO & SKØG GETTING TO KNOW: THE PINTO GETTING TO KNOW: THE SKØG 14 - 15 GETTING TO KNOW: THE BIKE’S COMPONENTS 16 - 17 TECHNOLOGY EXPLODED FRAME DIAGRAM... -
Page 3: Hello And Welcome
HELLO AND WELCOME THANK YOU FOR PURCHASING A BLACK MOUNTAIN BICYCLE. WE TAKE GREAT PRIDE IN WHAT WE DO AND HOPE YOU’LL BE EXTREMELY HAPPY WITH THE BIKE FOR YEARS TO COME. THIS MANUAL WILL TAKE YOU THROUGH WHAT YOU NEED TO KNOW ABOUT THE BIKE AND ITS SAFETY ESSENTIALS. -
Page 4: Warnings
WARNINGS There will be warnings throughout and important safety notices for you to read. To make this easier you can just look out for these symbols. The use of this symbol and the word WARNING indicates a potentially hazardous situation which, if not avoided, could result in serious injury or death. -
Page 5: On Receiving Your Bike
5pm Monday to Friday. You must keep all original packaging should you need to make a return (see returns opposite). We may not accept any claim or return if the bike has been ridden prior to reporting the damage to us. © Black Mountain Bikes... - Page 6 ON RECEIVING YOUR BIKE RETURNS For us to accept a bike as a return, the bike must be in a new and saleable condition, so we would expect the bike only to have been briefly test-ridden on a clean, dry surface for example, and returned in all of its original packaging.
-
Page 7: Safety Checks
Please ensure you have followed the instructions to install, maintain or change modes on your Black Mountain bike. If you’re not confident please take your bike to the nearest bike shop. Failure to undertake any work properly can result in serious injury. - Page 8 SAFETY CHECKS WARNING: All frame bolts should be checked regularly (at least every week) to ensure they are tight. Especially the rear-arm and top-tube bolts. This is very important. WARNINGS FOR GENERAL SAFE USE • Our bikes are intended for leisure riding and are not intended to be used for racing, competitions, stunts, jumps or on extreme terrain.
- Page 9 (in particular the braking system); and that you and your child learn, understand and obey local motor vehicle, bicycle and traffic laws. © Black Mountain Bikes...
-
Page 10: Getting To Know The Pinto & Skøg
GETTING TO KNOW THE... -
Page 11: Getting To Know: The Pinto
It fits better and lasts longer than any other kids’ bike. The PINTO rolls on 14” wheels and is the smallest bike in the Black Mountain EPOK range, aimed at children aged 2.5+ years. -
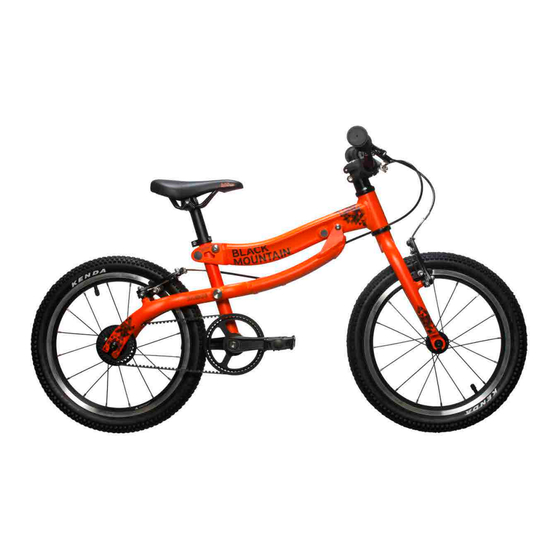
Page 12: Getting To Know: The Skøg
GETTING TO KNOW: THE SKØG SKØG MODE 2 SMALL PEDAL Taking over from PINTO, the bigger SKØG features the same EPOK™ growing technologies, but rolls on bigger 16” wheels. Whether new to riding, or moving up from the PINTO or another balance bike, the SKØG is the ultimate bicycle for your child to develop their riding ability. -
Page 13: Getting To Know: The Bike's Components
SEAT–POST CLAMP BRAKE CABLE ECCENTRIC PINCH BOLT BOLT, NUT & BRAKE PAD BUNGS WASHER REAR BRAKE BRAKE ARM BOLTS REAR ARM SEAT TYRE TUBE FRONT SPROCKET BELT REAR CRANKBOLTS SPROCKET & JACKET REAR CRANKS WHEEL BOLTS © Black Mountain Bikes... - Page 14 GRIP HANDLEBARS STEM BRAKE LEVER SPACERS BRAKE CABLES BUNGS HEADSET TOP TUBE FRONT BRAKE BRAKE PAD BRAKE ARM BOLTS HEAD TUBE FORKS TOP–TUBE BOLT & SLEEVE NUT FRONT OF REAR ARM REAR–ARM BOLT PEDALS TYRE FRONT WHEEL BOLTS www.blackmountain.bike...
-
Page 15: Technology
TECHNOLOGY OUR TERMS EXPLAINED UP:SCALE IN:GEAR GO:LOW MY:SIZE BELT DRIVE SAFE BRAKING © Black Mountain Bikes... - Page 16 TECHNOLOGY - TECHNICAL ASPECTS OF THE BICYCLE GROWING TECHNOLOGY EPOK Central to our design philosophy is that as kids grow and learn to ride, they go through stages, not just in terms of getting bigger, but in developing in confidence, strength and ability.
-
Page 17: Exploded Frame Diagram
BLACK ‘TOP HAT’ BUSHING X 2 ECCENTRIC TOP–TUBE BOLT WASHER AND NUT BLACK ‘TOP HAT’ BUSHING X 4 ECCENTRIC BOLT REAR ARM REAR–ARM BOLT BLACK ‘TOP HAT’ BUSHING X 2 BALANCE BIKE SEAT TUBE SEAT TUBE © Black Mountain Bikes... -
Page 18: Setting Up
SETTING UP YOUR GUIDE TO SETTING THE BIKE UP OUT OF THE BOX... -
Page 19: What's In The Box
The tools needed – two 5mm hex keys, a 4mm and 2.5mm hex key, and a 12mm and 15mm spanner. These are stored underneath the inner layer. • Your new PINTO or SKØG bike! Our QuickStart Guide and this User Manual. © Black Mountain Bikes... -
Page 20: Setting Up: Fitting The Handlebars
SETTING UP: FITTING THE HANDLEBARS TO DO THIS YOU WILL NEED THE 5MM HEX KEY Undo the four face–plate bolts on the front of the Insert the handlebars, making sure that they are stem and remove the face (front) plate. the correct way around and that the brake cables are not twisted. -
Page 21: Setting Up: Fitting The Front Wheel
WARNING: Having re-attached the brakes, always test the brakes by actioning both left and right brake levers, ensuring the wheels can be fully braked. If brakes are not re-attached properly, it can lead to injury or death. © Black Mountain Bikes... -
Page 22: Setting Up: Inserting The Seat
SETTING UP: INSERTING THE SEAT TO DO THIS YOU WILL NEED THE 4MM HEX KEY Insert the seat post and seat into the seat tube. Make sure the seat is straight and at the correct NOTE: Seat Tube “A” is used for Pedal Mode and height for your child. -
Page 23: Setting Up: Putting On The Pedals
If you requested the bike to come to you in Balance Bike Mode you can ignore this step, but if you ordered it in either of the Pedal Modes, the cranks and belt drive system will already be installed but you will still need to fit the pedals. © Black Mountain Bikes... -
Page 24: Modes And Mode Adjustments
MODES AND MODE ADJUSTMENTS YOUR GUIDE TO CHANGING BETWEEN MODES... -
Page 25: Mode One: Balance Bike
We cover how to swap between modes on page 30. © Black Mountain Bikes... -
Page 26: Mode Two: Small Pedal
MODE TWO: SMALL PEDAL MODE TWO: SMALL PEDAL When your child is ready, you can swap from Balance Bike Mode to Small Pedal Mode. To do this, you simply install the included PowerPack – our neat upgrade that brings into play the cranks, pedals and our unique lightweight, oil free belt drive system. -
Page 27: Mode Three: Large Pedal
(we cover this later in the manual) which increases the frame size and gearing, making the most of the easy rolling 14” wheel size on the PINTO and 16” on the SKØG, which means the bike will last your child much longer. © Black Mountain Bikes... - Page 28 MODES CONVERTING YOUR BIKE FROM MODE ONE: BALANCE BIKE TO MODE TWO: SMALL PEDAL...
- Page 29 It is important that you check that all the frame bolts are tightened, at least every 10 hours of riding. The frame should not rattle or feel loose in any way when everything is tightened correctly to the recommended torque, if it does, stop and check everything is tight. © Black Mountain Bikes...
- Page 30 CHANGING MODES: ONE TO TWO REMOVE THE SEAT AND SEAT POST First undo the seat-post clamp with the 4mm hex key, then remove the seat and seat post. Then remove the seat clamp from the Balance Bike Mode seat tube. REMOVE THE ECCENTRIC BOLT Using the 12mm spanner, loosen the nut on the left-hand side of the eccentric bolt and carefully...
- Page 31 The brakes work on a quick release system. Squeeze the brake arms together and pull out the NOODLE ‘noodle’ and cable (you do not need to undo the cable bolt), this will release the brake. CABLE BRIDGE © Black Mountain Bikes...
- Page 32 CHANGING MODES: ONE TO TWO REMOVE THE REAR WHEEL Loosen the two 5mm bolts, then slide the wheel out. The bike may wobble a bit without its rear wheel, so lay it flat on its side. INSTALL THE BELT AND REAR WHEEL The best way to do this is to hook the belt over the rear brake before you replace the rear wheel.
- Page 33 5Nm torque. You are done. You are ready to go riding. INFO: If you ever want to go back to Balance Bike Mode just reverse these steps. © Black Mountain Bikes...
- Page 34 MODES CONVERTING YOUR BIKE FROM MODE TWO: SMALL PEDAL TO MODE THREE: LARGE PEDAL...
- Page 35 10 hours of riding. The frame should not rattle or feel loose in any way when everything is tightened correctly to the recommended torque. If it does, stop and check that everything is tight. © Black Mountain Bikes...
- Page 36 CHANGING MODES: TWO TO THREE LOOSEN THE ECCENTRIC BOLT Remove the rubber bungs from the front and rear of the top tube. Keep these, as you’ll be re-fitting them again later in step 9. Using the 12mm spanner, loosen the nut on the left-hand side of the eccentric bolt at the rear of the top tube, and then slacken the belt tension by rotating the eccentric bolt with a 5mm hex key.
- Page 37 Using both of the 5mm hex keys, loosen and then remove the top- tube bolt. Allow the front end of the rear arm to drop a little. © Black Mountain Bikes...
- Page 38 CHANGING MODES: TWO TO THREE IMPORTANT: BLACK ‘TOP HAT’ BUSHINGS Once the front bolt is out carefully remove the two black plastic ‘Top Hat’ bushings from the frame (there are 8 in total in the frame). The bushings are important and are there to protect the frame.
- Page 39 Squeeze the two rear brake arms back together and replace the ‘noodle’ into the noodle holder (cable bridge). If you are having problems then give it a wiggle and it will slot into place. Check the brake works properly. You are finished. © Black Mountain Bikes...
-
Page 40: Troubleshooting
TROUBLESHOOTING... - Page 41 © Black Mountain Bikes...
-
Page 42: Cleaning, Advanced Adjustments & Guarantee
CLEANING, ADVANCED ADJUSTMENTS & GUARANTEE • When adjusting the frame between modes, please take care to make sure the plastic ‘Top Hat’ bushings are in place. On each side of the bike’s rear arm where the rear-arm bolts go, there should be 2 black ‘Top Hat’ bushings (a plastic top-hat shaped washer). One sits between the bolt and the rear arm and one between the rear arm and the seat tube. -
Page 43: Brakes - Adjustment & Maintenance
BRAKES - ADJUSTMENT & MAINTENANCE Your Black Mountain bike will have had its brakes set before leaving our factory, and the brakes will have been tested as part of our PDI (Pre–Delivery Inspection) process, but you and your child should always test the brakes for operation and reach/actuation before riding. -
Page 44: Belt Drive - Tensioning & Maintenance
BELT DRIVE - TENSIONING & MAINTENANCE Your drive belt system (i.e. belt, front sprocket and rear sprocket) does not require lubrication and must not be oiled or greased like a chain drive, so it’s very low maintenance, but here are some top tips to help you keep it running and in great shape. BELT TENSIONING The belt needs to be taut (so that it does not slip when pedalled hard), but not too taut so as to make the cranks stiff to rotate or cause belt noise. -
Page 45: Belt Drive - Troubleshooting
When the bottom of the seat tube is at its closest point to the rear sprocket, hook the belt over the front sprocket and then the rear sprocket, ensuring the belt is fully engaged with the teeth of both the front sprocket and rear sprocket. © Black Mountain Bikes... - Page 46 MAINTENANCE GENERAL ADVICE • Routinely check the bicycle, especially brakes, tyres, rims and all components. Please follow the maintenance schedule below. • Always check your frame bolts to make sure they are tight and that ‘Top Hat’ bushings are in place.
- Page 47 Any form of crack, scratches or change of colouring in highly stressed areas indicate that the life of the component has been reached and should be replaced. © Black Mountain Bikes...
-
Page 48: Geometry Charts
GEOMETRY CHARTS GEOMETRY (14” WHEEL BIKE) BALANCE BIKE SMALL LARGE HEAD ANGLE 67° 67° 68° TOP TUBE LENGTH 323mm 323mm 380mm SEAT TUBE ANGLE 75.5° 75.5° 72.5° STANDOVER 395mm 395mm 395mm BOTTOM BRACKET HEIGHT 172mm 172mm WHEELBASE 630mm 630mm 662mm MIN SADDLE HEIGHT 420mm 430mm... - Page 49 www.blackmountain.bike...
Need help?
Do you have a question about the PINTO SKOG and is the answer not in the manual?
Questions and answers