Table of Contents
Advertisement
Quick Links
Advertisement
Table of Contents

Related Manuals for Etisalat 3G21WE

Summary of Contents for Etisalat 3G21WE
- Page 1 All manuals and user guides at all-guides.com Introduction User Guide...
- Page 2 All manuals and user guides at all-guides.com Preface The purpose of this manual is to provide you with detailed information on the installation, operation and application of your 3G21WE HSPA+ WiFi Router. Important Notice and Safety Precaution • Before servicing or disassembling this equipment, always disconnect power from the device. •...
-
Page 3: Table Of Contents
All manuals and user guides at all-guides.com Etisalat HSPA+ WiFi Router USER GUIDE – INTRODUCTION ............4 – ADVANCED SETTINGS ..........23 6.10 SIMPLE NETWORK TIME PROTOCOL (SNTP) ..35 FEATURES .............. 5 LOCAL AREA NETWORK (LAN) ......24 6.11 USB SETTINGS............ 35 PACKAGE CONTENTS ..........5 NETWORK ADDRESS TRANSLATION (NAT) ... 25 6.11.1 PRINT SERVER ........35 LED INDICATORS ........... -
Page 4: Introduction
All manuals and user guides at all-guides.com Introduction Introduction Introduction CHAPTER-1... -
Page 5: Features
All manuals and user guides at all-guides.com Etisalat HSPA+ WiFi Router USER GUIDE Features Package Contents • C ombines Etisalat Broadband service, WiFi and Ethernet Router in one device Your package contains the following: • Tri-band HSPA+/UMTS (850 /1900/ 2100 Mhz) • Etisalat HSPA+ WiFi Router • Embedded multimode HSUPA/HSDPA/HSPA+/UMTS module • Printed Quick Start Guide • 2 x USB 2.0 host ports • C D (Containing User Guide) • WEP/WPA/WPA2 and 802.1x • Ethernet Cable •... -
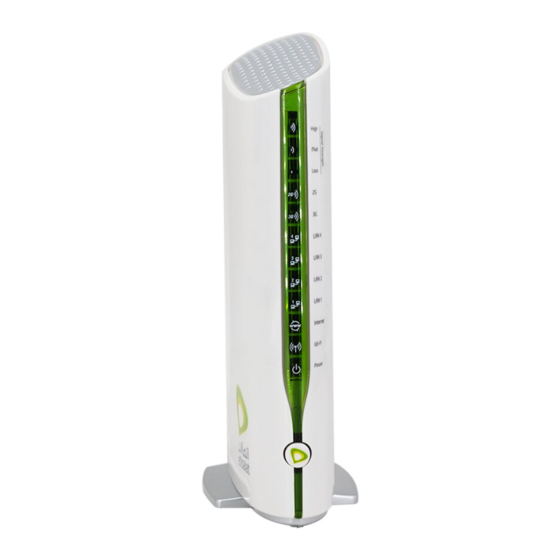
Page 6: Led Indicators
All manuals and user guides at all-guides.com Etisalat HSPA+ WiFi Router USER GUIDE LED Indicators Panels The rear and side panels shown below contain the ports for data and power connections. The LED indicators are explained in the table below. Icon Color Mode Description High Green High signal strength No activity, Router powered off or on other signal strength Green Medium signal strength No activity. The Router is powered off or is currently using another signal strength Green Low signal strength No activity. The Router is powered off or is currently using another signal strength Green Connection established with the 3G network Either there is no activity, the Router is powered off, or there is no... -
Page 7: Advanced Setup (Without Usb Key)
All manuals and user guides at all-guides.com Advanced This chapter explains advanced setup for your Router: CHAPTER-2... -
Page 8: Protocol (Tcp/Ip) Settings
All manuals and user guides at all-guides.com Etisalat HSPA+ WiFi Router USER GUIDE 2.1 TCP/IP SETTINGS W I N D O W S X P STATIC IP MODE The following steps show how to assign a Static IP address It is likely that your computer will automatically obtain an To access the dialog box that allows you to configure to your PC using subnet 192.168.1.x... - Page 9 All manuals and user guides at all-guides.com Etisalat HSPA+ WiFi Router USER GUIDE M A C O S X 10.46 STATIC MODE 1. From the Configure drop down list, you can set your To access the dialog box that allows you to configure your computer to Static IP mode by selecting the option network connection. Browse to the Apple menu and select...
- Page 10 All manuals and user guides at all-guides.com Etisalat HSPA+ WiFi Router USER GUIDE 2.2 Default Settings DHCP MODE STATIC IP MODE You can set your PC to DHCP mode by selecting Obtain an IP To configure your Router manually, your PC must have a The following are the default settings for the Router address automatically in the dialog box shown below. static IP address within the Router’s subnet. The following •...
-
Page 11: Default Settings
All manuals and user guides at all-guides.com Etisalat HSPA+ WiFi Router USER GUIDE 2.3 Login Procedure To login to the web interface, follow the steps below: NOTE: The default settings can be found in 3.3 Default Settings. 1: Open a web browser and enter the default IP address for the Router in the Web address field. In this case http://192.168.1.1... -
Page 12: Basic
All manuals and user guides at all-guides.com Basic This chapter explains basic setup for your Router: CHAPTER-3... -
Page 13: Web User Interface Homepage
All manuals and user guides at all-guides.com Etisalat HSPA+ WiFi Router USER GUIDE 3.1 WEB USER INTERFACE HOMEPAGE Option Description The web user interface (WUI) is divided into two window panels, the main menu (on the top) Model Name The model name of the device. and the display screen (on the bottom). The main menu has the following options: Basic,... -
Page 14: Etisalat Settings
All manuals and user guides at all-guides.com Settings This menu includes Etisalat service Setup and PIN Configuration. CHAPTER-4... -
Page 15: Etisalat Service Setup
Etisalat UAE profile with the Etisalat’s APN as etisalat. ae. Authentication Method should be provided by Etisalat; or just leave it set to AUTO if not required. If you have not received the username and password, leave these fields empty. -
Page 16: Wifi
All manuals and user guides at all-guides.com WIFI Etisalat CHAPTER-5... -
Page 17: Settings
All manuals and user guides at all-guides.com Etisalat HSPA+ WiFi Router USER GUIDE 5.1 SETTINGS The WiFi submenu provides access to Wireless Local Area Network (LAN) configuration settings including: This screen allows you to configure basic features of the wireless LAN interface. You can enable or disable the • Wireless network name... -
Page 18: Security
All manuals and user guides at all-guides.com Etisalat HSPA+ WiFi Router USER GUIDE 5.2 SECURITY Option Description This Router includes a number of options to help provide a secure connection to the Etisalat Enable WiFi A checkbox that enables or disables the wireless LAN interface. When selected, the Network. Web UI displays Hide Access point, SSID, and County settings. The default is Enable WiFi. Security features include: Enable SSID Deselect Enable SSID Broadcast to protect the access point from detection by • WEP / WPA / WPA2 data encryption wireless active scans. Broadcast To check AP status in Windows XP, open Network Connections from the Start Menu • SPI Firewall and select View Available Network Connections. If the access point is hidden, it... -
Page 19: Configuration
All manuals and user guides at all-guides.com Etisalat HSPA+ WiFi Router USER GUIDE 5.3 CONFIGURATION Option Description The following screen appears when you select Configuration. This screen allows you to Select SSID Your Service Set Identifier (SSID), sets your Wireless Network Name. control the advanced features of the Wireless Local Area Network (WLAN) interface: You can connect multiple devices including Laptops, Desktop PCs and PDAs to your Wireless Router. To get additional devices connected, • Select the channel which you wish to operate from scan for a network, and locate the SSID shown on your Wireless Security Card. If the SSID does not match, access is denied. - Page 20 All manuals and user guides at all-guides.com Etisalat HSPA+ WiFi Router USER GUIDE Option Description Fragmentation A threshold, specified in bytes, that determines whether packets will be fragmented and at what size. On an 802.11 WLAN, packets that exceed the Threshold Band The new amendment allows IEEE 802.11g units to fall back to speeds of 11 Mbps, fragmentation threshold are fragmented, i.e., split into, smaller units suitable so IEEE 802.11b and IEEE 802.11g devices can coexist in the same network. The for the circuit size. Packets smaller than the specified fragmentation threshold two standards apply to the 2.4 GHz frequency band. IEEE 802.11g creates data- value are not fragmented. Enter a value between 256 and 2346. If you rate parity at 2.4 GHz with the IEEE 802.11a standard, which has a 54 Mbps rate experience a high packet error rate, try to slightly increase your Fragmentation at 5 GHz. (IEEE 802.11a has other differences compared to IEEE 802.11b or g, Threshold. The value should remain at its default setting of 2346. Setting the such as offering more channels.) Fragmentation Threshold too low may result in poor performance. Channel Drop-down menu that allows selection of a specific channel. RTS Threshold Request to Send, when set in bytes, specifies the packet size beyond which the WLAN Card invokes its RTS/CTS mechanism. Packets that exceed the specified Auto Channel Auto channel scan timer in minutes (0 to disable) RTS threshold trigger the RTS/CTS mechanism. The NIC transmits smaller packet Timer (min) without using RTS/CTS. The default setting of 2347 (maximum length) disables...
-
Page 21: Wireless Bridge
All manuals and user guides at all-guides.com Etisalat HSPA+ WiFi Router USER GUIDE 5.4 MAC FILTER 5.5 WIRELESS BRIDGE This screen appears when Media Access Control (MAC) Filter is selected. This option allows The following screen appears when selecting Wireless Bridge, and goes into a detailed access to be restricted based upon the unique 48-bit MAC address. explanation of how to configure wireless bridge features of the wireless LAN interface. To add a MAC Address filter, click the Add button shown below. Click Save/Apply to implement new configuration settings. To delete a filter, select it from the table below and click the Remove button. Option Description... -
Page 22: Station Info
All manuals and user guides at all-guides.com Etisalat HSPA+ WiFi Router USER GUIDE 5 . 6 S TATION INFO The following screen appears when you select Station Info, and shows authenticated wireless stations and their status. Click the Refresh button to update the list of stations... -
Page 23: Advanced Settings
All manuals and user guides at all-guides.com Advanced This chapter explains advanced setup for your Router: CHAPTER-6... -
Page 24: Local Area Network (Lan)
All manuals and user guides at all-guides.com Etisalat HSPA+ WiFi Router USER GUIDE 6.1 LOCAL AREA NETWORK (LAN) Option Description This screen allows you to configure the Local Area Network (LAN) interface on your IP Address Enter the IP address for the LAN interface... -
Page 25: Network Address Translation (Nat)
All manuals and user guides at all-guides.com Etisalat HSPA+ WiFi Router USER GUIDE 6.2 NETWORK ADDRESS TRANSLATION (NAT) 6.2.1 PORT FORWARDING Port Forwarding allows you to direct incoming traffic from the Internet side (identified Options Description by Protocol and External port) to the internal server with a private IP address on the LAN Select a Service User should select the service from the list. -
Page 26: Port Triggering
All manuals and user guides at all-guides.com Etisalat HSPA+ WiFi Router USER GUIDE 6.2.2 PORT TRIGGERING Options Description Some applications require specific ports in the Router’s firewall to be open for access by Select an Application or User should select the application from the list. or User can enter remote parties. Port Triggering opens up the ‘Open Ports’ in the firewall when an application the name of their choice. -
Page 27: Security
All manuals and user guides at all-guides.com Etisalat HSPA+ WiFi Router USER GUIDE SECURITY Your Router can be secured with the IP Filtering function. Options Description 6.3.1 IP FILTERING Filter Name The filter rule label The IP Filtering screen sets filter rules that limit incoming and outgoing IP traffic. Multiple Protocol TCP, TCP/UDP, UDP or ICMP filter rules can be set with at least one limiting condition. All conditions must be fulfilled Source IP address Enter source IP address to allow individual IP packets to pass through the filter. Source Subnet Mask Enter source subnet mask OUTGOING IP FILTER Source Port (port or port:port) Enter source port number or port range The default setting for Outgoing traffic is ACCEPTED. Under this condition, all outgoing IP packets that match the filter rules will be BLOCKED. -
Page 28: Routing
All manuals and user guides at all-guides.com Etisalat HSPA+ WiFi Router USER GUIDE ROUTING INCOMING IP FILTER The default setting for all Incoming traffic is BLOCKED. Under this condition only those Static Route and Dynamic Route settings can be found in the Routing link as illustrated incoming IP packets that match the filter rules will be ACCEPTED. -
Page 29: Dynamic Route
All manuals and user guides at all-guides.com Etisalat HSPA+ WiFi Router USER GUIDE 6.4.2 DYNAMIC ROUTE 6.5.1 TIME RESTRICTION To activate this option, select the enabled radio button for Global RIP Mode. To configure an individual interface, select the desired RIP version and operation, followed by placing a check in the enabled checkbox for that interface. Click Save/Apply to save the configuration and to start or stop dynamic routing. Time Restriction allows you to restrict access from a device on your Local Area network (LAN) to the Internet through the Router on selected days at certain times. Make sure to activate the Internet Time server synchronization as described in section 7.10 SNTP, so that... -
Page 30: Url Filter
All manuals and user guides at all-guides.com Etisalat HSPA+ WiFi Router USER GUIDE Complete the fields listed below and click Save/Apply to apply the settings. Options Description User Name A user-defined label for this restriction Browser’s MAC Address Allows easy identification of MAC address of the computer running the Browser Other MAC Address MAC address of another LAN device Days of the Week Select one or more days for the restrictions to apply to. Start Blocking Time Enter the time you want the restriction to start... -
Page 31: Domain Name System (Dns)
All manuals and user guides at all-guides.com Etisalat HSPA+ WiFi Router USER GUIDE DOMAIN NAME SERVER (DNS) To add a dynamic DNS service, click the Add button and this screen will display 6.6.1 DNS SERVER CONFIGURATION If Enable Automatic Assigned DNS is selected, this device will accept the first received DNS assignment from the Wide Area Network (WAN) interface during the connection process. Otherwise, you can enter the primary and optional secondary DNS server IP addresses. Click on Save to apply. Options Description D-DNS provider Select a dynamic DNS provider from the list. -
Page 32: Device Settings
All manuals and user guides at all-guides.com Etisalat HSPA+ WiFi Router USER GUIDE 6.7 DEVICE SETTINGS 6.7.3 RESTORE DEFAULT The following screen appears when selecting Restore Default. By clicking on the Restore The Device Settings screens allow you to backup, retrieve and restore the default settings of Default Settings button, you can restore your Gateways default firmware settings. To restore your Router. It also provides a function for you to update your Router’s settings. system settings, reboot your Router. 6.7.1 BACKUP SETTINGS The following screen appears when Backup is selected. Click the Backup Settings button to save the current configuration settings. You will be prompted to define the location of a backup file to save to your PC. NOTE: The default settings can be found in section 2.3 Default Settings. Once you have selected the Restore Default Settings button, the following screen will appear. Close the window and wait 2 minutes before reopening your browser. If required,... -
Page 33: Update Firmware
All manuals and user guides at all-guides.com Etisalat HSPA+ WiFi Router USER GUIDE 6.8 ACCESS CONTROL 6.7.4 UPDATE FIRMWARE The following screen appears when selecting Update Firmware. By following the steps on The Access Control option found in the Management drop down menu configures access this screen, you can update your Router’s firmware. Manual device upgrades from a locally... -
Page 34: Passwords
To do this, the administrator typically runs an SNMP management station program such as MIB browser on a local host • admin is to be used for local unrestricted access control to obtain information from the SNMP agent, in this case the 3G21WE (if SNMP enabled). • support is to be used for remote maintenance of the device An SNMP ‘community’ performs the function of authenticating SNMP traffic. A ‘community • user is to be used to view information and update device firmware... -
Page 35: Simple Network Time Protocol (Sntp)
All manuals and user guides at all-guides.com Etisalat HSPA+ WiFi Router USER GUIDE 6.10 SIMPLE NETWORK TIME PROTOCOL (SNTP) 6.11 USB SETTINGS This screen allows you to configure the time settings of your Router. To automatically The USB Settings option found in the Advanced Settings drop down menu configures USB port related parameters in the following two areas: synchronize with Internet time servers, tick the box as illustrated below. • Print Server • USB Storage... - Page 36 All manuals and user guides at all-guides.com Etisalat HSPA+ WiFi Router USER GUIDE F O R W I N D O W S X P: 4: Select Network Printer and click Next. 2: Go to the Printers and Faxes application in the Control Panel and select the Add a printer function (as located on the side menu below). 5: Select Connect to a printer on the Internet and enter your printer link. (e.g. http://192.168.1.1/printers/printername) and click Next. NOTE: the printer name must be the same name entered in the web user interface “printer server setting” as in step 3: Click Next to continue, when you see the dialog box below. Advanced...
- Page 37 All manuals and user guides at all-guides.com Etisalat HSPA+ WiFi Router USER GUIDE 6: Click Have Disk and insert the printer driver CD. 9: Check the status of printer from Windows Control Panel, printer window. Status should show as Ready. 3. With your Printer driver installed, please add your printer from the Printer & Fax menu.
- Page 38 All manuals and user guides at all-guides.com Etisalat HSPA+ WiFi Router USER GUIDE 4. Click + to add your printer from the Print & Fax menu. 5. Select Internet Printing Protocol – IPP from the Protocol drop down list. 6. T ype into the Address field “GatewayIPAddress:631” where GatewayIPAddress is the IP address of your Router (default: 192.168.1.1). See screenshot below for an example. Also enter into the Queue field “/printers/PrinterName”, where PrinterName is the name you gave your printer in step 1 7. Select your printer from the Print Using drop down list.
- Page 39 All manuals and user guides at all-guides.com Etisalat HSPA+ WiFi Router USER GUIDE 8. Click Add and check the printer status. 4. Click on the radio-button labeled Select a shared printer Print Server set up is now complete. You will now be able by name, and type “http://192.168.1.1:631/printers/ 6. Choose whether you want this printer to be the default to print from common applications by selecting this printer PrinterName” in the box below. Click Next.
-
Page 40: Usb Storage
USB Drive Name The name of USB drive. This should only be modified if there are multiple USB devices connected to your Etisalat HSPA+ WiFi Router . The default name is “3G21WE” FOR WINDOWS XP: 6.11.2 USB STORAGE 2: Open a web-browser (such as Internet explorer, Firefox or Safari) and type in the address The Etisalat HSPA+ WiFi Router allows you to connect a USB storage device and share it \\”GatewayName”\”USBDriveName”\ (e.g. \\3G21WE\USB-Storage) with all of the users on the network. NOTE: There is no username and password required to access the USB drive, the user will be able to read/write the folder/files in the USB drive. By default, this feature is already enabled, so it is simply a matter of connecting your USB storage device and entering the appropriate network location. If you wish to modify any of these features, the steps below explain the procedure for enabling the USB Storage. - Page 41 All manuals and user guides at all-guides.com Etisalat HSPA+ WiFi Router USER GUIDE 1. Click on the Start button and click My Computer 5. Select the Guest radio button and then click Connect 2. Clink on tools > Map network drive 3. In the Folder field, enter the address of the USB Storage Drive \\GatewayName\ USBDriveName (e.g. \\3G21WE\USB-Storage) 4. To access the USB Storage Drive in the future, you can simply double-click on the item in the My Computer menu FOR MAC OSX: 2. From the Finder, select the Go and then click Connect to Server FOR WINDOWS VISTA 3. In the address field of the Connect to Server dialog, type in the address: 2. Open a web-browser (such as Internet explorer, Firefox or Safari) smb:// “GatewayName”/“USBDriveName” (e.g. smb://3G21WE/USB-Storage)
-
Page 42: Save And Reboot
All manuals and user guides at all-guides.com Etisalat HSPA+ WiFi Router USER GUIDE TO MAP THE USB STORAGE DRIVE To enable easy access to the USB Storage Drive, you can map the network location. To do this, use the following steps: 5. Click on the Start button and click Computer 6. Click the Map network drive button 7. In the Folder field, enter the address of the USB Storage Drive \\GatewayName\ USBDriveName (e.g. \\3G21WE\USB-Storage) -
Page 43: Diagnostics
All manuals and user guides at all-guides.com Diagnostics Introduction CHAPTER-7... -
Page 44: Diagnostics
All manuals and user guides at all-guides.com Etisalat HSPA+ WiFi Router USER GUIDE DIAGNOSTICS The Diagnostics menu has the following submenus: The Diagnostics menu provides feedback on the connection status of the device. The • Diagnostics individual tests are listed below. If a test displays a fail status: • System Log 1: Click on the Help link • 3G Network 2: Now click Re-run Diagnostic Tests at the bottom of the screen to re-test and confirm •... -
Page 45: System Log
All manuals and user guides at all-guides.com Etisalat HSPA+ WiFi Router USER GUIDE SYSTEM LOG Name Description This function allows you to view system events and configure related options. Follow the steps below to enable and view the System Log. Pass: Indicates that the Ethernet interface from your computer is Wired Connection connected to the LAN port of this Router. -
Page 46: Network Status
All manuals and user guides at all-guides.com Etisalat HSPA+ WiFi Router USER GUIDE 3G NETWORK Name Description Select this option for detailed status information on your Gateways 3G connection. Indicates whether the system is currently recording events. You can enable or disable event logging. By default, it is disabled. Allows you to configure the event level and filter out unwanted events below this Log level level. The events ranging from the highest critical level “Emergency” down to this configured level will be recorded to the log buffer on the Router’s SDRAM. When the log buffer is full, the newest event will wrap up to the top of the log buffer and overwrite the oldest event. By default, the log level is “Debugging”, which is the lowest critical level. The log levels are defined as follows: Emergency is the most serious event level, whereas Debugging is the least important. For instance, if the log level is set to Debugging, all the events from the lowest Debugging level to the most critical level emergency level will be recorded. If the log level is set to error, only error and the level above will be... -
Page 47: Statistics
All manuals and user guides at all-guides.com Etisalat HSPA+ WiFi Router USER GUIDE STATISTICS These screens provide detailed information for: Field Description • Local Area Network (LAN) and Wireless Local Area Network (WLAN) The manufacturer of the embedded 3G module. Manufacturer • 3G Interfaces The model name of the embedded 3G module. Model NOTE: These statistics page refresh every 15 seconds The firmware version of the 3G module. FW Rev. The IMeI (International Mobile equipment Identity) is a 15 digit number that IMEI is used to identify a mobile device on a network. Factory Serial Number of the 3G module. -
Page 48: Network Statistics
All manuals and user guides at all-guides.com Etisalat HSPA+ WiFi Router USER GUIDE ROUTE Field Description Select Route to display the paths the Router has found. Destination Destination network or destination host Router next hop IP address Subnet Mask Subnet mask of Destination Flag U: route is up !: reject route G: use Router H: target is a host R: reinstate route for dynamic routing D: dynamically installed by daemon or redirect M: modified from routing daemon or redirect Metric The ‘distance’ to the target (usually counted in hops). It is not used by recent... -
Page 49: Address Resolution Protocol (Arp)
All manuals and user guides at all-guides.com Etisalat HSPA+ WiFi Router USER GUIDE DYNAMIC HOST CONFIGURATION PROTOCOL (DHCP) Click ARP to display the ARP information. Click DHCP to display the DHCP information. Field Description Hostname Shows the device/host/Pc network name Field Description MAC Address Shows the Ethernet MAC address of the device/host/Pc IP address Shows IP address of host pc IP address Shows IP address of device/host/Pc... - Page 50 All manuals and user guides at all-guides.com Introduction Introduction CHAPTER-1...
Need help?
Do you have a question about the 3G21WE and is the answer not in the manual?
Questions and answers