Table of Contents

Summary of Contents for Camtec COLOR-CON 2
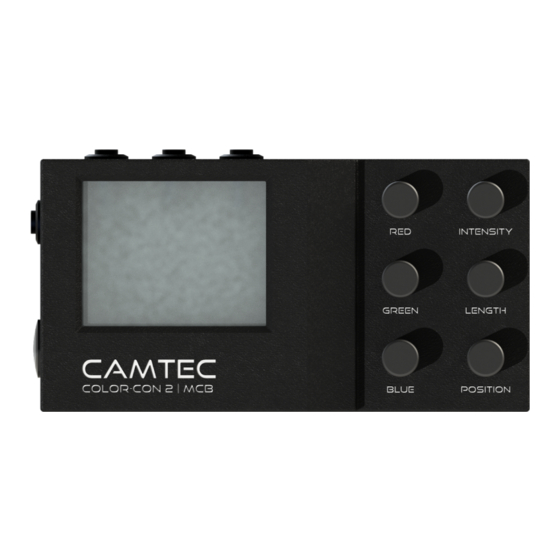
- Page 1 CAMTEC COLOR-CON 2 | MCB MANUAL FRONT FUNCTIONS 1 - 3 MENU/ DATA OUT LOCK DISPLAY / MENU ON/OFF CONTROLS POWER IN 12V LEFT SIDE MENU - PRESS: Enter Menu / Select ----------- HOLD 2 SECS: Lock All Controls POWER - PRESS: ON / OFF...
- Page 2 RIGHT SIDE DATA OUT: To COLOR-CON BOTTOM POWER IN: 12V ¼-20 THREAD FUNCTION 1 - 3...
- Page 3 1. Plug a 2-Pin LEMO cable from 12V to the 2-Pin PWR IN port on the MCB. 2. Connect the filter tray to the MCB DATA OUT port through 3-Pin LEMO cable. 3. Press POWER button. The CAMTEC logo should appear for about 3 secs before the color controls are displayed.
- Page 4 ● PRESETS If you would like to add a preset effect use any knob to select the preset you’d like to use. To have a custom preset made, please reach out to your Camtec agent before your prep date. ● SAVE Use this to save your current color/strip setting to FN-1, FN-2, or FN-3 buttons located at the top of the MCB unit.
- Page 5 1. Flip tray so the side with the 4 corner screws is facing up. 2. Unscrew each of the 4 corner screws to remove tray lid. 3. Remove/Place glass filter. 4. Replace tray lid and lightly tighten the 4 corner screws. CAMTEC COLOR-CON 2 MCB FOR QUESTIONS AND TROUBLESHOOTING: email: INFO@CAMTEC.TV call: 818.841.8700...
Need help?
Do you have a question about the COLOR-CON 2 and is the answer not in the manual?
Questions and answers