Table of Contents
Advertisement
Quick Links
Advertisement
Table of Contents

Summary of Contents for Zetronix HADES HPSmartIPC
- Page 1 ♦ ♦ SPEAKER CHARGER CAMERA USER MANUAL HPSmartIPC...
-
Page 3: Table Of Contents
Contents In the Box Page 1 Diagram Page 2 Mobile App Setup Page 4 Page 9 Romote Video Stream Advanced Features Page 10 Camera Name and Password Page 11 Motion Alarm Notifications Page 12 Recording Localy to Memory Card Page 13 Viewing Recorded Media Page 15 Bluetooth Speaker Setup... -
Page 4: In The Box
IN THE BOX Speaker Camera Audio headphone jack cable Driver CD Reset Pin Micro USB adapter This manual USB AC Wall Charger Page... -
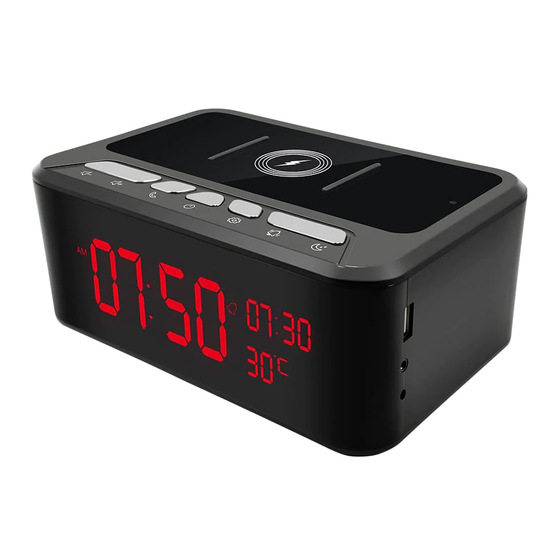
Page 5: Diagram
DIAGRAM Page... - Page 6 DIAGRAM Camera Sensor Infra-red emitter Bluetooth Indicator Lower Volume / Previous Increase Volume / Next Pause / Pickup phone Press and hold: Celsius / Fahrenheit Bluetooth Speaker On/Off Time setup Press and hold: 12 hour / 24 hour format Alarm setup ...
-
Page 7: Mobile App Setup
MOBILE APP SETUP Download the App Download and install the HDSmartIPC app from Google Play or the App Store. Google Play App Store Power up the device If your device uses a battery, esure that it is charged, else ensure that is connected to power or powered on. - Page 8 MOBILE APP SETUP Connect to the device camera’s WiFi Open your smartphone settings, search and connect the to device's wiress network n starting with the letters "LM..." or "AI...",wait for Wi-Fi to connect, and phone status bar to shows the Wi-Fi symbol in blue.
- Page 9 MOBILE APP SETUP Connect the phone to the camera device. z We a t h e r S t a t i o n - 5 0 0 w Enter the App, and the app will add just the connected camera automatically. if you dont see any listed press the plus sign (+) to add a new camera.
- Page 10 MOBILE APP SETUP Add the camera Back on the App's main screen you will see a video preview display of the added camera. icon to open settings then Press the gear select Device settings. _____ ___ _______ ____ Page...
- Page 11 MOBILE APP SETUP Select Wi-Fi Config (Network configuration on Andoid phones) then look for your local WiFi network name (SSID). You will be prompted for your local network Password. The App will now connect to the camera. _____________ Quit and restart the App, and the device will start up with the WiFi connected within 30 secods.
-
Page 12: Romote Video Stream
LIVE STREAM Camera UID / Name Camera status Recorded videos in memory card Camera setting Files: Snapshots and Recorded videos Message: Alarm messages (Please insert micro sd card to get alarm pictures) Page... -
Page 13: Advanced Features
ADVANCED FEATURES Set name: Set camera name like, Office. Living room. Kids room... Set new password: Set camera new password Wi-Fi config: Set camera to other Wi-Fi Video setting: Set SD card record mode / Resolution /File length … Motion alarm config: Set motion detection sensitivity Camera info: Camera ip address, Mac address, Reboot... -
Page 14: Camera Name And Password
CAMERA NAME AND PASSWORD Hit the gear icon below the camera view, then select Modify Device, you will be prompted to Set name, choose a new camera name, then set the Set new password. The Default (old) password is 8888. Enter your desired password, and hit OK. -
Page 15: Motion Alarm Notifications
MOTION ALARM RECORDING Alarm rnotification will sent you a notification and record a snapshot when the camera detects motion. Under Device settings choose set Motion Alarm config and set Motion detection to ON. Alarm interval is the time it should continue to record after motion was initially triggered. -
Page 16: Recording Localy To Memory Card
LOCAL MEMORY CARD RECORDING Media can be recorded to a memory card installed on the device. First make sure that you have a MicroSD memory card installed in the CRESENDO. Hit the gear icon below the camera view to go into Device Stttings, then select MicroSD Card Config on Android phones and look for TF card set. - Page 17 LOCAL RECORDING Format MICRO SD card: this will wipe all media and files recorded on the MicroSD card Stop record: no recording is done. Fulltime recording: records indefinitely. Alarm Video: records when motion is detected. Note that motion activation needs to be set for this to work, please refer to Page 12.
-
Page 18: Viewing Recorded Media
MEDIA PLAYBACK Playback with WinCam Pro app You can use the app to review the media recorded to the card; from the main menu, tap on the Files icon on the bottom of the screen. Playback from computer. You can also connect the memory card to your computer and view it there. -
Page 19: Bluetooth Speaker Setup
BLUTOOTH SETUP Press the Bluetooth Clock power button to turn on Bluetooth on the HADES to start the search. Under your phone Settings, ensure Blutooth is turned on, wait for it to search then select the 019T device. All media played on your phone will be played out though HADES’s speaker. -
Page 20: Troubleshooting
TROUBLESHOOTING Most issues can be solved by formatting the memory card, restarting the HADES, or resetting the HADES’s WiFi. Formatting the memory: formatting the memory will wipe out all the WARNING recorded media previously stored. Formatting the memory will clean up any file corruption that may exist preventing the device from operating correctly. -
Page 21: Formatting On Pc
FORMATTING ON A PC Formatting the memory on a PC: Connect the memory to your PC as instructed on page 15 of this manual. Locate your hard drive directory. It will be under “My Computer” or “This PC”. You can also open a new File Explorer window and your drives will be listed there. - Page 22 FORMATTING ON A PC From the options shown, make sure that you have selected FAT32 or exFAT as your file system. Leave other settings at their defaults. Click Start. After a few seconds the memory will be formatted. Page...
-
Page 23: Formatting On Mac
FORMATTING ON A MAC Formatting the memory on a Mac Connect the memory card to your computer as instructed page 15 of this manual. Locate and open a program called “Disk Utility”. It is usually found by going into the application folder and opening the utility folder. - Page 24 FORMATTING ON A MAC In Disk Utility, Select the drive from the list on the left. Most likely named “NO NAME”. Along the top of the window menu, click on the button labeled Erase (highlighted in the square above) From the dropdown menu labeled Format, choose MS- DOS (FAT).
-
Page 25: Product Specifications
PRODUCT SPECIFICATIONS PRODUCT SPECIFICATIONS Item Parameter Sensor 2 Megapixel CMOS Video Resolution 1920x1080 Video Format H.264 Frame Rate Up to 25 FPS Viewing Angle 120 degrees Night vision Up to 20 Feet Power Adapter 12V/2.5A 128GB MicroSD Me mory Ca pacity Recording rate 20MB per Minute Mobile OS Support... -
Page 26: Warranty
Zetronix Corporation ("Zetronix") warrants this product against defects in material or workmanship as follows: PRODUCT: Zetronix will repair this product with new or refurbished parts, free of charge, for a period of one (1) year from the date of original purchase in the event of a defect in materials or workmanship. - Page 27 PRODUCT: Zetronix will repair this product with new or refurbished parts, free of charge, for a period of one (1) year from the date of original purchase in the event of a defect in materials or workmanship.
-
Page 28: Additional Help
Still Have Questions? 9AM-5PM EST Page... - Page 30 ©2020 Zetronix Corp.
Need help?
Do you have a question about the HADES HPSmartIPC and is the answer not in the manual?
Questions and answers