Advertisement
Providing a site with the Surveyor 2 service has been made as simple as possible and should take no longer than
30 minutes to implement. You will need to install one IOT Connect Card (Part No: QTS2/5) into every Quantec
Controller that you would like to connect to the service (mounting posts and connectors are provided).
Important Note: The NVM link on the Quantec Controller's mainboard must be permanently fitted BEFORE
installing the IOT Connect Card as the link will be hidden when the IOT Connect Card is installed.
The IOT Connect Card connects to the Surveyor 2 service via the internet using Ethernet cable (not supplied).
Ensure that network access rules whitelist quantecservice.c-tec.co.uk on port 80.
5
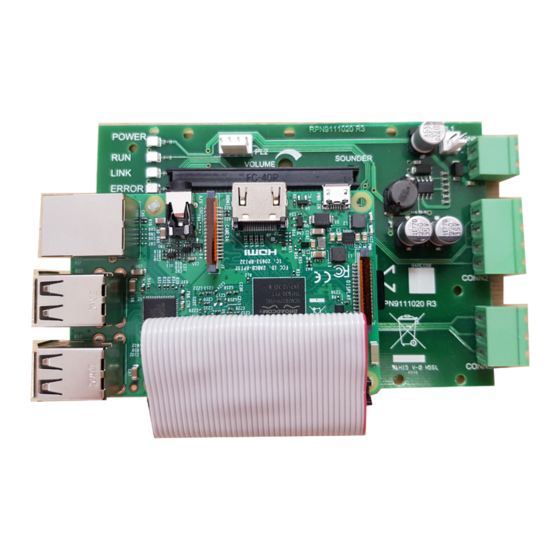
IOT Connect Card Connection Points and Status LEDS (shown above)
1. Ethernet (RJ-45) CAT-5 connection to the building internet. Ethernet cable not supplied. The Green light
on this connector turns on when the Ethernet connection is live. BEFORE the IOT Connect Card will
connect to the internet, the card must be configured (see page 2).
2. RS232 4-way serial port. Using the supplied cable connect to the 4 pin serial header on the Quantec
mainboard.
3. 24V 2-way Power connector. Using the supplied cable connect to 0V & 24V supply on the Quantec
mainboard.
4. Status LEDs:
POWER (Green):
RUN (Green):
LINK (Yellow):
ERROR (Red):
5. IOT Connect Card shutdown button (Red).
Approved Document Number DNU6500005 Rev 4
Quantec Surveyor 2
Technical Installation Document
1
Will turn on when the IOT Connect Card is receiving power
Will turn on after firmware has initialized and is running
Will blink on every data transfer
1. Will turn on when a network error has occurred, e.g. cannot reach destination. When
this occurs the current operation is latched and re-tried every 30 secs. A signal is also sent
to the Quantec Controller to hold off further reporting until this operation succeeds.
2. The IoT Setup app has connected from your device to the IoT Connect Card.
2
4
3
1/4
Advertisement
Table of Contents

Subscribe to Our Youtube Channel
Summary of Contents for Quantec Surveyor 2
- Page 1 Technical Installation Document Providing a site with the Surveyor 2 service has been made as simple as possible and should take no longer than 30 minutes to implement. You will need to install one IOT Connect Card (Part No: QTS2/5) into every Quantec Controller that you would like to connect to the service (mounting posts and connectors are provided).
- Page 2 IOT Connect Card (within 30 cm). Tip. If more than one Surveyor 2 device is closely located in the same area, remove power from these devices to ensure that the correct Surveyor 2 device is connected. The app will connect to the strongest signal (usually the closest device).
- Page 3 Each Quantec panel connected to Surveyor 2 with an IOT Connect Card will display a different pairing code. You should now make a note of these codes and the panel they are allocated to then log into your Surveyor 2 provider account: quantec.c-tec.co.uk.
- Page 4 Permanently fit the NVM link on the Quantec Controller’s mainboard. If this is EVER removed, give up now as it will NEVER work. The NVM link will be concealed when the IOT Connect Card is installed.
Need help?
Do you have a question about the Surveyor 2 and is the answer not in the manual?
Questions and answers