Advertisement
SERVICE INSTRUCTION
KK-4456 FLUID REGULATOR
REPAIR KIT
DESCRIPTION
The KK-4456 HGS fluid regulator repair kit
is recommended for replacement of the
diaphragm and seating components when
repairing the regulator. It is designed to
be used with all HGS regulators.
DISASSEMBLY
Shut off and relieve pres-
sure before disconnecting
hoses from fluid regulator.
Pressurized parts cause
a risk of injury to person-
nel if disassembled under
pressure.
1. Remove all pressure from regulator.
2. Remove regulator and clean.
Note
Refer to HGS Fluid Regulator Ser-
vice Bulletin SB-6-403 for general
service and cleaning procedures.
3. Remove six cap screws (8).
4. Remove bottom plug (25) circulating
regulators; or plug (27) non-circu-
lating regulators.
5. Remove and discard O ring (24) from
plug.
6. Remove stem (23) by inserting a blad-
ed screwdriver into slot and turning
counterclockwise while holding hex
nut (14).
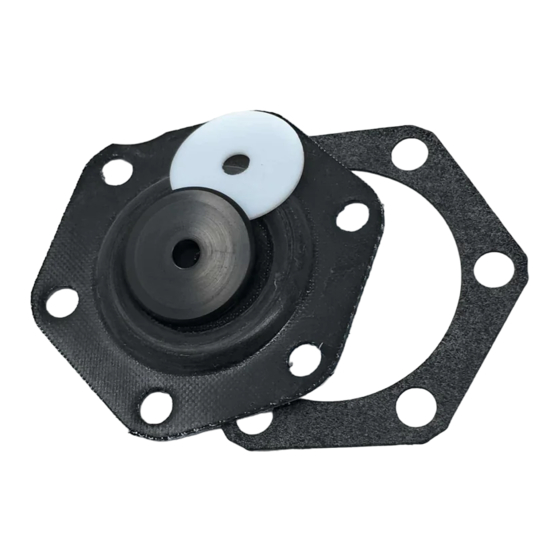
7. Remove and discard upper plate (15),
gasket (16), diaphragm (17) and
PTFE washer (18) from valve stem
(23). Remove and save flat washer
(19).
8. Remove and discard PTFE valve seat
(22) from body (20 or 21).
9. Clean all parts to remove any trace of
contaminates.
Ref.
Description
No.
1
T-handle Kit
2
Adjustment Screw
3
Lock
4
Guard
5
Cap Nut
6
Nut
7
Allen Set Screw
8
Cap Screw
9
Connector
10
Bonnet
11
Bonnet
SI-6-41-1-L (11/2015)
ASSEMBLY
1. Insert valve seat (22) into body (20
or 21) so that the flat surface of
the valve seat is flush with the flat
surface of the body.
2. Insert stem (23) through seat (22) so
it extends through body (20 or 21).
3. Install flat washer (19) and PTFE
washer (18) onto valve stem (23).
Note
PTFE washer (18) must be posi-
tioned between the flat washer
(19) and diaphragm (17).
4. Place diaphragm (17) onto valve stem
(23) so that threaded portion of stem
protrudes through diaphragm.
5. Apply a couple of drops of QH-130 to
threads of valve stem (23).
6. Place upper plate (15) over threads of
stem against diaphragm and secure
in place with hex nut (14). Torque to
proper torque specification.
7. Install gasket (16) and bonnet (10 or
11) and secure in place with six cap
screws (8). Torque to proper torque
specifications.
8. On circulating regulators, Install O
ring (24) and plug (25); on non-
curculating regulators, install O-ring
(24) and plug (27); and if equipped,
install spacer (26). Torque to proper
torque specification.
9 Reinstall fluid regulator into the system.
PROP 65 WARNING
65
CA PROP
WARNING: This product
contains chemicals
known to the State of
California to cause
cancer and birth defects or other
reproductive harm.
PARTS LIST
Ind.
Ref.
Parts
Description
No.
Req'd.
•
12
Adjustment Seat
1
13
Regulator Spring
1
14*
Hex Nut
1
15*
Upper Plate
1
16*
Gasket
1
17*
Diaphragm, PTFE
1
18*
Washer, PTFE
6
19
Flat Washer
1
20
Regulator Body
1
21
Regulator Body
1
22*
Valve Seat, PTFE
•T-handle must be
ordered separately.
5
6
7
8
15 lb./in.
(1.6 N-m)
PTFE, (smooth
gray surface)
must face
wetted section
20
120 lb./in.
13.5 N-m)
Circulating Port
Ind.
Parts
Req'd.
1
1
1
1
1
1
1
1
1
1
1
1 / 2
Tamper
Resistant
1
2
3
4
1/8"-27
11
NPT(F)
15 lb./in.
8
12
(1.6 N-m)
13
14
6 lb./in.
15
(.07 N-m)
16
17
18
19
21
22
Apply QH-130
23
Loctite to threads.
24
26
25
120 lb./in.
27
13.5 N-m)
Non-Circulating
Ref.
Description
No.
23
Valve Stem
24*
O-ring, PTFE
25
Plug
26
Spacer
27
Plug
*
QH-130 Loctite
•T-handle must be ordered separately.
* These parts are included in the KK-4456
Regulator Repair Kit.
Air
9
Pilot
1/8-27
NPT(F)
Inlet
Port
Ind.
Parts
Req'd.
1
1
1
1
1
1
Advertisement
Table of Contents

Related Manuals for DeVilbiss KK-4456

Summary of Contents for DeVilbiss KK-4456
- Page 1 Plug Diaphragm, PTFE QH-130 Loctite Allen Set Screw Washer, PTFE •T-handle must be ordered separately. Cap Screw Flat Washer * These parts are included in the KK-4456 Connector Regulator Body Regulator Repair Kit. Bonnet Regulator Body Bonnet Valve Seat, PTFE...
- Page 2 WARRANTY POLICY DeVilbiss products are covered by Finishing Brands one year materials and workmanship limited warranty. The use of any parts or accessories, from a source other than Finishing Brands, will void all warranties. For specific warranty information please contact the closest Finishing Brands location listed below.
Need help?
Do you have a question about the KK-4456 and is the answer not in the manual?
Questions and answers