
Summary of Contents for Chandler And Me CMP-15-ANZ
- Page 1 M E LTE R 15 Litre / 4 Gallon NZ/AU CMP-15-ANZ CMP-15-USA 240V 50/60hz with NZ/AU plug 110V 50/60hz with USA plug User Manual...
-
Page 3: Table Of Contents
This Wax Melter has been designed for use with all types of waxes and oils commonly used in the manufacture of candles and soap. The unit features a fully integrated, digitally controlled, element with two power settings along with a fully programmable run timer and start time delay feature. Tap Assembly Instructions Main Features Operating Instructions... -
Page 4: Tap Assembly Instructions
Tap Assembly Instructions Before you use your wax melter you will need to assemble the tap handle. Simply follow the instructions below. You will need (Supplied): 1 x handle 1 x nut 1 x washer 1 x wrench Instructions: Locate the parts from inside the packaging box. Attach the handle to the tap (see diagram). -
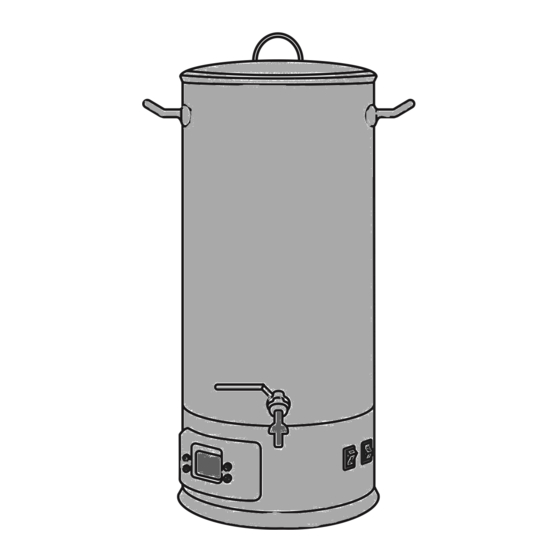
Page 5: Main Features
Main Features Stainless steel lid with handle 1 - Mains Power Switch 2 - Element Power Adjust Switch Stainless steel 600W: For ALL initial and small batch melts. side handle 1600W: For harder waxes and larger batches. 3 - Reset Pin (Underneath melter) The melter features a dry heat protection system which can be reset using the Reset Pin underneath the melter. -
Page 6: Operating Instructions
Operating Instructions Load your wax into the tank (you can use flakes, pressing the “ON/OFF” button press the +/- blocks, beads or liquid). buttons to select your target temperature and then press the SET button. Set the element to 600W. Caution! Never use 1600W for your initial melt. -
Page 7: Decanting Tips / Overheat Protection / Error Codes
Tips for Decanting Dry & Overheat Cut-off Protection Open the tap gradually and fully to decant the The melter features a cut-off protection system melted wax into your mixing or pouring pot. When which will cause the unit to switch off if the wax the wax level is low you can gently tip the tank level is too low or if the temperature rises too toward you to drain the remaining wax through... -
Page 8: Operating Parameters
Operating Parameters Default temperature setting: 180 F / 82 Programable Temperature range: 86 F – 212 F / 30 C – 100 Minimum recommended dry wax weight: 11 lb / 5kg Maximum volume (melted wax): 4 gallons / 15 litres Delayed start timer default setting: 00:00 (no delay) Delayed start time programmable range: 1 to 24 hours Runtime default setting: 4 hours... -
Page 9: How To Change The Default Settings
Change the Default Settings Caution! High Heat Mode & F/C Display 1600W • With the unit in standby mode (mains switch The melter has two power settings, 600W and "On" and LCD Panel Switch "Off") press and 1600W. For most Soy and vegetable waxes you hold the “set”... -
Page 10: Safety
Safety This appliance is not intended for use by persons with a lack of experience and knowledge, unless they have been given supervision or instruction concerning use of the appliance by a person responsible for their safety. • Children should be supervised to ensure that •... -
Page 11: Cleaning
Cleaning Clean your melter after use with a weak solution of dishwashing liquid and flush through the tap. The tap fittings can be removed for through cleaning. Scrub the inside with a nylon brush or similar. Wipe down the outside with a damp cloth. Do not immerse in water. - Page 12 Exclusive Distributors New Zealand www.candlecreations.co.nz www.candlescience.com Wax Meltear USA: CMP-15-US | NZ/AU: CMP-15-ANZ...
Need help?
Do you have a question about the CMP-15-ANZ and is the answer not in the manual?
Questions and answers