Table of Contents
Advertisement
Quick Links
Advertisement
Table of Contents
Troubleshooting

Summary of Contents for RSR CL02
- Page 1 User Manual of CL02...
- Page 2 Clock Radio CL02 USER MANUAL...
-
Page 3: Table Of Contents
Contents Important Safety Instructions ..................2 Safety ....................................2 Identifying the Parts....................5 Connections .......................6 Connect to an external device ..........................6 Set up the FM aerial ..............................6 Connect Power ................................6 For First-time use BACKUP Battery: ........................6 To Replace the BACKUP Battery: ..........................6 General Operation .....................7 Turn ON/OFF ................................ -
Page 4: Important Safety Instructions
Important Safety Instructions This lightning flash with arrowhead s y m b o l w i t h i n a n e q u i l a t e r a l triangle is intended to alert the user to the presence of non-insulated “dangerous voltage”... - Page 5 Caution: Use of controls or adjustments or performance of procedures other than those described herein, may result in hazardous radiation exposure or other unsafe operation. To reduce the risk of fire or electric shock, do not expose this apparatus to rain or moisture. The apparatus must not be exposed to dripping or splashing and objects filled with liquids, such as vases, must not be placed on apparatus.
- Page 6 FCC STATEMENT This device complies with Part 15 of the FCC Rules. Operation is subject to the following two conditions: (1) this device may not cause harmful interference, and (2) this device must accept any interference received, including interference that may cause undesired operation.
-
Page 7: Identifying The Parts
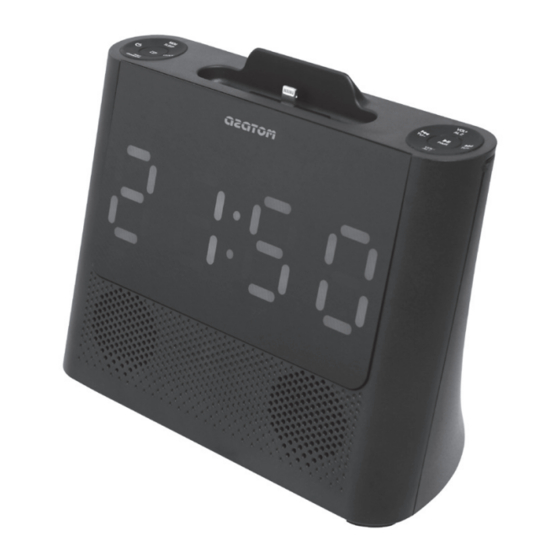
Identifying the Parts Front View 1 Buttons • Turn on or turn off the unit. • Select a source. • CLOCK View the current radio frequency. Press and hold to set the time. View the time. • MEM / SLEEP Press and hold to preset stations manually. Set the sleep timer. -
Page 8: Connections
Connections Connect to an external device Use a 3.5mm to 3.5mm audio cable (included) to connect the external audio device headphone socket to the LINE IN socket on the unit. Phone/Media player Set up the FM aerial Unwind the coiled FM aerial at the back of the docking station. IMPORTANT: You may need to adjust the position of the FM aerial when tuning the radio to receive the strongest signal. -
Page 9: General Operation
General Operation Turn ON/OFF When you first connect the unit to the mains socket, the unit will be in STANDBY mode. • Press the button to turn on. • Press the button again to turn off. - Disconnect the mains plug from the mains socket if you want to switch the unit off completely. - If there is no signal under the DOCK/LINE IN /Bluetooth modes, the unit will automatically switch off with in 15 minutes. -
Page 10: Set The Sleep Timer
• Activate and Deactivate the Alarm Timer Press VOL-/AL1 or VOL+/AL2 repeatedly to activate or deactivate the timer. • Stop Alarm Ring When the alarm rings, press the button. The alarm stops but the alarm settings remain. Note: For the SNOOZE function, when the alarm is activated, you could press any key except the ALARM or ON/OFF key to repeat the alarm. -
Page 11: Bluetooth Operation
Bluetooth device, the system has entered pairing mode. 2 Activate your Bluetooth device and select the search mode. 3 “CL02” will appear on your Bluetooth device. 4 Select “CL02” and enter “0000” for password if necessary. If the pairing succeeds, display panel shows "BT" . Tips: /PAIR"... -
Page 12: Listening To The Fm Radio
Listening to the FM Radio Auto Scan and Save Preset Station Ensure that you have connected and fully extended the FM aerial. button to switch FM mode. 1 Press the 2 Press and hold the button for few seconds to activate automatic programming. All available stations are programmed in the order of waveband reception strength. -
Page 13: Specifications
Clock/timer setting erased Power has been interrupted or the power cord has been disconnected. Reset the clock/timer. I can not find the Bluetooth name of this unit on my Bluetooth device Ensure the Bluetooth function is activated on your Bluetooth device. Re-pair the unit with your Bluetooth device. - Page 14 广东省中山市港口镇沙港东路群乐工业区 QunLe Industrial Area, East Shagang Road GangKou, ZhongShan, GuangDong, China Tel:+86-760-89923666 Fax:+86-760-89923669 http://www.richsound.com...
- Page 15 User Manual of CR02 & 8037280...
- Page 16 8037280 Allegro Bluetooth ® Clock Radio Owner’s Manual...
- Page 17 Contents Important Safety Instructions ..................... 3 Safety .................................. 3 Caution ................................3 Warning ................................3 Identifying the Parts ......................4 Main Unit ................................4 Connections .......................... 5 Connect to an external device........................5 Set up the FM aerial ............................5 Connect Power ..............................
-
Page 18: Important Safety Instructions
Important Safety Instructions to avoid injury from tip-over. WARNING 13 Unplug the apparatus during lightning storms or when unused for long periods of time. RISK OF ELECTRIC SHOCK DO NOT OPEN 14 Refer all servicing to qualified personnel. Servicing is required when the apparatus has been damaged WARNING: To reduce the risk of electric shock, do not remove in any way, such as power supply cord or plug is cover (or back) as there are no user-serviceable parts inside. -
Page 19: Identifying The Parts
Identifying the Parts Main Unit Top View: 1. Buttons • Turn ON or turn OFF the unit. • Select a source. • MEM/SLEEP Press and hold to preset stations manually. Set the sleep timer. • CLOCK View the current source. Press and hold to set the time. -
Page 20: Connections
Connections Connect to an external device - Use the supplied 3.5mm to 3.5mm audio cable to connect the external audio device headphone plug to the LINE IN jack on the unit. Set up the FM aerial Phone/Media player - Unwind the coiled FM aerial at the back of the unit. -
Page 21: General Operation
General Operation ON/OFF When you first connect the unit to the main jack, the unit will be in Standby mode. • Press the button to turn ON. Press again to turn OFF. - Disconnect the main plug from the main jack if you want to switch the unit OFF completely. -
Page 22: Set The Nap Timer
• Repeat Alarm SN 9 When the alarm rings, press the SNOOZE/DIMMER button. " " shows in the display. The alarm will ring again 9 minutes later. • Stop Alarm Ring When the alarm rings, press the button. The alarm stops but the alarm settings remain. Set the NAP Timer - Press the NAP button repeatedly to select time (in minutes): 05 →... -
Page 23: Playing From An External Audio Device
- To pause/resume play, press the button. /TU-,TU+/ - To skip to a track, press the buttons. Tips: - Enter “0000” for the password if necessary. - If a connection exists, press and hold the button to re-activate the Pairing mode, the PAIr connection will be interrupted. -
Page 24: Tuning In A Station
Tuning in a Station /TU- or TU+/ - Press the buttons repeatedly until you find the station you want. /TU- or TU+/ - Press and hold the buttons, the frequency changes down or up automatically until a station is found. Note: The unit will switch between the Stereo or MONO channel to receive the FM radio mode automatically, to receive the best signal. -
Page 25: Standard Accessories
Standard Accessories Instruction Manual ............................x 1 Adapter................................. x1 3.5mm to 3.5mm audio cable ........................x 1 Features and specifications are subject to change without prior notice. FCC Statement This device complies with Part 15 of the FCC Rules. Operation is subject to the following two conditions: (1) this device may not cause harmful interference, and (2) this device must accept any interference received, including interference that may cause undesired operation. -
Page 26: Warranty
THE SOURCE – WARRANTY The Source warrants that this product will be free from defects in materials and workmanship for a period of twelve (12) months from the date of purchase. Within this period, simply take the product and your proof of purchase to any The Source store or participating dealer and the product will be replaced (where available) without charge.
Need help?
Do you have a question about the CL02 and is the answer not in the manual?
Questions and answers