Advertisement
Table of Contents
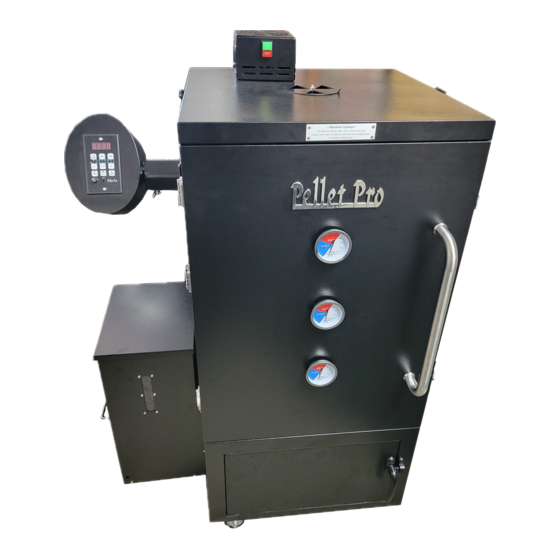
Pellet Pro® Vertical Pellet Smoker
1. Remove all parts from the inside of the smoker and remove all cellophane.
2. Flip the smoker on its back side and attach the four casters to the bottom
corners of the smoker using the smaller bolts provided. It is optional to attach
the swiveling casters on the left or right side.
3. Once the casters are attached to the bottom of the smoker, flip the smoker
upright.
4. Carefully insert the hopper assembly into the left side of the smoker and connect the RTD Probe wires with the black
plastic connector. Once the hopper is against the smoker, use the (4) M6 Bolts and washers to secure the hopper
assembly from the inside of the smoker. Tightened down the bolts with the wrench provided and carefully flip the smoker
onto the right side so that the hopper is facing upward. Remove the bottom perforated plate on the hopper using a Philips
head screwdriver in order to access the wiring bundle.
5. Feed the RTD temperature probe wire from the smoker into the hopper assembly hole close to the wall of the smoker.
The wire should end up in the inside of the hopper housing where the components are located. Use a wire tie to bundle
the wires in order to take up the wire slack and re-attach the bottom perforated plate. Be sure the wiring is not interfering
with fan blades on the components.
6. Carefully flip smoker upright.
Installation Manual
Advertisement
Table of Contents

Related Manuals for Smoke Daddy Pellet Pro 2300

Summary of Contents for Smoke Daddy Pellet Pro 2300
- Page 1 Pellet Pro® Vertical Pellet Smoker Installation Manual 1. Remove all parts from the inside of the smoker and remove all cellophane. 2. Flip the smoker on its back side and attach the four casters to the bottom corners of the smoker using the smaller bolts provided. It is optional to attach the swiveling casters on the left or right side.
- Page 2 7. Attach the three temperature gauges to the door. Be sure to tighten only finger tight. 8. Remove the bolts and washers that are attached to the door handle and side handle. Using the separate longer bolts and washers provided, attach the door handle and side handle to the cabinet.
Need help?
Do you have a question about the Pellet Pro 2300 and is the answer not in the manual?
Questions and answers