Advertisement
TM
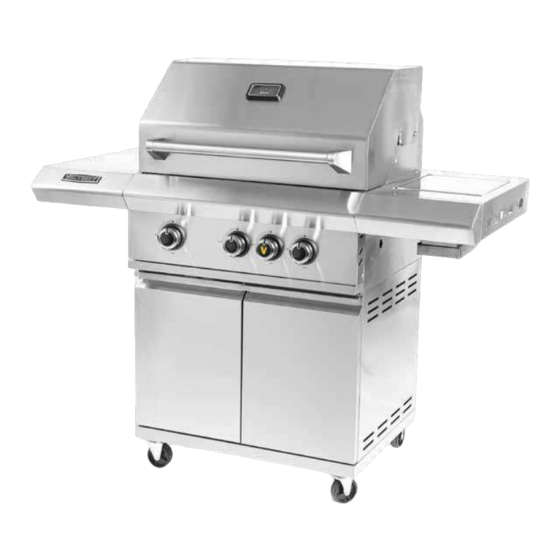
GAS GRILL
26 INCH WITH SEARING SIDE BURNER
Owner's Manual
MODEL NUMBER: BBQ-VCT3BSB-LP
WARNING
Do not store or use gasoline or other flammable liquids or vapor in the vicinity of this or any other appliance.
Never store in the vicinity of this or any other appliances an LP cylinder not connected for use.
Victory Gas Grill Owner's Manual Page 1
Advertisement
Table of Contents

Related Manuals for Victory BBQ-VCT3BSB-LP

Summary of Contents for Victory BBQ-VCT3BSB-LP
- Page 1 Do not store or use gasoline or other flammable liquids or vapor in the vicinity of this or any other appliance. Never store in the vicinity of this or any other appliances an LP cylinder not connected for use. Victory Gas Grill Owner’s Manual Page 1...
- Page 2 For our customers — our clients, our friends, our lifelong partners — becoming true cookout champions on a Victory gas grill means proudly joining the family. There’s always room around our table for one more. Three fires ignite our spirit: Craftsmanship.
-
Page 3: Table Of Contents
TABLE OF CONTENTS Warnings 4–5 Components Diagram Components & Hardware Lists Grill Specifications Assembly Instructions 9–13 Gas Leaks 14–15 LP Gas Cylinders Troubleshooting First-Time Operation 18–19 Cleaning Your Grill Warranty Registration Victory Gas Grill Owner’s Manual Page 3... -
Page 4: Warnings
NFPA 58 or CSA B149.1 natural gas vehicles and/or boats. Victory using soap-and-water solutions and propane installation code. grills are intended for in the “Checking for Gas Leaks” single-family/residential use only. section on Page 14. Victory Gas Grill Owner’s Manual Page 4... - Page 5 CSA-B359 Cylinders, Spheres and being certain that the burners are Tubes for the Transportation of positioned and seated over the gas Dangerous Goods). valves and on the burner support. Victory Gas Grill Owner’s Manual Page 5...
-
Page 6: Components Diagram
COMPONENTS DIAGRAM Picture Part Number Name Part Description Quantity Screw M6x12mm Lock Washer Screw M5x10mm Screw M4x15mm Victory Gas Grill Owner’s Manual Page 6 Victory Gas Grill Owner’s Manual Page 6... -
Page 7: Components & Hardware Lists
Flame Tamers Front Drip Tray Unpacking the Grill Side Burner Shelf A final inspection of every Victory grill occurs at the factory to ensure a quality product is packaged. Please Side Burner Grate re-check for possible shipping damage immediately Right Side Shelf Cap after unpacking your grill. -
Page 8: Grill Specifications
GRILL SPECIFICATIONS 25” 54.5” 48.4” Victory Gas Grill Owner’s Manual Page 8 Victory Gas Grill Owner’s Manual Page 8... -
Page 9: Assembly Instructions
Attach the Cart Front Support (7), with its magnet facing the front of the cart, to the Left and Right Cart Wall Panels by using 2 AA Screws on each side. This time, you can fully tighten the screws. Victory Gas Grill Owner’s Manual Page 9... - Page 10 1 DD Screw. Now’s a good time for an optional the wall, and rotating it down into the door beer break! alignment hole. Once aligned in the Cart Wall Panel and Cart Door, firmly tighten the bracket using the 2 existing screws. Victory Gas Grill Owner’s Manual Page 10...
- Page 11 Side Burner Shelf (17), Side Burner Grate side-shelf assembly. (18), and Right Side Shelf Cap (19). Ensure that the gas line and igniter line are hanging from the side burner for use in the following step. Victory Gas Grill Owner’s Manual Page 11...
- Page 12 Once the gas line and ignitor wire are in place, attach the wind guard by sliding it onto the 2 screws already in the side burner burner. Tighten all fasteners at this point. Victory Gas Grill Owner’s Manual Page 12...
- Page 13 In order, insert the Side Burner Drip Tray (20), Front Drip Tray (16), Flame Tamers (15), and Cooking Grates (14). Congrats, you’re done! How does another beer sound? Victory Gas Grill Owner’s Manual Page 13...
-
Page 14: Gas Leaks
• The below diagram is intended to show what a leaking connection would look like. These 2 locations are not the only points to check nor the only potential areas for a gas leak to be present. Victory Gas Grill Owner’s Manual Page 14... - Page 15 Ensure the leak test includes all valves, pipe connections, joints, lines, and every point from the gas source to the burners. Page |1 2 Victory Gas Grill Owner’s Manual Page 15...
-
Page 16: Lp Gas Cylinders
7. Close the cylinder valve by turning the hand wheel counterclockwise until it stops. 8. Disconnect the regulator from the LP cylinder. Caution: Never leave the grill unattended. The grilling surface gets extremely hot, and anyone who touches it can get seriously burned. Victory Gas Grill Owner’s Manual Page 16... -
Page 17: Troubleshooting
1. Dirty piezo ignition. be done by a qualified gas installer.) Then clean but will light with a the piezo ignition with a soft bristle brush, or match. gently sand with sandpaper. Victory Gas Grill Owner’s Manual Page 17... -
Page 18: First-Time Operation
Use caution by standing as far away from the burners as possible. Do not put your hands, arms, head, or any other body parts close to the grill when lighting. 3. When match-lighting the grill, use the lighting wand provided with your Victory grill (see below). Victory Gas Grill Owner’s Manual Page 18... - Page 19 5. If the burner does not light after 5 seconds, turn the burner off and wait 5 minutes with the lid open until the gas clears before attempting ignition again. 7. If the burner does not light after several attempts, immediately close all gas valves and consult an authorized service technician. Victory Gas Grill Owner’s Manual Page 19...
-
Page 20: Cleaning Your Grill
This allows any food particles or grease drippings to burn away. Once your grill has cooled completely, use a soft brush or vacuum to remove any ash accumulation on the burner (if necessary). Victory Gas Grill Owner’s Manual Page 20... -
Page 21: Warranty Registration
Installation, repair, and maintenance work should be performed by an authorized service technician. Work by unqualified persons could be dangerous and will void the warranty. All Victory gas grills must have a qualified installer complete the installation for the warranty to be in effect. Incorrect installation of the grill will void the warranty. - Page 22 GAS GRILL Not sure where to go from here? Scan the code below for recipes and how-to content that’ll ensure win after win on your Victory gas grill! Victory Gas Grill Owner’s Manual Page 22...
- Page 23 Victory Gas Grill Owner’s Manual Page 23...
- Page 24 GAS GRILL Owner’s Manual Victory Gas Grill Owner’s Manual Page 24...
Need help?
Do you have a question about the BBQ-VCT3BSB-LP and is the answer not in the manual?
Questions and answers
Where can I obtain replacement stainless steel cooking grates for this grill?
The context does not provide information on where to buy replacement stainless steel cooking grates for the Victory BBQ-VCT3BSB-LP grill. Additionally, one review mentions difficulty obtaining replacement parts despite a lifetime warranty. You may need to contact the manufacturer or check with authorized retailers.
This answer is automatically generated