Advertisement
Quick Links
Daintree
®
Sensor, Ceiling Mount
(WOS2-CM)
BEFORE YOU BEGIN
Read these instructions completely and carefully.
Save these instructions for future use.
WARNING
Risk of electrical shock. Disconnect power before servicing or
installing product.
Install in accordance with National Electric Code and local codes.
The Ceiling Mounted Wireless Occupancy Sensor (WOS2-CM)
operates seamlessly within the Daintree Networked platform.
The WOS2-CM is a battery-powered occupancy sensor using
passive infrared (PIR) sensing technology to detect movement.
As part of the Daintree Networked platform and using open,
standards based ZigBee wireless communications, the WOS2-CM
reports real-time occupancy events to turn on lights or keep them
on when movement is detected, and turn off lights when a space
is left vacant. The sensor's off-delay timer is user-configurable
from any location using the Daintree Controls Software (DCS)
web application, eliminating the need for on-site, manual
sensor adjustment.
The WOS2-CM-S provides the standard coverage area, 500SF
with a 360 degree (lateral) coverage. The WOS2-CM-E provides
an extended coverage area of up to 1000SF.
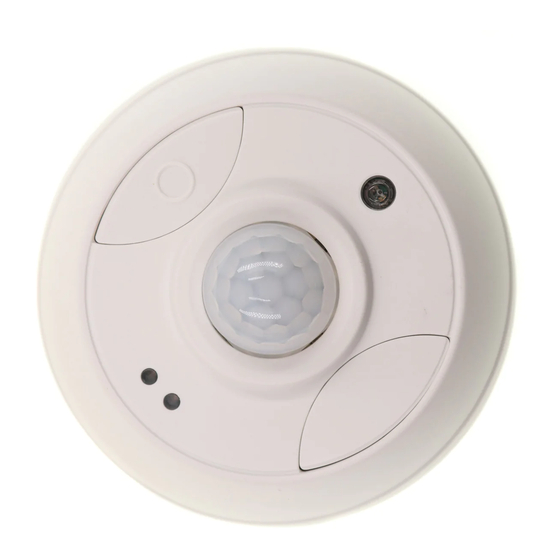
Occupancy
Sensor
Lens
Utility
Button
Wireless Occupancy
Network LED
(green)
Infrared Detection
&Test Mode LED
(red)
CAUTION
Risk of injury. Wear safety glasses and gloves during installation and
servicing.
1
Installation Process
• Keep the sensor lens clean. Avoid touching the sensor lens.
• After first-time installation or reinstallation of a new battery,
allow up to three minutes for initialization.
1. Determine the mounting local on for the sensor based on day
light availability and task area. See Placement for details.
2. Remove the sensor from the base by twisting it. Locate the
sensor's IEEE address on the label inside the base. Record the
sensor's IEEE address in its local on the facility floor plan.
3. Attach the mounting base to the ceiling in the specified location.
Be sure the label is visible after mounting the base.
4. Install the batteries in the orientation (+ -) shown on
the bottom of the battery compartments.
5. Secure the sensor to the ceiling by twisting it onto the base.
6. After the batteries have been installed for at least 3 minutes,
initiate the Installation Test Mode: Momentarily press the
Utility button. The green LED flashes once then the red
LED flashes each time the sensor detects motion. (The test
mode times out after 5 minutes.)
Installation Guide
WOS2-CM | DT108
Base
Advertisement

Related Manuals for Daintree GE Current WOS2-CM


Summary of Contents for Daintree GE Current WOS2-CM
- Page 1 (PIR) sensing technology to detect movement. • After first-time installation or reinstallation of a new battery, As part of the Daintree Networked platform and using open, allow up to three minutes for initialization. standards based ZigBee wireless communications, the WOS2-CM reports real-time occupancy events to turn on lights or keep them 1.
- Page 2 LED Operation After successfully completing the Installation Test the occupancy Green LED: Description sensor is ready to communicate with the Daintree Wireless Area Network Indicator Controller (WAC) and the Daintree Controls Software web-based lighting management user interface. Rapid flash (12 times...
- Page 3 Daintree Networked Wireless Occupancy Sensor, Ceiling Mount (WOS2-CM) Installation Guide ® Placement (continued) • The PIR sensor must have clear line of sight to the coverage area. Adjustments It may not detect a human body if it is blocked by furniture, fixtures, large plants, glass, curtains, etc.
- Page 4 Weight (without battery): 2.85 oz. (81g) If lights do not turn Off after the WOS2-CM has Joined the ZigBee network: • Check the “Off delay” for the zone in the Daintree WOS2-CM-E Controls Software. Check for other DCS scheduled events or manual overrides •...