Advertisement
I n S t a l l a t I O n
C O n t E n t S
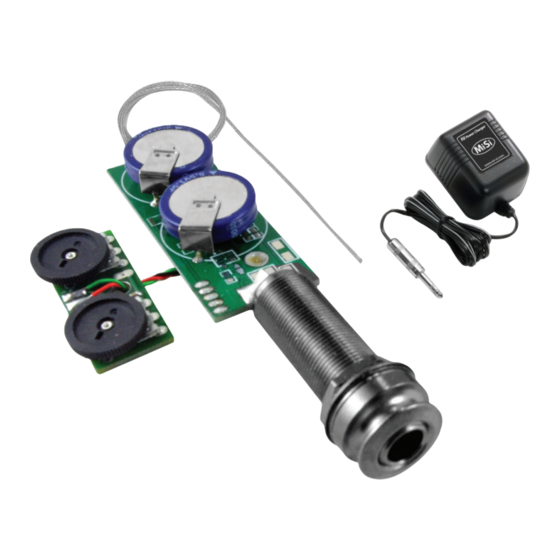
• Battery-Free Endpin-Mounted Preamp
with Independent Volume Controls
• Element Under-Saddle Pickup
• Power Charger
O v E r v I E w
The Mi-Si Air Trio is an active, battery-free MEMS microphone & Element under-
saddle pickup system for acoustic guitar. Simply powering up for 60 seconds using
the Mi-Si Power Charger will provide you with up to 8 hours of performance time.
CAUTION: WE RECOMMEND PROFESSIONAl INSTAllATION OF THIS SYSTEM.
Installation Instructions SHOUlD BE STUDIED CAREFUllY BEFORE PROCEEDING.
MI-SI ElECTRONICS DESIGN, INC. WIll NOT BE RESPONSIBlE FOR ANY DAMAGE TO
THE INSTRUMENT OR PERSONAl INjURY RESUlTING FROM INSTAllATION, IMPROPER
INSTAllATION OR ANY MISUSE OF THE PRODUCT.
USE ONLY THE POWER CHARGER PROVIDED IN THIS PACKAGE TO POWER
UP YOUR PRODUCT! UTILIZATION OF ANY OTHER POWER SUPPLY OR
MODIFICATION TO AN EXISTING ONE MAY CAUSE PERMANENT DAMAGE TO
THE SYSTEM AND WILL NOT BE COVERED UNDER WARRANTY!
C H a r G I n G a n D P l u G G I n G I n
To charge the Air Trio system, plug the Power Charger into a 120/220 V AC outlet.
Then plug in the Power Charger 1/4" stereo plug into the Air Trio system's endpin
jack and wait 60 seconds. Now your system is ready for 8 hours of performance time
(actual playing time may vary depending on playing style). For best performance,
increase the charging time up to 120 seconds for the initial 2-3 charging cycles.
178 Crescent Road Needham, MA 02494 • office/fax 617.795.2146 • e-mail info@mi-si.com
G u I D E
Mi-Si Air Trio
Battery-Free MEMS
Microphone System for
Acoustic Guitar
Mi-Si Electronics Design, Inc.
Battery-Free Technology for Acoustic Amplification
www.mi-si.com
You can plug your instrument into ANY input of ANY system or amplifier regardless
of input impedance. In the same manner, you can use ANY type of shielded MONO
cable - regardless of its capacitance. Your sound will not be altered. You can enjoy
the benefits of an active amplified system without worrying about batteries.
u S E f u l t I P
Using the Power Charger to power up your preamp is truly remarkable. But what if
you forgot or lost your Power Charger? Don't worry! Although we don't promote the
use of batteries, in this case all you need to power up your system is any stereo cord
and a common 9V battery.
Plug the stereo cord into your instrument. Hold the 9V battery
so that the positive terminal is touching the Ring of the stereo
plug and the negative terminal is touching the Ground. Hold
it like this for 60 seconds and you are ready to play for 8 hours.
The system will not be damaged by accidentally connecting
the battery in the wrong direction.
I n S t a l l a t I O n
Note: For optimum pickup performance, the bridge slot must have a clean, flat
surface free of any debris or over-spray from the finish. The slot must be a minimum
of .125" (1/8") deep, but we suggest a depth of at least .187" (3/16") to avoid
excessive saddle tilt.
The commonly-known 50/50 rule applies: The amount of saddle visible above
the bridge surface (with pickup installed) should be no greater than the amount of
saddle in the slot beneath the bridge surface; otherwise the balance and output of
the pickup may suffer.
Inspect the inside of the guitar and note the position of the braces and the pickup in
relation to the saddle slot. Drill at either end of the slot on the side that will enable
you to avoid all braces as you penetrate the top, as shown in figure 4. Blow out the
slot with compressed air and check for remaining debris.
Important: Round the inside of the hole where it meets the bottom of the slot
with a small, sharp knife or small file to avoid pinching the pickup as the saddle lies
on it.
Feed the pickup into the slot from inside the guitar with the BlACk DOT on the end
of the pickup FACING UP toward the saddle. Inserting a toothpick or similar object
through the hole from the outside is helpful in finding the location of the hole on
the inside of the guitar.
Important: The fit of the saddle in the slot is the single most important factor in
this installation. It is crucial that the bottom of the slot and the lower surface of the
saddle be flat to make even contact with the pickup. The saddle should fit loosely
enough in the slot that it can be pulled out with your fingertips. It will then have
a slight forward lean when the strings are under tension. It is absolutely necessary
to compensate for this slight lean by sanding a tilt in the bottom of the saddle so it
still sits flat on the pickup when the strings are at tension (see figure 5). If the saddle
is too tight, binds at all or is too loose, this will have a negative effect on the string
balance and output. Set the saddle in the slot, noting how much material must be
removed to compensate for the thickness of the pickup. Sand the bottom surface of
Ring
Ground
+
-
9V
Advertisement
Table of Contents

Subscribe to Our Youtube Channel
Summary of Contents for Mi-Si Air Trio
- Page 1 It is absolutely necessary To charge the Air Trio system, plug the Power Charger into a 120/220 V AC outlet. to compensate for this slight lean by sanding a tilt in the bottom of the saddle so it Then plug in the Power Charger 1/4”...
- Page 2 The warranty period is one (1) year from the date of purchase. During this time, Mi-Si Electronics Design, Inc. will replace a faulty unit at their discretion. This warranty does not cover any consequential damages or damage to the unit due to misuse, accident or neglect.
Need help?
Do you have a question about the Air Trio and is the answer not in the manual?
Questions and answers
Hello, I use the **** air for five years now, and since a while I have bad noises when I play the lower strings a bit harder, like scratching or pulling the plug without turning the amp off. Can you give me some advice how to determine teh reason? Thanks a lot.
Bad noises when playing lower strings on a Mi-Si Air Trio could be caused by an uneven interface between the bottom of the saddle and the saddle slot. If the saddle slot or saddle bottom is not completely flat, it can cause string balance problems, leading to boominess or feedback, especially on lower strings.
This answer is automatically generated