Advertisement
Quick Links
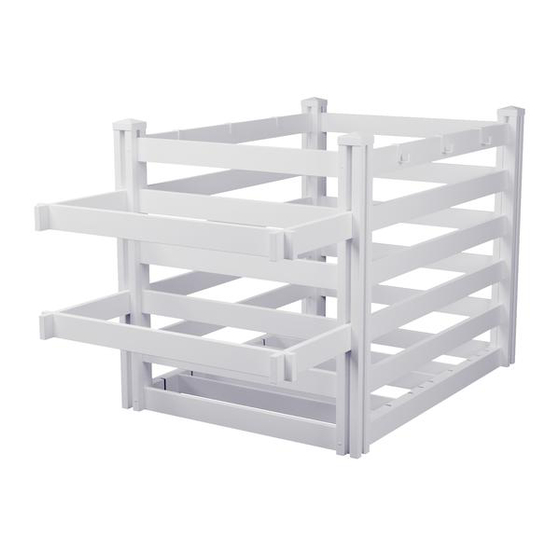
ASSEMBLY INSTRUCTIONS
ZIPPITY
POOLSIDE ORGANIZER
(36" W X 64" L X 38" H)
Approximate assembly time for entire product
Want to see a video on how to
assemble this product?
WWW.ZIPPITY-OUTDOOR.COM
WWW.ZIPPITY-OUTDOOR.COM
60 MIN
Scan the QR code
ASSEMBLY
INSTRUCTIONS
ZP19061
ZP19061
1
VER. 102021
Advertisement

Summary of Contents for Zippity ZP19061
- Page 1 ZP19061 ASSEMBLY INSTRUCTIONS ZIPPITY ASSEMBLY INSTRUCTIONS POOLSIDE ORGANIZER (36" W X 64" L X 38" H) ZP19061 60 MIN Approximate assembly time for entire product Want to see a video on how to assemble this product? Scan the QR code WWW.ZIPPITY-OUTDOOR.COM...
- Page 2 ZP19061 ASSEMBLY INSTRUCTIONS GENERAL IMPORTANT INFORMATION Check the inside of the larger pieces in your box for other materials packed inside. When assembling components, place on a non-abrasive surface (i.e. shipping box) to avoid scratching. We recommend an area approximately 5’x 8’ for unobstructed assembling.
- Page 3 ZP19061 ASSEMBLY INSTRUCTIONS 63 7/8 in 44 1/8 in 36 1/4 in 32 1/8 in 30 3/8 in 38 3/8 in 36 in 3 5/8 in WWW.ZIPPITY-OUTDOOR.COM...
- Page 4 ZP19061 ASSEMBLY INSTRUCTIONS LAY OUT MATERIALS STEP 1: Post Cap (4) Towel Hook (6) Spacer (40) Slat Channel (2) Floor Slat (4) Long Horizontal Slat (12) 7/8" x 3" x 42" 7/8" x 3" x 44" 3/8" x 2 3/4" x 32"...
- Page 5 ZP19061 ASSEMBLY INSTRUCTIONS ASSEMBLE FIRST SLATS STEP 2: STEP 2.1 Lay out the Posts with the tabs oriented as shown below. NOTE: Orientation of tabs in this step is critical to future install. Preview Top View of Posts This will be the front of the organizer STEP 2.2...
- Page 6 ZP19061 ASSEMBLY INSTRUCTIONS STEP 2.3 Take (2) Short Horizontal Slats and insert them into the channels of the posts ensuring the tabs line up with the grooves in the slats. Drive (4) total 2 1/2" self-drilling stainless steel screws into the Preview posts as shown to secure the short horizontal slats.
- Page 7 ZP19061 ASSEMBLY INSTRUCTIONS STEP 3.2 Insert the (4) Floor Slats into the notches in the slat channels. NOTE: These slats can be arranged differently depending on the application to assist with organization. Preview Preview ASSEMBLE ADDITIONAL SLATS STEP 4: STEP 4.1...
- Page 8 ZP19061 ASSEMBLY INSTRUCTIONS STEP 4.2 Slide (2) long horizontal slats and (2) short horizontal slats down the post channels, as shown, ensuring the post tabs align with the notches in the horizontal slats. Preview Add the remaining spacers and the horizontal rails into the post channels.
- Page 9 ZP19061 ASSEMBLY INSTRUCTIONS INSTALL BASKET HOLDERS STEP 5: STEP 5.1 Slide (2) Short Basket Holders down the post channels on the front of the organizer. Preview Drive (4) 2 1/2" self-drilling stainless steel screws into the post to secure the short basket holder parts.
- Page 10 ZP19061 ASSEMBLY INSTRUCTIONS STEP 5.2 Insert (2) Long Basket Holders over the notches in the short basket holders. Preview ADD CAPS AND HOOKS STEP 6: STEP 6.1 Insert (6) Towel Hooks over the horizontal slats at the desired location. Place (4) Post Caps...
- Page 11 ZP19061 ASSEMBLY INSTRUCTIONS 6935 Reames Rd. Ste. K. Charlotte, NC 28216 support@zippity-outdoor.com 704-892-5222 877-234-6196 WWW.ZIPPITY-OUTDOOR.COM WWW.ZIPPITY-OUTDOOR.COM...
Need help?
Do you have a question about the ZP19061 and is the answer not in the manual?
Questions and answers