Table of Contents
Advertisement
Quick Links
Advertisement
Table of Contents

Related Manuals for Summit Racing SUM-G1083

Summary of Contents for Summit Racing SUM-G1083
- Page 1 High Top Creeper Assembly & Use Instructions Introduction...
-
Page 2: Specifications
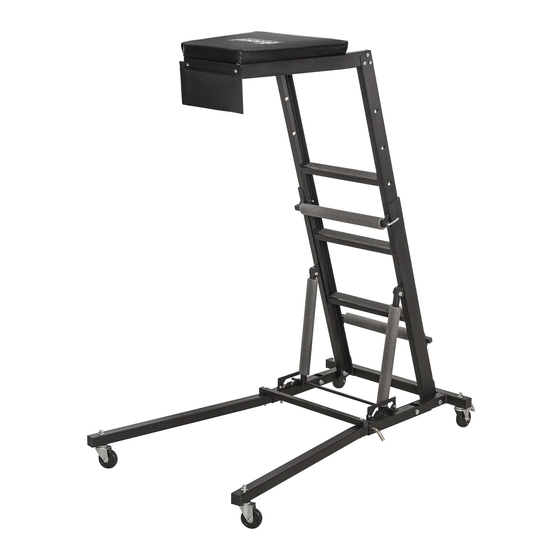
The Foldable High Top Creeper can adjust between 45 and 66 inches in height. The heavy-duty steel construction is powder coated for protection. A padded high density foam deck provides additional comfort. The unit folds to save space. Specifications Construction Powder Coated Steel 3”... -
Page 3: Personal Precautions
4. Non-skid footwear is recommended to maintain footing and balance in the work environment. 5. Wear steel toe footwear or steel toe caps to prevent a foot injury from falling objects. PERSONAL PRECAUTIONS Control the tool, personal movement and the work environment to avoid personal injury or damage to the tool. 1. -
Page 6: Assembly And Installation
ASSEMBLY & INSTALLATION Chassis Letter references in (8) refer to the contents. Chassis 1. Assemble the right and left feet (10 & 11) to the (8). Insert the end of each foot into the Chassis's openings and align the bolt holes. The height adjustment notches will be on the inside and the legs must angle outwards. - Page 7 Ladder support Bolt M12X60 3. Install the (5) by inserting a (21) through each side of the base Nut M12 frame and lower ladder assembly. Secure ach bolt with a (22). Swing the ladder's angle support into the height adjustment notches. Make sure the crossbar is firmly in place.
- Page 8 Square tube Bolt M8X80 4. Place the (7) on both feet (10 & 11), aligning the bolt holes. Insert a (18) through the each end of the leg cross support and leg. Slide a washer over one bolt and secure with Nut M6 (27).
-
Page 9: Care And Maintenance
Thin slice Leather bag Bolt 7. Place the (3) over the (13) and align the screw holes. Insert a M8X20(14) and Nut M8 (15) through the screw holes. Line up the protruding screws with the holes in the deck frame's front. Secure the pouch to the deck frame with screws. 8. -
Page 10: Removal From Storage
1. Maintain the tool with care. A tool in good condition is efficient, easier to control and will have fewer problems. 2. Inspect the tool components periodically. Repair or replace damaged or worn components. Only use identical replacement parts when servicing. 3. - Page 11 Recycle a tool damaged beyond repair at the appropriate facility.
Need help?
Do you have a question about the SUM-G1083 and is the answer not in the manual?
Questions and answers