Table of Contents
Advertisement
Quick Links
Advertisement
Table of Contents

Subscribe to Our Youtube Channel
Related Manuals for golmar ART 1 G2+


Summary of Contents for golmar ART 1 G2+
- Page 1 ART 1 G2+ TERMINAL TECHNOLOGY Code 50122529 ART 1/ G2 E + N REV.02 1...
-
Page 2: Table Of Contents
ART 1/G2+ HANDS-FREE AUDIO TERMINAL INTRODUCTION First of all, we thank and congratulate you for purchasing this product. Our commitment to achieving the satisfaction of customers like you is manifested through our ISO-9001 certification and the manufacture of products like the one you have just purchased. Its advanced technology and strict quality control will ensure that customers and users enjoy the numerous features that this device offers. -
Page 3: Characteristics
ART 1/G2+ HANDS-FREE AUDIO TERMINAL CHARACTERISTICS ART 1 hands-free audio terminal with simplified installation (non-polarised 2 wire bus). - Up to 4 ART 1 terminals/monitors per apartment (master, slave 1, slave 2 and slave 3). - Up to 32 apartments/ART 1 terminals in mixed installations with monitors (EL632 G2+ SE module) - Up to 128 apartments/ ART 1... -
Page 4: Description
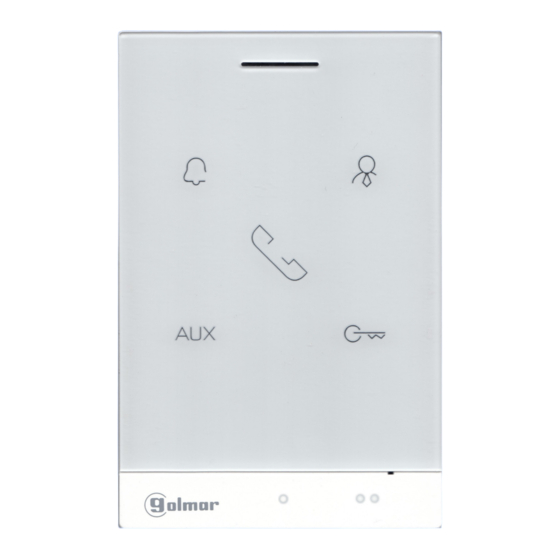
00 - Master 10 - Slave 1 DIP 10 01 - Slave 2 End of line resistor 11 - Slave 3 GOLMAR S.A. C/ Silici, 13. 08940-SPAIN Speaker. Micr ophone Function push buttons. Wall mounting connector fixing (x4). Raised dots for the visually impaired people. -
Page 5: Art 1/G2
ART 1/G2+ HANDS-FREE AUDIO TERMINAL TERMINAL DESCRIPTION: Description of the DIP switch and configuration of the ART 1/G2+ terminal address (code): Edificio / Chalet (Placa Nexa) Dip1 Dip : Sets the terminals address (addresses to Note: Mixed installations with monitors (addresses 1 to 32). The switches set to OFF have a zero value. - Page 6 ART 1/G2+ HANDS-FREE AUDIO TERMINAL TERMINAL DESCRIPTION: Continued from previous page. Apartment code Apartment code Apartment code Apartment code Apartment code Apartment code Apartment code Apartment code Apartment code Apartment code Apartment code Apartment code Apartment code Apartment code Apartment code Apartment code Apartment code Apartment code...
- Page 7 ART 1/G2+ HANDS-FREE AUDIO TERMINAL TERMINAL DESCRIPTION: Continued from previous page. Apartment code Apartment code Apartment code Apartment code Apartment code Apartment code Apartment code Apartment code Apartment code Apartment code Apartment code Apartment code Apartment code Apartment code Apartment code Apartment code Apartment code Apartment code...
- Page 8 ART 1/G2+ HANDS-FREE AUDIO TERMINAL TERMINAL DESCRIPTION: Continued from previous page. Apartment code Apartment code Apartment code Apartment code 1 11 Apartment code Apartment code Apartment code Apartment code Apartment code Apartment code Apartment code Apartment code 1 19 Apartment code Apartment code Apartment code Apartment code...
-
Page 9: Autoswitch-On Function
ART 1/G2+ HANDS-FREE AUDIO TERMINAL TERMINAL DESCRIPTION: Autoswitch-on function: With the ART 1/G2+ terminal in standby mode, you can establish an audio communication with the master door panel. It is only operative if there is no communication in progress. With the terminal in standby mode, press the button for 3 seconds, a confirmation tone will sound and the led of the button on the terminal will turn on, indicating that audio communication has been established with the master door panel. -
Page 10: Configuration & Selection Of The Call Tone
ART 1/G2+ HANDS-FREE AUDIO TERMINAL TERMINAL DESCRIPTION: Continued from previous page. Configuration & selection of the call tone: The terminal must be in standby mode for the configuration and selection of the desired call tone. To modify the call tones, press the button for 3 seconds until you hear 3 confirmation tones that indicate that the terminal is in configuration mode. -
Page 11: In Wall Mounting Connector
ART 1/G2+ HANDS-FREE AUDIO TERMINAL INSTALLING THE TERMINAL IN A WALL MOUNTING CONNECTOR Avoid dusty or smoky environments or locations near sources of heat. Positioning the wall mounting connector: The top of the wall mounting connector should be located at a height of 1.60m from the ground. The minimum distance between the wall mounting connector and the closest object must be 5 cm. - Page 12 ART 1/G2+ HANDS-FREE AUDIO TERMINAL INSTALLATION OF THE TERMINAL IN AN EMBEDDING BOX Avoid dusty or smoky environments or locations near sources of heat. Positioning the embedding box: Make a hole in the wall to position the top of the universal embedding box at a height of 1.60 m from the ground. The minimum distance between the sides of the embedding box and the closest object must be 5 cm.
- Page 13 ART 1/G2+ HANDS-FREE AUDIO TERMINAL WIRING DIAGRAMS Audio door entry system with 128 apartments / ART 1-G2+ terminals Golmar d.c lock release ART 1/G2+ ART 1/G2+ Master Master Make the connections in electrical junction box. APARTMENT 128 APARTMENT 127 ART 1/G2+...
-
Page 14: Cleaning The Monitor
ART 1/G2+ HANDS-FREE AUDIO TERMINAL CLEANING THE TERMINAL - Do not use solvents, detergents or cleaning products that contain acids, vinegar or abrasive components. - Use a soft damp lint-free cloth with water. - Always wipe the terminal in the same direction, from top to bottom. - After cleaning the terminal , remove any moisture with a soft dry lint-free cloth. -
Page 15: Not S
ART 1/G2+ HANDS-FREE AUDIO TERMINAL NOT S:... -
Page 16: Compliance
C/ Silici, 13 08940- Cornellá de Llobregat SPAIN Golmar se reserva el derecho a cualquier modificación sin previo aviso. Golmar se réserve le droit de toute modification sans préavis. Golmar reserves the right to make any modifications without prior notice.
Need help?
Do you have a question about the ART 1 G2+ and is the answer not in the manual?
Questions and answers