
Subscribe to Our Youtube Channel
Related Manuals for Digital Foci Image Moments

Summary of Contents for Digital Foci Image Moments
- Page 1 Image Moments User’s Guide...
- Page 3 All names and products mentioned within this document are registered trademarks of their respective companies. ©2005 Digital Foci, Inc. All rights reserved. This publication is intended for sole use by the owner of the associated device. Neither this publication nor any part of this publication may...
- Page 4 If there is a problem or defect with your Device, please contact Digital Foci, Inc. Disclaimer This limited warranty is the only warranty Digital Foci, Inc. makes for the Device. To the extent allowed by Law, no other warranty applies, whether expressed, implied, or statutory, including any warranty of merchantability, of fitness for a particular purpose, or of non-infringement.
- Page 5 140°F (60°C). • To prevent risk of heat buildup, place Image Moments in a well ventilated location. • To prevent risk of short circuit and damage, do not expose Image Moments to liquids, precipitation, or moisture.
-
Page 6: Table Of Contents
1.2. Supported File Formats...................1 1.3. Package Contents .....................2 Getting Started ....................3 2.1. Device Layout ......................3 2.2. Getting Image Moments Ready for Use..............4 2.3. Remote Control Explanation ..................5 2.4. Inserting Memory Cards..................7 2.5. Selecting from Multiple Memory Cards ..............8 2.6. Adjusting the Video Settings ...................9 2.7. - Page 7 Organize your files to play in a specified order...........29 6.2. Organize your photos by folders/events...............30 6.3. Keep a dedicated memory card for Image Moments..........30 Frequently Asked Questions ..............31 Troubleshooting and Technical Support ...........34 Appendix – Image Moments Technical Specifications ......35 10.
-
Page 8: Welcome
• A mini entertainment center that can playback your photos, videos, and music. 1.1. Supported Memory Card Formats Image Moments has been tested to support the following memory card formats: • CompactFlash ® ) Type I & II, MicroDrive •... -
Page 9: Package Contents
Image Moments User’s Guide 1.3. Package Contents Before using your Image Moments, check that your package contains the following items: • Image Moments • Detachable leg • Remote control • User’s Guide • AC power adapter • Quick Start Guide •... -
Page 10: Getting Started
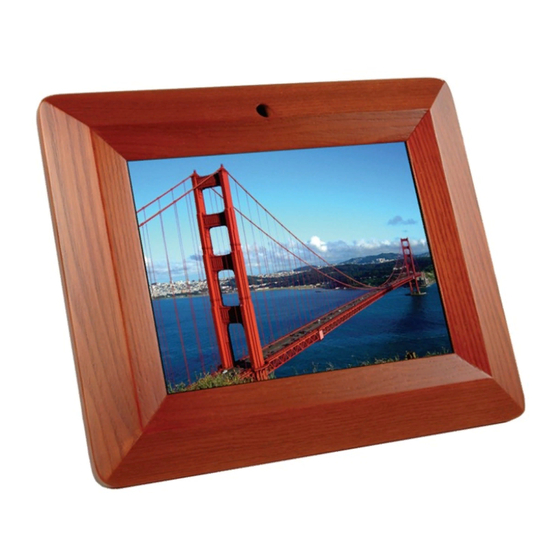
Image Moments User’s Guide 2. Getting Started 2.1. Device Layout Front View Remote Control Sensor 8” High-resolution Classic Wooden Frame TFT LCD Screen Back View Display Control Buttons Card Slots Built-in Video/Audio Speakers Input Power Switch Detachable Leg AC Adapter Jack Page 3 Revision 1.3... -
Page 11: Getting Image Moments Ready For Use
2.2. Getting Image Moments Ready for Use 2.2.1. Attaching the leg Locate the detachable leg from the packaging and screw it into the detachable leg port on the back side of Image Moments just under the middle part that slightly sticks out. 2.2.2. Powering Image Moments After the detachable leg is securely attached to Image Moments, plug the AC adapter to the AC Adapter Jack on the back of Image Moments. -
Page 12: Remote Control Explanation
Image Moments User’s Guide 2.3. Remote Control Explanation The buttons on the remote control have been designed for optimal ease of use. Similar functions are grouped together to provide simple and intuitive operation. Display Toggle Setup Menu Card Select Mode... - Page 13 Display Toggle Turn on and off file information display. Select memory card to access when more than Card Select one card is inserted into Image Moments. Select operation mode. Photo Mode – select photo files only. Mode Select Music Mode – select music files only.
-
Page 14: Inserting Memory Cards
Image Moments User’s Guide 2.4. Inserting Memory Cards Insert your memory cards in the designated memory card slot with the label side facing the front as demonstrated in the following drawing. Warning: Do not force the memory card in the slot if it does not slide in smoothly. -
Page 15: Selecting From Multiple Memory Cards
User’s Guide 2.5. Selecting from Multiple Memory Cards When more than one memory card is inserted in Image Moments, you can choose which card to access by navigating to the Mode Select screen (See Section 3 for details about the Mode Select screen.) and pressing the CARD button on the remote control. -
Page 16: Adjusting The Video Settings
Image Moments User’s Guide 2.6. Adjusting the Video Settings To access the Video Settings, press the Menu button on the top of Image Moments. This will display the Video Settings menu on the Image Moments screen. Press the Select UP/DN buttons to navigate the highlight up and down. -
Page 17: Setting The Volume
The first setting is the base volume setting that determines the maximum volume range for Image Moments. You can adjust this setting by pressing the +/- buttons under Value on the top of Image Moments. The maximum base volume setting is 100. -
Page 18: Basic Operation Modes
User’s Guide 3. Basic Operation Modes The diagram below shows the Mode Select screen on Image Moments. From this screen, you can use the Control Pad to select the desired mode. To navigate to the Mode Select screen, press STOP on the remote control until the Mode Select screen appears. - Page 19 Image Moments User’s Guide Image Moments – Screen Flow Diagram Mode Select Card Select Setup Video Settings Video Photo Music File Thumbnail Thumbnail Library Library Display Display Photo Music Video File Display Equalizer Playback Playback Music Slideshow Mode Music Slideshow Mode...
-
Page 20: Photo Mode
User’s Guide 3.1. Photo Mode When Photo Mode is selected, Image Moments will scan through the selected memory card and show only the JPEG photo files. All of the JPEG photo files on the memory card will be listed in alphabetical order regardless of their folder location on the memory card. - Page 21 Image Moments User’s Guide Photo Display In Photo Display mode, you will see your photos on the full screen. You can navigate and select the photo to display by using the remote control. • Use the Control Pad left and right buttons to navigate to the previous and next photo.
-
Page 22: Music Mode
User’s Guide 3.2. Music Mode When Music Mode is selected, Image Moments will scan through the selected memory card and play only the MP3 music files. All of the MP3 Music files on the memory card will be listed in alphabetical order regardless of their folder location on the memory card. - Page 23 Image Moments User’s Guide Music Equalizer • Press PLAY/PAUSE to play and pause the song. • Press REW and FF to scan through the song. • Press PREV and NEXT to skip to the previous or next song. • Press DISPLAY to change the screen display to the Music Library screen.
-
Page 24: Video Mode
User’s Guide 3.3. Video Mode When Video Mode is selected, Image Moments will scan through the selected memory card and show only the video files. All of the video files on the memory card will be listed in alphabetical order regardless of their folder location on the memory card. - Page 25 Image Moments User’s Guide Video Playback • Press REW and FF to scan through the video. • Press PREV or NEXT to skip to the previous or next video file. • Press PLAY/PAUSE to start and pause the video. • Use the Audio Control buttons to adjust the playing volume and toggle the mute setting.
-
Page 26: File Mode
Image Moments User’s Guide 3.4. File Mode When File Mode is selected, Image Moments will show the FILE LIBRARY screen where you can navigate through the directory on the selected memory card. As you highlight each file, a preview of the highlighted file will show in the preview window at the lower-right hand portion of the screen. -
Page 27: Music Slideshow Mode
Photo Mode or Music Mode: If the Music Slideshow is started while you are in Photo Mode or Music Mode, Image Moments will scan through all the files on the selected memory card and display all the photo files with the music files playing in the background. -
Page 28: How Do I
This section details step-by-step instructions on how to perform specific operations on Image Moments. 4.1. Play all the contents of my memory card. 1. Turn on Image Moments. 2. Insert your memory card. All of the contents on your memory card will start playing automatically in alphabetical order. -
Page 29: Play Only The Files From A Specific Folder
Image Moments User’s Guide 4.4. Play only the files from a specific folder. 1. Turn on Image Moments. 2. Insert your memory card. 3. Press FILE on the remote control. 4. Use the Control Pad to navigate to and select the desired folder. -
Page 30: Change The Remote Control Battery
Image Moments User’s Guide 4.6. Change the remote control battery. 1. Slide out battery holder on remote control. 2. Replace old battery with new CR2025 (3 Volt) battery. 3. Re-insert battery holder into remote control. o See illustration below. The remote control is ready for use. -
Page 31: System Setup Options
Image Moments User’s Guide 5. System Setup Options To access the Setup Menu, press SETUP on the remote control. The following screen shows the main page of the Setup Menu. Note: The Preferences page of the Setup Menu can only be accessed while Image Moments is in the Mode Select screen. -
Page 32: Photo Setup
Image Moments User’s Guide 5.1. Photo Setup SETUP MENU -- PHOTO SUBMENU SELECTION Description Use embedded thumbnails when available for faster loading. THUMBNAIL DIGEST Resize thumbnails from original photo. Transition screen effect occurs at faster FAST speed. TRANSITION MODE Transition screen effect occurs at slower SLOW speed. -
Page 33: Video Setup
Image Moments User’s Guide 5.3. Video Setup SETUP MENU -- VIDEO SUBMENU SELECTION Description SINGLE Repeat the current video. REPEAT MODE ONE LOOP Stop playing after last video is finished. CONTINUOUS Repeat all videos in a continuous loop. MAIN PAGE Return to Setup Menu -- Main Page. -
Page 34: Slideshow Setup
1 second. Large files may take more than 1 second to display. ** Image Moments will return to the default setting of ‘Auto Start – ON’ each time it is powered on. Every time you turn on Image Moments and insert your memory card, your files will begin playing automatically. -
Page 35: Preferences
Image Moments User’s Guide 5.5. Preferences SETUP MENU -- PREFERENCES -- SUBMENU SELECTION Description Select language for On Screen Display of OSD LANG Setup Menu. (See chart below.) Reserved for future use. OSD MESSAGE Reserved for future use. Select to return all values to their default... -
Page 36: Tips And Techniques
For instance, if you rename your files to start with 001, 002, 003, … , Image Moments will play the files in numerical sequence starting with the lowest number first. Alternatively, you can use alphabetical characters (I.e., A, B, C, …) to organize your files. -
Page 37: Organize Your Photos By Folders/Events
Last 2 Digits of Year 2 Digits for Month Note: Image Moments will only display the first 8 characters of each filename. Now you can easily identify the different photo collections you have on the memory card, and select which photos you want to view. -
Page 38: Frequently Asked Questions
How many photos can I store on Image Moments? Image Moments does not have any internal memory. The number of photos that can be displayed on Image Moments depends on the size of the memory card used. Use this chart below as a guide to help you estimate how many... - Page 39 1 second. Large files may take longer than 1 second to display. After using Image Moments for a long period of time it seems to get hot. Should I be concerned? As with any electrical device, it is normal for the device to heat up and become warm after long periods of use.
- Page 40 To do this, go into the Setup Menu by pressing SETUP on the remote control. Then, select Slideshow Setup. Under Slideshow Mode, select AUTO. How are the files and folders ordered on Image Moments? Image Moments displays the files and folders alphabetically by their names.
-
Page 41: Troubleshooting And Technical Support
Use the Video Settings to adjust the display brightness, contrast, and sharpness. See Section 2.6 for detailed instructions. Technical Support Contact If you are still having troubles using your Image Moments, please contact Digital Foci, Inc. technical support at support@digitalfoci.com. Page 34... -
Page 42: Appendix - Image Moments Technical Specifications
Image Moments User’s Guide 9. Appendix – Image Moments Technical Specifications Model No. IMT-80 LCD screen 8” color TFT LCD screen Screen resolution 640 x 480 pixels (VGA) Picture aspect ratio Brightness 250 cd/m Contrast ratio 250:1 ° ° Viewing angle H / 110 CompactFlash I &... -
Page 43: Regulatory Compliance
TV. However, we do not guarantee the absence of interference. If you modify the device in any way, without approval from Digital Foci, Inc., your device may violate FCC regulations. Violation of FCC regulations may cause the FCC to void your rights to use the modified device. -
Page 44: Canadian Doc Statement
Image Moments User’s Guide 10.2. CANADIAN DOC STATEMENT This digital apparatus does not exceed the Class B limits for radio noise for digital apparatus set out in the Radio Interference Regulations of the Canadian Department of Communications. Le présent appareil numérique n’émet pas de bruits radioélectriques dépassant les limites applicables aux appareils numériques de las classe... - Page 46 3111 Via Mondo, Rancho Dominguez, California, 90221 USA Copyright 2005 Digital Foci, Inc. All rights reserved.
Need help?
Do you have a question about the Image Moments and is the answer not in the manual?
Questions and answers