Table of Contents
Advertisement
Quick Links
Portable Gas
Pizza Oven Box
Wood fired pe ormance at home
Product Guide
Important, Retain for Future Reference: Read Carefully
WARNING: This product guide contains important information
necessary for the proper assembly and safe use of the
Read and follow all warnings and instructions before
assembling and using the appliance.
Follow all warnings and instructions when using the appliance.
Follow all leak-check procedures in the Product Guide before
This appliance is for outdoor use only.
If you smell gas:
1.
Shut o gas to the appliance.
2.
Extinguish any open flame.
3.
If odor continues, keep away from appliance
DANGER
and immediately call your fire department.
Failure to follow these instructions could result in fire or explosion
which could cause property damage, personal injury or death.
1.
Never operate this appliance unattended.
2.
Never operate this appliance within 10
of any structure, combustible material or other
gas cylinder.
3.
Never operate this appliance within 25
DANGER
of any flammable liquid.
4.
If a fire should occur, keep away from the
appliance and immediately call your fire
department. Do not attempt to extinguish
an oil or grease fire with water.
Failure to follow these instructions could result in fire, explosion or
burn hazard which could cause property damage, personal injury
or death.
www.bakerstonebox.com - (855) 657 OVEN (6836)
Model O-AJLXX-O-000
appliance.
using the appliance.
3617 W. MacArthur Blvd, Unit 500
Santa Ana, California, USA 92704
(3.0 m)
(7.5 m)
Advertisement
Table of Contents

Summary of Contents for BakerStone O-AJLXX-O-000
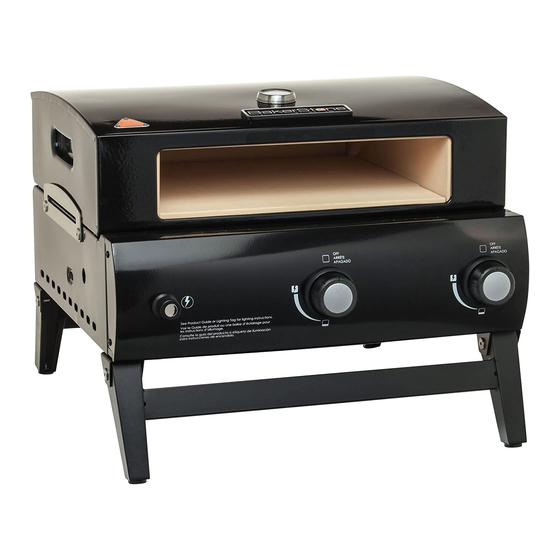
- Page 1 Portable Gas Pizza Oven Box Wood fired pe ormance at home Product Guide Model O-AJLXX-O-000 Important, Retain for Future Reference: Read Carefully WARNING: This product guide contains important information necessary for the proper assembly and safe use of the appliance.
- Page 2 Product Guide Safety Precautions – read before using the appliance The installation of this appliance must conform with local codes or, in the absence of local codes, with the National Fuel Gas Code, ANSI Z223.1/NFPA 54, Storage and Handling of Liquefied Petroleum Gases, ANSI/NFPA 58; or Natural Gas and Propane Installation Code, CSA B149.1;...
- Page 3 Do not place gasoline, alcohol, wood products, charcoal or any other combustible material (unless BakerStone approved) in the baking chamber. Remove any appliance cover and place at least 10 feet (3 Meters) from appliance before use.
-
Page 4: Table Of Contents
Product Guide Table of Contents Page What’ s in the package Assembly of the Pizza Oven Box Battery Installation LP Gas Cylinder Requirements LP Gas Cylinder Connection LP Gas Leak Test Pre-Use Safety Checks LP Gas Cylinder Placement Lighting Instructions How to Use Routine Care &... -
Page 5: What's In The Package
Product Guide What’s in the package Before assembling your Pizza Oven Box, ensure that all parts below are included. Housing Back Panel Stone Supports Top Stone Base Stone Side Stones Rear Stone Notch Firebox Assembly M4x0.7-10 M4 Flat Washers Tapping Screws Battery Vent Catch Tool required for assembly, not included:... -
Page 6: Assembly Of The Pizza Oven Box
(J) and 4 FLAT WASHERS (H). You will identify the BACK PANEL (B) by the em- bossed BakerStone flame logo on this panel. STEP 4. Identify the TOP STONE (D), this is the largest stone in the box. NOTE: There are notches on both sides of this stone. - Page 7 Product Guide STEP 6. Identify the 2 SIDE STONES (F). Fit the 2 SIDE STONES into the notches of the TOP STONE (D). NOTE: The flat end of the SIDE STONES (F) should face the front of the oven. STEP 7. The other large stone is the BASE STONE (E). Fit this in between and on top of the 2 SIDE STONES (F).
- Page 8 Product Guide STEP 10. Locate the VENT CATCH (L) and place into the vent of the oven and resting on the BASE STONE (E). STEP 11. Place the STONE SUPPORTS (C) across the HOUSING (A) and secure with SELF TAPPING SCREWS (J).
-
Page 9: Battery Installation
Product Guide STEP 12. Turn the Pizza Oven Box over and carefully place on Firebox (O). NOTICE: Remove all stickers before placing on Firebox. NOTE: Before using your Pizza Oven Box for the first time, wipe the base stone with a damp cloth to remove any packaging debris. -
Page 10: Lp Gas Cylinder Requirements
Product Guide LP Gas Cylinder (tank) Requirements The appliance is only to be fueled by an LP (liquid propane) gas cylinder measuring 12” (30.5cm) diameter and 18” (45.7cm) high with a 20lb. (9.1kg) capacity. The gas cylinder (tank) must incorperate a Type 1 cylinder valve and an over filling protection device (OPD). -
Page 11: Lp Gas Cylinder Connection
Product Guide LP gas cylinder connection: Step 1 Ensure the LP cylinder used conforms to the requirements listed on the previous page. Also inspect the LP gas cylinder valve rubber seal for deterioration such as cracks, deformation or tears. Step 2 Inspect the LP gas cylinder valve to ensure the threads match that of the included hose and regulator. -
Page 12: Lp Gas Leak Test
Product Guide LP Gas Leak Test LP Gas Cylinder Valve Before first use and a er each time the LP gas cylinder is reconnected or changed the LP gas Leak Test must be performed. Do not use an open flame to check for leaks. Do not smoke or be in the presence of any ignition sources while performing a leak test. -
Page 13: Lp Gas Cylinder Placement
Product Guide LP Gas Cylinder Placement Ensure the LP Gas Cylinder is placed at least 24in (61cm) away from the appliance on a level and stable su ace [See Figure - 6]. 24in (61cm) Take care to place the LP Gas Cylinder where it will not present a trip hazard. -
Page 14: How To Use
Product Guide How to use WARNING: Please completely read all safety precautions at the beginning of and throughout this guide before using the appliance. The appliance becomes extremely hot and can cause burns. Failure to follow precautions when using the Pizza Oven Box can result in serious injury and/or property damage. - Page 15 Product Guide STEP 6. Using the pizza peel, launch your pizza into the appliance [see Figure - 13]. NOTE: This can be accomplished by placing the pizza peel just over half-way into the appliance, and using a quick back and fo h shaking motion while sliding the peel out of the appliance.
- Page 16 Product Guide Step 11. When finished baking, turn the burners on the appliance to the o position [see Figure - 16] and allow the appliance to cool for a period of at least ninety (90) minutes. NOTE: If cleaning is required, leave the burners on and continue to heat the oven for 15 minutes prior to cleaning.
-
Page 17: Routine Care & Cleaning
Product Guide Periodic Care & Cleaning of Burner System This appliance will periodically require more detailed cleaning a er continued storage of 3 months or more. Periodically check and clean burner/venturi tubes for insects and insect nests. WARNING: A clogged tube can lead to a fire beneath the appliance. -
Page 18: Customer Service
Product Guide Step 11. Turn o the appliance according to the instructions provided in this guide. Step 12. With the appliance o and cool to the touch, place the Pizza Oven Box on top of the firebox [see Figure - 23]. Step 13. -
Page 19: Warranty
Within 14 calendar days from the date of purchase, any missing parts or damages must be reported to BakerStone. NOTE: Slight chips or scratches in the stones are not considered damages and do not a ect the pe ormance of the appliance. - Page 20 Product Guide Disclaimer Use of this appliance is at the discretion of the user. BakerStone is not responsible for personal injury or property damage resulting from the misuse of this appliance. FAILURE TO NOT FOLLOW THE PRECAUTIONS AND INSTRUCTIONS IN THE PRODUCT GUIDE MAY RESULT IN THE VOIDING OF THE WARRANTY OF THIS APPLIANCE.
-
Page 21: Frequently Asked Questions
Product Guide Frequently Asked Questions Why is my Pizza Oven Box not lighting? - LP Gas Cylinder Valve turned o . - LP Gas Cylinder out of fuel. - Excess flow limiting device may have been activated. To deactivate: 1. Turn all burners to the OFF position. 2.
Need help?
Do you have a question about the O-AJLXX-O-000 and is the answer not in the manual?
Questions and answers