Table of Contents
Advertisement
Quick Links
Advertisement
Table of Contents

Subscribe to Our Youtube Channel
Summary of Contents for HENX HSX1420
- Page 1 20INCH SINGLE-STAGE SNOW BLOWER FOR SERVICE CALL: 1-866-678-8989 WARNING : To reduce the risk of injury, user must read this manual before assembling, opera ng and maintaining this unit, You are responsible for opera ng the product properly & safely. 1/30...
-
Page 2: Table Of Contents
WARNING! Read the following instructions before using the product! These instructions below are for your safety. Please read through them thoroughly before use and retain them for future reference. Familiarise yourself with them to reduce hazards like personal injuries and damage to property. TABLE OF CONTENTS Safety Rules.………………….……………………………………………………………………………2 Symbols..……………………………………………………………………………………………………6... - Page 3 Disengage all clutches and shift into the discharge opening at all times neutral before starting the engine Exercise extreme caution when Do not operate the product without operating on or crossing gravel drives, wearing adequate winter garments. walks, or roads. Stay alert for hidden Wear footwear, which will improve hazards or traffic footing on slippery surfaces...
- Page 4 proper guards, plates or other safety Maintenance and storage protective devices in place. Check shear bolts; engine-mounted bolt, 10. Never operate the product near glass etc., at frequent intervals for proper enclosures, automobiles, window tightness to be sure the product is in wells, offs, etc.
- Page 5 maintenance and repair is provided 8. Never breathe in any fuel fumes, in this user manual. when you are refuelling the product. Never fill the tank in enclosed spaces, 2. Never carelessly touch the product, such as basements or sheds. There is a you can burn yourself.
-
Page 6: Symbols
Keep tight grip on the handles/grip Residual risks surface. Even if you are operating this product in 5. Maintain this product in accordance accordance with all the safety with these instructions and keep it requirements, potential risks of injury well lubricated (where appropriate). and damage remain. - Page 7 Symbol Illustration Symbol Illustration Open flames in the work area, around the product Note and in the vicinity of flammable materials are prohibited! Do not smoke in the work area, around the product Warning. and in the vicinity of flammable materials! Read the instruction Do not expose the product manual.
- Page 8 Add engine oil (Oil has been drained for shipping. Do not operate this And the engine must be machine in house filled before beginning to operater). Oil type 5W-30. Warning! Avoid injury from rotating working tool - Primer (press 3 times) keep hands, feet and clothing away.
-
Page 9: Product Specifications
PRODUCT SPECIFICATIONS Model # HSX1420 Description Single-stage Snowthrower Oil tank capacity 0.35L/11.8 OZ. Engine oil type 5W-30 Fuel tank capacity 1.6L/0.4Gal Fuel type #93, unleaded fuel Engine type 4-stroke Start mode Recoil start Engine displacement 87cc Net Power 1.65kW Max. engine speed... -
Page 10: Know Your Snow Blower
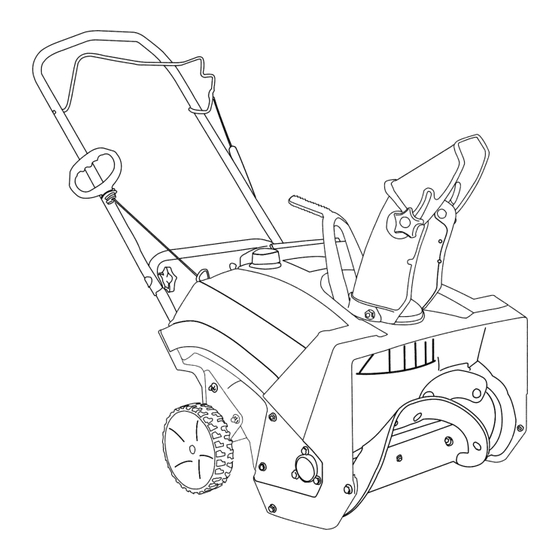
KNOW YOUR SNOW BLOWER 1 Handle 8 Snow Scraper 2 Auger Control 9 Auger 3 Starter Handle 10 Chute 4 Fixing screw(including 11 Knob washer and knob) for handle 5 Lower handle 12 Chute Deflector 6 Upper Cover 13 Chute Direction Control 7 Wheel 14 Fuel Tank Cap 10/30... -
Page 11: Assembly
ASSEMBLY NOTE: The product is heavy, You will need ask another person for (items not supplied) assistance if required. 10cm wrench Unpack all parts and lay them on a flat, Suitable personal protective stable surface. equipment Remove all packing materials and ... - Page 12 Upper Handle 1. Loosen the knobs on each side of the lower handle. Discharge chute 2. Align the holes in the upper handle 1. Unscrew the bolts from the lower with the holes in the lower handle. chute. Fit chute on the discharge hole And secure the connection with the of thrower.
- Page 13 Rotate the chute in proper direction 1. Set up the machine. Unscrew and by crank. remove the oil tank cap. Insert the oil funnel. Engine oil and Fuel This product is equipped with a 4-stroke engine. Before operation you must add proper fuel and engine oil.
- Page 14 4. Wipe spilled oil with a soft cloth and NOTE: Fuel deteriorates over screw the oil tank cap. time. It may be difficult to Fuel start the engine if you use fuel which has been kept for more than WARNING! WARNING! This 30 days.Towards the end of the season, product is not supplied with it is advisable to put only as much fuel...
-
Page 15: Operation
OPERATION Cold Start (low environment temperature -20°C) If it has never started before your start or the engine stops for a while (more than 20min) after your start, follow below steps. Set choke to the Electric start (If equipped, 110V CLOSE position. - Page 16 Warm Start Set choke to the Electric start (if so OPEN position equipped, 110V or 230V): ①connect extension cord to start and plug extension into 110V. or 230V 3-wire,grounded outlet. ②press starter button on engine until engine starts. Insert ignition key. ③remove the connect extension cord DO NOT twist the from the grounded outlet.
- Page 17 Keep children, pets, and bystanders Intended use away from the area of operation. Be This product is intended for clearing aware that the normal noise of the garden paths, yards and private product when turned on may make it approach lanes from snow in domestic difficult for you to hear approaching areas.
- Page 18 WARNING! Never direct the engage the auger. Release the lever to stop the snow throwing action. chute deflector at the operator, at bystanders,at vehicles or at nearby windows! The discharged snow and foreign objects accidentally picked up by the product can cause serious damage and personal injury! Always orient the discharge chute in the Opposite direction from where you,...
- Page 19 adjustments may be necessary. If the Carburettor auger seems to hesitate when If the auger fails to operate at rotating, proceed as follows: operational speed the carburettor may Slide the cable boot off the cable need to be adjusted. Please contact an adjustment bracket.
-
Page 20: Maintenance
allowed to be used and what 2. Regular and proper cleaning will help restrictions apply! Ask your community ensure safe use and prolong the life for detailed information and observe of the product. the regulations in order to preserve a Inspect the product before each use peaceful neighbourhood and avoid for worn and damaged parts. - Page 21 wrench. Replace the old rubber auger with Removing blockages new one. Then, securely retighten bolts WARNING! Wear protective and nuts. gloves when removing blockages! Use proper tools to remove debris, e. g. a wooden stick! Never use your bare hands! Warning! Rotating working tool, keep hands away! Do not insert your hands into the discharge chute.
- Page 22 Belt Engine oil 1. Loosen the bolts on the belt case and NOTE: Check the oil level and remove them together with the case. quality before each use and after every five hours of operation to be sure correct oil level is maintained.
- Page 23 Fuel 7. Before re-use refill the fuel tank as NOTE: Fuel deteriorates over described in to section “Engine time. Engine starting may be Oiland Fuel – Fuel.” difficult if you use fuel kept for more NOTE: Towards the end of the than 30 days.
- Page 24 cleaning of the electrode. 6. Dry the spark plug with a soft cloth if it is wet from petrol. When replacing the spark plug, first screw it in hand tight and then lightly tighten it with the spark plug wrench. WARNING! Do not over tighten the spark plug to avoid any damage!
-
Page 25: Toubleshooting
2. Do not try to carry the product alone! occur during transportation in Only transport it pushing forward. If it vehicles. is necessary to lift the product ask Secure the product to prevent it from another person for help. slipping or falling over. 3. -
Page 26: Exploded View
EXPLODED VIEW 26/30... - Page 27 27/30...
-
Page 28: Part List
PART LIST Refe# Description Q’ty Stock# Shaft Cirdip AGT1420-1 Ball Bearing AGT1420-2 Bearing Pedestal AGT1420-3 Auger Assembly AGT1420-4 Gib-headed Bolt AGT1420-4.1 Hex Lockout AGT1420-4.2 Rubber Blade AGT1420-4.3 Spiral Weldment AGT1420-4.4 Trigonocephaly Bolt AGT1420-5 Self-tapping Screw AGT1420-6 Hex Flange Bolt AGT1420-7 Hex Lockout AGT1420-8 Plate Weldment R... - Page 29 Refe# Description Q’ty Stock# Hex Flange Screw AGT1420-29 Spring Washer AGT1420-30 Trigonocephaly Bolt AGT1420-31 Belt Holder AGT1420-32 Belt Cover Bracket AGT1420-33 Hex Flange Screw AGT1420-34 Spring Washer AGT1420-35 Flat Washer AGT1420-36 Semicircular Key AGT1420-37 Auger Belt AGT1420-38 Small Pulley AGT1420-39 Petrol Engine AGT1420-40 Hex Flange Bolt...
- Page 30 Flat Washer AGT1420-68 Hex Lockout AGT1420-69 Square Bolt AGT1420-70 Cupper Washer AGT1420-71 AGT1420-72 Spring Washer AGT1420-73 Lower Handle AGT1420-74 Knob M8 AGT1420-75 Cupper Washer AGT1420-76 Square Bolt 1 AGT1420-77 Cupper Washer AGT1420-78 Hex Lockout AGT1420-79 Recoil Starter Seat AGT1420-80 Upper Handle AGT1420-81 Auger Control AGT1420-82...
Need help?
Do you have a question about the HSX1420 and is the answer not in the manual?
Questions and answers