
Summary of Contents for ATS BULLSEYE
- Page 1 ULLSEYE with IR Leak Detector Patent info available online: automotivetestsolutions.com/ats-patents User Manual...
- Page 3 ULLSEYE with IR Leak Detector Table of contents 3......Table of Contents 5......Getting to know your device 7......Air Conditioning 17......Auto EVAP 29......Smart Control 35......Cooling 41......Tire & Wheel 49......Air Ride Suspension Pg. 3...
- Page 5 The more LED’s times during your leak inspection. illuminated the larger the leak size. • Charge Port WARNING! Use only the supplied BULLSEYE Smart AC Charger. SMART AC CHARGER • Flashing Red Lamp • Steady Red Lamp • Steady Green Lamp...
- Page 7 Air Conditioning ULLSEYE with IR Leak Detector Pg. 7...
- Page 9 Step 5. You can also use an industrial carbon dioxide (CO2) gas bottle (Airgas part # CD FG5) or equivalent. When using an industrial style bottle you will use the special blue adapter to connect the ATS High Pressure Regulator to this style bottle. Adapter is included in most kits.
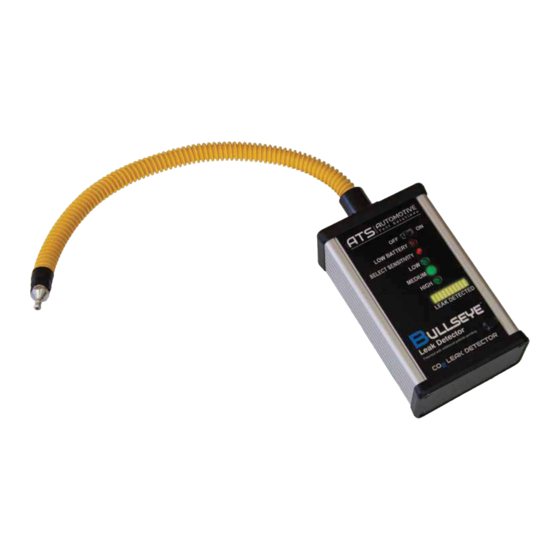
- Page 10 Charging Port Step 6. Remove BULLSEYE Leak Detector IR CO2 sensor from kit and turn on the unit. Pump will start immediatly followed by a green (Low Sensitivity) light appoximtely 20 seconds after turning unit on. Use the red Select Sensitivity button to toggle between Low, Medium, and High sensitivity.
- Page 11 Plug system to 110 PSI. In this case you will need to this drain hose with a Caplug from the BULLSEYE repair the large leak and then retest the system. kit while the rest of the system is tested If the pressure gets to 110 PSI and then drops for leakage.
- Page 12 Oneshot Leak Seeker Foam over the area. Note: if all the foam changes from a red color to a yellow color right away, wash the area with the BULLSEYE Distilled Water Wash thoroughly. Reapply the Oneshot Leak Seeker Foam.
- Page 13 BULLSEYE Air Conditioning Step 18. The Oneshot Leak Seeker Foam will spray on pinkish red and turn yellow at the leak site. On very small leak sites no bubbles will form. This is due to a very low gas volume escaping from the leak site.
- Page 14 BULLSEYE Air Conditioning Step 20. If no leak is found place BULLSEYE IR sensor Step 21. Unscrew the High Pressure Regulator from at EVAP drain hose and remove Caplug while sensor is the 90 gram CO2 cartridge and adapter. near the hose outlet. CO2 is heavier than air and will fall...
- Page 15 BULLSEYE Air Conditioning Refilling The BULLSEYE Distilled Water Wash Aerosol Bottle 1. Depress shrader valve and release any air pressure remaining in bottle. 2. Unscrew top counter clockwise from bottle. 3. Fill bottle with 8 oz. of distilled water maximum.
- Page 17 Auto EVAP ULLSEYE with IR Leak Detector Pg. 17...
- Page 19 Charging Port Step 2. Remove BULLSEYE Leak Detector IR CO2 sensor from kit and turn on the unit. Pump will start immediatly followed by a green (Low Sensitivity) light appoximtely 20 seconds after turning unit on. Use the red Select Sensitivity button to toggle between Low, Medium, and High sensitivity.
- Page 20 Step 5. You can also use an industrial carbon dioxide (CO2) gas bottle (Airgas part # CD FG5) or equivalent. When using an industrial style bottle you will use the special blue adapter to connect the ATS High Pressure Regulator to this style bottle. Adapter is included in most kits.
- Page 21 BULLSEYE Auto EVAP Screw Closed Step 6. Remove High Pressure Regulator with Step 7. Remove Low Pressure Gauge assembly adapter from kit and screw CO2 cylinder to High from kit and attach it to the High Pressure Regulator, Pressure Regulator.
- Page 22 BULLSEYE Auto EVAP Clockwise 80 PSI Step 10. Turn top adjustment knob clockwise on Step 11. Adjust High Pressure Regulator to 80 PSI High Pressure Regulator to begin adjustment. by turning adjustment knob and watching the High Pressure Gauge. Adjust...
- Page 23 BULLSEYE Auto EVAP Open Step 15. Now that the BULLSEYE CO2 system is Step 16. Watch the Low Pressure Gauge for about connected to the vehicle, open the shutoff valve 20 seconds to make sure that the pressure does that is located on the Low Pressure Gauge not start to increase.
- Page 24 BULLSEYE Auto EVAP Step 19. If there is no large or gross leak Step 20. Now check the Low Pressure Gauge present, allow the system to fill with pressure reading. for about 4-6 minutes. • Green: No leak at this time.
- Page 25 Oneshot Leak Seeker Foam over the area. Note: if all the foam changes from a red color to a yellow color right away, wash the area with the BULLSEYE Distilled Water Wash thoroughly. Reapply the Oneshot Leak Seeker Foam.
- Page 26 BULLSEYE Auto EVAP Step 26. The Oneshot Leak Seeker Foam will turn from pinkish red to yellow in color at the leak site and may also bubble. This will make it very easy to identify the exact location of the leak site.
- Page 27 BULLSEYE Auto EVAP Step 29. Once the pressure has been drained Step 30. Unscrew the High Pressure Regulator from turn the low pressure adjustment knob the 90 gram CO2 cartridge and adapter. counter-clockwise until it hits it’s stop. Note: The high pressure 90 gram adapter has a Now unit is ready for storage.
- Page 28 BULLSEYE Auto EVAP Refilling The BULLSEYE Distilled Water Wash Aerosol Bottle 1. Depress Schrader valve and release any air pressure remaining in bottle. 2. Unscrew top counter clockwise from bottle. 3. Fill bottle with 8 oz. of distilled water maximum.
- Page 29 Smart Control ULLSEYE with IR Leak Detector Pg. 29...
- Page 31 BULLSEYE Smart Control Step 2. Remove BULLSEYE Smart Control from case.This Smart Control unit will only work to control electrical soleniods. Step 1. Remove safety glasses from kit and put Note: The Smart Control will not work with them on in order to protect your eyes.
- Page 32 Some may have pumps in which the inlet or outlet can be plugged using the red Caplugs from the BULLSEYE kit. If the unit has more than two wires consult a service manual. Lamps Step 9.
- Page 33 BULLSEYE Smart Control Step 11. To actuate the solenoid push the red On Step 12. If the fuel containment system has more button, and to reset the solenoid push the black pressure than 15” of H2O, the vent valve may not Off button.
- Page 34 BULLSEYE Smart Control Purge Activation Step 16. Now back probe the purge solenoid. Step 17. Once all testing is finished actuate the The purge solenoid will have two wires; power purge control so the pressure in the fuel and control. Either back probe can be connected containment system is dumped into the intake to either purge solenoid wire.
- Page 35 Combustion gas in cooling system (Head Gasket Leaks) ULLSEYE with IR Leak Detector Pg. 35 Pg. 33...
- Page 37 Charging Port Step 2. Remove BULLSEYE Leak Detector IR CO2 sensor from kit and turn on the unit. Pump will start immediatly followed by a green (Low Sensitivity) light appoximtely 20 seconds after turning unit on. Use the red Select Sensitivity button to toggle between Low, Medium, and High sensitivity.
- Page 38 BULLSEYE Combustion Gas in Cooling System Closed Step 3. Start and run engine for 1-2 minutes Step 4. Turn engine off and let set for with several snap throttles during run time. 1-2 minutes. Step 5. Remove sealing cap (radiator cap or Step 6.
- Page 39 BULLSEYE Combustion Gas in Cooling System LED display bar Step 9. When CO2 gas is detected the LED display Step 8. Position BULLSEYE IR sensor over bar is activated along with the audio alert (loud radiator neck or coolant neck bottle for 1 to 2 minutes.
- Page 40 BULLSEYE Combustion Gas in Cooling System Refilling The BULLSEYE Distilled Water Wash Aerosol Bottle 1. Depress Schrader valve and release any air pressure remaining in bottle. 2. Unscrew top counter clockwise from bottle. 3. Fill bottle with 8 oz. of distilled water maximum.
- Page 41 Tire & Wheel ULLSEYE with IR Leak Detector Pg. 41...
- Page 43 Charging Port Step 2. Remove BULLSEYE Leak Detector IR CO2 sensor from kit and turn on the unit. Pump will start immediatly followed by a green (Low Sensitivity) light appoximtely 20 seconds after turning unit on. Use the red Select Sensitivity button to toggle between Low, Medium, and High sensitivity.
- Page 44 Step 5. You can also use an industrial carbon dioxide (CO2) gas bottle (Airgas part # CD FG5) or equivalent. When using an industrial style bottle you will use the special blue adapter to connect the ATS high pressure regulator to this style bottle. Adapter is included in kit.
- Page 45 BULLSEYE Tire & Wheel 80 PSI Screw Step 6. Remove High Pressure Regulator with Step 7. Adjust the High Pressure Regulator by adapter from kit and screw CO2 cylinder to High turning the knob on top clockwise until the gauge Pressure Regulator.
- Page 46 BULLSEYE Tire & Wheel Adjust LED display bar Step 11. Using the BULLSEYE IR sensor go around Step 12. When CO2 gas is detected the LED display the Tire and wheel to identify the leak site area. While bar is activated along with the audio alert (loud moving the CO2 probe tip around the system it is best beeping noise).
- Page 47 BULLSEYE Tire & Wheel Refilling The BULLSEYE Distilled Water Wash Aerosol Bottle 1. Depress Schrader valve and release any air pressure remaining in bottle. 2. Unscrew top counter clockwise from bottle. 3. Fill bottle with 8 oz. of distilled water maximum.
- Page 49 Air Ride Suspension ULLSEYE with IR Leak Detector Pg. 49...
- Page 51 Charging Port Step 2. Remove BULLSEYE Leak Detector IR CO2 sensor from kit and turn on the unit. Pump will start immediatly followed by a green (Low Sensitivity) light appoximtely 20 seconds after turning unit on. Use the red Select Sensitivity button to toggle between Low, Medium, and High sensitivity.
- Page 52 BULLSEYE Air Ride Suspension Step 3. In order to charge the BULLSEYE Air Ride Suspension Test Kit a large CO2 supply will be necessary. A 24oz paint ball canister will work well. Install the High Pressure Regulator directly on the paint ball canister.
- Page 53 Step 6. The BULLSEYE Air Ride system will be connected to the vehicle’s air compressor. Note: The Air Ride adapter is divided into two halves; the red side and the blue side.
- Page 54 Air Ride Adapter Install Compressor Output Hose(s) into BULLSEYE Air Ride Adapter Step 8. Install the hose that you removed from the vehicle’s air compressor into the Air Ride Adapter. This will be connected to the same side and colored hose as the hose that was connected to the compressor.
- Page 55 BULLSEYE Air Ride Suspension Step 9. Connect the High Pressure Regulator to the Air Ride adapter. Adjust the High Pressure Regulator to greater than 80 PSI. Open Valve Closed Valve Step 10. Close the valve from the compressor Step 11. If the air suspension system has...
- Page 56 BULLSEYE Air Ride Suspension Step 12. You will need a factory style scantool in order to drain the air from the air suspension system and then refill the air suspension system with CO2. Step 13. Once the vehicle’s air suspension is filled and the vehicle has raised back to its ride height; the system can then be tested for leakage.
- Page 57 BULLSEYE Air Ride Suspension Step 14.Take the BULLSEYE Leak Detector IR CO2 sensor and go around the system to identify the leak site area. While moving the CO2 probe tip around the system it is best to keep the CO2 sensor face perpendicular to the surface being tested.
- Page 58 Oneshot Leak Seeker Foam over the area. Note: if all the foam changes from a red color to a yellow color right away, wash the area with the BULLSEYE Distilled Water Wash thoroughly. Reapply the Oneshot Leak Seeker Foam.
- Page 59 Note: If all the foam changes from a pinkish red color to a yellow color right away wash the area with the BULLSEYE distilled water wash thoroughly. Then reapply the BULLSEYE leak seeker foam solution. Pg. 59...
- Page 60 BULLSEYE Air Ride Suspension Refilling The BULLSEYE Distilled Water Wash Aerosol Bottle 1. Depress Schrader valve and release any air pressure remaining in bottle. 2. Unscrew top counter clockwise from bottle. 3. Fill bottle with 8 oz. of distilled water maximum.
- Page 61 Copyright © 2016 Automotive Test Solutions, Inc. All Rights Reserved...
- Page 62 ULLSEYE with IR Leak Detector Patented with additional patents pending...
Need help?
Do you have a question about the BULLSEYE and is the answer not in the manual?
Questions and answers