Table of Contents
Advertisement
Quick Links
Aeolus_Sense PRO
INSTALLATION MANUAL
ATTENTION : Installation of the Aeolus_Sense PRO is supplemental only . It is not intended
as a replacement for, or modification to an existing, approved, or required system.
Aeolus_Sense PRO is not a certified avionic instrument. Do not rely on Aeolus_Sense PRO
as your only navigation aid. Failure to comply to this warning may result in property
damage, serious injury or death. You assume total responsibility and risk associated with
using this device and associated app.
Congratulations on purchasing a Aeolus_Sense PRO avionic instrument. Aeolus_Sense PRO is a rich
flight information system, as detailed below. Proper installation and maintenance of the device
facilitates accurate performance and uninterrupted operation.
Please read the current manual prior to using Aeolus_Sense PRO and keep it for future reference.
Correct operation of the Aeolus_Sense PRO requires that one or more smart device, phone or tablet
(iOS or Android) are connected to the device. We propose to use a tablet instead of a phone as the
tablet screens are larger and and therefore easier to view.
Α TTENTION
We perform updates to the EFIS TA application and the firmware of our units when necessary to
ensure the best performance of our devices. This procedure is automatic. When you connect your
smart device to the internet, an update of the EFIS TA application is automatically downloaded.
This of course depends on smart device/user settings, so if you are asked to give your permission,
please do so.
After downloading the EFIS TA application update, the first time you connect your smart device to
our instrument, you might be asked to update the Aeolus_Sense PRO instrument firmware (if there
is a latest firmware update for it), please press confirm.
ATTENTION, during this process, don't power off the device for at least 3mins. Then reconnect it
to the tablet for normal operation. Please ensure that there is power available for the time required
to complete the firmware update operation.
If the device is turned off intentionally or because of a poor power supply during this operation, the
device could stop working and the only way to recover it is by sending back to the factory for
complete reprogramming.
1
Advertisement
Table of Contents

Related Manuals for TALOS AVIONICS Aeolus Sense PRO

Summary of Contents for TALOS AVIONICS Aeolus Sense PRO
- Page 1 Aeolus_Sense PRO INSTALLATION MANUAL ATTENTION : Installation of the Aeolus_Sense PRO is supplemental only . It is not intended as a replacement for, or modification to an existing, approved, or required system. Aeolus_Sense PRO is not a certified avionic instrument. Do not rely on Aeolus_Sense PRO as your only navigation aid.
-
Page 2: Table Of Contents
TABLE OF CONTENTS 1 Aeolus_Sense PRO..............................3 1.1 Mounting the Aeolus_Sense PRO.........................3 1.2 Power Connection............................4 1.3 Software – EFIS TA app..........................5 1.4 Compass Calibration............................6 1.5 AHRS Leveling...............................8 1.6 Electronic Emissions and Flame Resistance Compliance................9 2 Aeolus_Sense PRO Maintenance........................9 3 Limitations and Abnormal Operation........................10 4 Support................................10... -
Page 3: Aeolus_Sense Pro
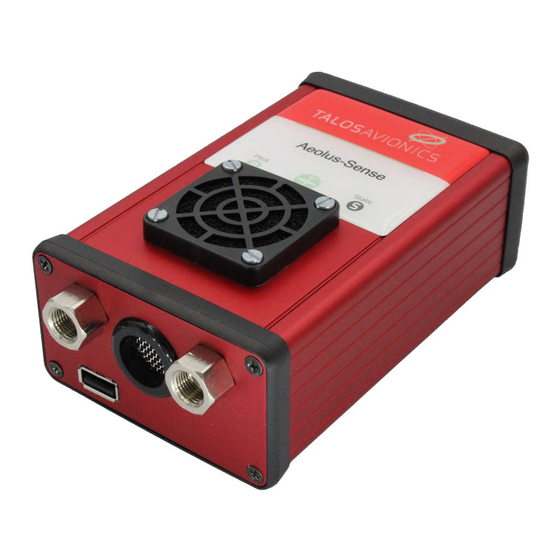
1 Aeolus_Sense PRO The Aeolus_Sense PRO is a portable device that requires connections to a GPS and an ADS-B antenna (both antennae are included). The instrument has a USB socket for cable/tether connection to a smart device (tablet or smartphone). Aeolus_Sense PRO includes a dual-band (978 MHz and 1090 MHz) ADS-B receiver for traffic and weather information. -
Page 4: Power Connection
Fig. 2. Aeolus_Sense PRO should be mounted parallel to the main axes of the airplane. 1.2 Connection Aeolus_Sense PRO is powered by two means: An internal battery, offering approximately one and half (1.5) hours of operation. Please turn the battery-switch on if a battery device operation is required. ... -
Page 5: Software - Efis Ta App
It is suggested that Aeolus_Sense PRO is always connected to a power source, and is operated with the battery-switch on. In case of power-failure, Aeolus_Sense PRO will continue its operation after a short reboot (please make sure you reconnect to the FlySense WiFi network). - Page 6 Figure 3 : Sensor status window. (a) EFIS TA app working with internal sensors only, (b) EFIS TA app connected to a Aeolus_Sense PRO. To test the connection, start the EFIS TA application and tap on “MENU” button, then “Sensor Status”.
-
Page 7: Compass Calibration
Then, depending on the device and operating system, you may need to tap "Software information", then tap "Build number" seven times repeatedly. The "Developer options" menu will now appear in the Settings menu. Again, depending on the device, it may appear under Settings->General-> Developer options (you need to go back to the Settings screen and scroll down to the end). -
Page 8: Ahrs Leveling
Figure 4: (a) Press “Start” to start compass calibration. (b) Calibration in progress. The calibration results are indicated as “Weak”; you should continue rotating your device until you have a “Good” or “Strong” indication. (c) “Strong” calibration signifies that the device compass has been properly calibrated. -
Page 9: Electronic Emissions And Flame Resistance Compliance
• Power up your device. • Connect your smart device (iOS or Android) to the Aeolus_Sense PRO wifi Network. • Start the EFIS TA application on your mobile device. • Tap on “MENU” button and then “Level AHRS”. • EFIS TA app will return back to the main screen and the “AHRS leveling” window (Fig. 6 ) will appear. -
Page 10: Limitations And Abnormal Operation
Aeolus_Sense PRO has been designed and manufactured for long and maintenance-free operation. Still, some care must be applied with regards to the following: Aeolus_Sense PRO Compass: Any replacement and/or relocation of metallic items in the cockpit may require re-calibration of the Compass. Please follow the steps outlined in section 1.4 of the current document for Compass calibration.
Need help?
Do you have a question about the Aeolus Sense PRO and is the answer not in the manual?
Questions and answers